Why You’ll Love This Easy Hawaiian Guava Cake
If you want a dessert that tastes like sunshine in every bite, this Easy Hawaiian Guava Cake is a wonderful pick. It brings together fluffy cake, creamy filling, and a bright guava topping that feels tropical without being fussy. Best of all, it starts with a cake mix, so busy home cooks can make it with very little stress.
- Quick and simple: With just 10 minutes of prep time and a total time of 35 minutes, this Easy Hawaiian Guava Cake fits nicely into weeknights, potlucks, and last-minute family plans. The steps are easy to follow, even if you are new to baking.
- Bright tropical flavor: The guava nectar or guava juice gives the cake a sweet, fruity taste that stands out from standard layer cakes. If you love island-style desserts, this Hawaiian Guava Cake brings that vacation feeling right to your kitchen.
- Family-friendly and versatile: This recipe serves 12, so it works well for birthdays, brunch tables, school events, and holiday gatherings. It also pairs nicely with other simple treats like chocolate muffins for easy dessert boards.
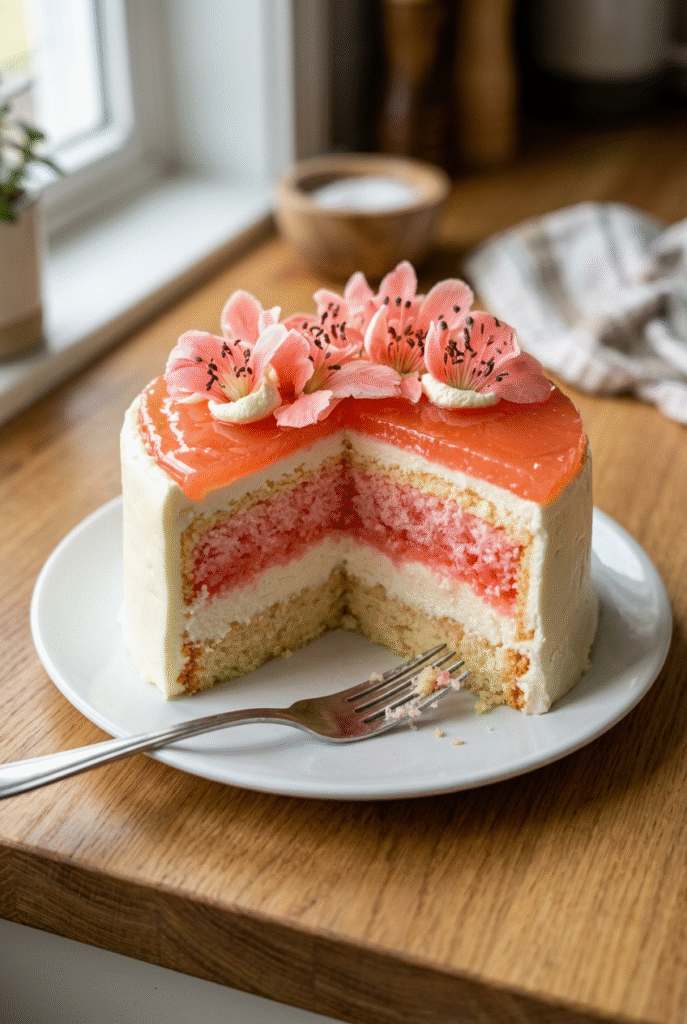
- Comforting but still light: Each serving gives you a soft cake base, a smooth cream cheese layer, and a glossy guava gel topping. Guava also adds a fruit-forward touch, and you can read more about the fruit on this guava nutrition guide from Cleveland Clinic.
This easy Hawaiian guava cake is the kind of dessert that makes people ask for the recipe before they finish their slice.
It is a great choice for home cooks, students, working professionals, and anyone who wants a tropical dessert that feels special without requiring advanced baking skills.
Jump to:
- Why You’ll Love This Easy Hawaiian Guava Cake
- Essential Ingredients for Easy Hawaiian Guava Cake
- Main cake ingredients
- Cream cheese layer
- Guava gel topping
- Special dietary options
- How to Prepare the Perfect Easy Hawaiian Guava Cake: Step-by-Step Guide
- First step: Mix the cake batter
- Second step: Make the cream cheese layer
- Third step: Cook the guava gel topping
- Fourth step: Assemble the cake
- Final step: Chill and serve
- Dietary Substitutions to Customize Your Easy Hawaiian Guava Cake
- Protein and main ingredient alternatives
- Vegetable, sauce, and seasoning modifications
- Mastering Easy Hawaiian Guava Cake: Advanced Tips and Variations
- Pro cooking techniques
- Flavor variations
- Presentation tips
- Make-ahead options
- How to Store Easy Hawaiian Guava Cake: Best Practices
- Refrigeration
- Freezing
- Reheating
- Meal prep considerations
- FAQs: Frequently Asked Questions About Easy Hawaiian Guava Cake
- My guava cake glaze isn’t setting up. What should I do?
- Can I freeze Hawaiian guava cake?
- What can I substitute for coconut oil in guava cake?
- How long does Hawaiian guava cake last in the fridge?
- Can I use fresh guavas instead of guava nectar in the cake glaze?
- Easy Hawaiian Guava Cake
- Ingredients
- Instructions
- Last Step:
- Notes
- Nutrition
- Did you make this recipe?
Essential Ingredients for Easy Hawaiian Guava Cake
Here is a complete ingredient list for this Hawaiian Guava Cake recipe. Every item plays an important role in the texture, sweetness, and tropical flavor of the finished dessert.
Main cake ingredients
- 1 strawberry cake mix, 15.25 oz, for a soft and colorful cake base.
- 1 1/3 cups guava nectar or guava juice, to bring tropical flavor into the cake batter.
- 3 eggs, to help the cake rise and hold together.
- 1/3 cup coconut oil, room temperature and liquid, for moisture and a gentle coconut note.
Cream cheese layer
- 8 ounces cream cheese, softened, for a rich and tangy filling.
- 1/3 cup sugar, to sweeten the cream layer.
- 1 teaspoon vanilla, for warm flavor.
- 8 ounces thawed whipped topping, to keep the layer light and fluffy.
Guava gel topping
- 2 cups guava nectar or guava juice, for the glossy fruit topping.
- 1/2 cup sugar, to balance the tart fruit flavor.
- 1/4 cup cornstarch, to thicken the gel.
- 3 tablespoons water, for the slurry.
Special dietary options
- Vegan: Use a vegan strawberry cake mix, plant-based cream cheese, and a dairy-free whipped topping. Replace the eggs with an egg substitute such as a flax egg or a store-bought egg replacer.
- Gluten-free: Choose a gluten-free strawberry cake mix and confirm that your cornstarch, whipped topping, and other packaged ingredients are certified gluten-free.
- Low-calorie: Use sugar-free whipped topping, a reduced-sugar cake mix, and a light cream cheese alternative. You can also slightly reduce the sugar in the guava gel if your juice is already sweet.
If you want a sweet breakfast-style idea to serve before dessert, you might also like this easy monkey bread recipe for a cozy weekend spread.
How to Prepare the Perfect Easy Hawaiian Guava Cake: Step-by-Step Guide
First step: Mix the cake batter
Start by preheating your oven according to the instructions on the strawberry cake mix box. Lightly grease a 9×13-inch glass baking dish so the cake releases easily after baking. In a mixing bowl, combine the 1 strawberry cake mix, 1 1/3 cups guava nectar or guava juice, 3 eggs, and 1/3 cup coconut oil that is room temperature and liquid. Mix until everything is well combined, but do not overmix. A hand whisk works well here because it helps keep the cake tender instead of tough.
Once the batter looks smooth, pour it into the prepared dish and bake according to the package directions. Since oven times can vary a little, start checking a few minutes before the end of the suggested bake time. Insert a toothpick into the center of the cake. If it comes out clean or with just a few moist crumbs, the cake is ready.
Second step: Make the cream cheese layer
While the cake bakes, prepare the creamy filling. In a medium mixing bowl, beat 8 ounces softened cream cheese with a hand mixer until fluffy. Add 1/3 cup sugar and 1 teaspoon vanilla, then mix until smooth and well blended. Slowly fold in 8 ounces thawed whipped topping until the mixture is light and even. Refrigerate this layer until the cake is fully cool.
Room temperature cream cheese mixes more smoothly, so take it out early if you can. This step matters because cold cream cheese can leave lumps in the frosting layer. If you are making dessert for a crowd, you can also prepare this layer ahead of time and keep it chilled for a few hours.
Third step: Cook the guava gel topping
Next, make the glossy topping that gives this Hawaiian Guava Cake its signature look. In a medium saucepan, add 2 cups guava nectar or guava juice and 1/2 cup sugar. Bring the mixture to a boil over medium heat. In a small bowl, stir 1/4 cup cornstarch with 3 tablespoons water to make a slurry. Remove the guava mixture from the heat, stir in the slurry, then return the pan to the stove and bring it back to a boil for 1 minute while stirring.
If you want a thicker set, you can boil the gel slurry for 2 minutes instead of 1, which helps it firm up a little more. After cooking, cool the topping in the refrigerator until it thickens and is easy to spread. If your guava juice tastes very sweet, you can taste and adjust the sugar slightly before boiling.
Fourth step: Assemble the cake
When the cake has cooled completely, spread the cream cheese mixture evenly over the top. Take your time with this part so the layer looks smooth from edge to edge. A cooled cake is important here, because warm cake can melt the cream filling and make the layers slide.
After the cream layer is in place, spoon or pour the guava gel over the top and spread it gently. Cover the entire surface for that bright, shiny finish. Then place the cake in the refrigerator so the layers can set well.
Final step: Chill and serve
For the best slices, chill the cake for at least 12 hours before serving. This helps the guava topping firm up and makes the cream layer neat and sliceable. If you are short on time, a few hours will work, but overnight chilling gives the cleanest results. Before serving, garnish with fresh guava slices or shredded coconut if you want a tropical look.
Allowing the cake to cool completely before frosting is one of the easiest ways to get pretty layers and a tidy finish.
The finished dessert is sweet, creamy, fruity, and perfect for sharing at potlucks, birthdays, or simple family dinners.

Dietary Substitutions to Customize Your Easy Hawaiian Guava Cake
Protein and main ingredient alternatives
This Easy Hawaiian Guava Cake is already flexible, and you can make small changes based on what is in your kitchen. If you need to replace the eggs, use a commercial egg replacer or flax eggs if you want a more plant-based dessert. For the oil, coconut oil can be swapped with vegetable oil or canola oil in a 1:1 ratio. Those substitutions keep the cake moist and tender without changing the texture too much.
If you prefer a richer flavor, melted unsalted butter can also work instead of coconut oil. Keep in mind that butter may slightly shorten the bake time, so check the center early with a toothpick. For a lighter option, applesauce or plain Greek yogurt can add moisture, but reduce the liquid slightly so the cake does not turn gummy.
Vegetable, sauce, and seasoning modifications
The cream cheese layer can be adjusted too. For a lighter dessert, try reduced-fat cream cheese or a lighter whipped topping. If you need a dairy-free option, choose plant-based cream cheese and whipped topping. The guava topping can be made with fresh guava puree if nectar is not available. Simply puree ripe guavas, strain out the seeds, and use the puree in place of guava nectar.
Fresh guava gives the cake a more natural, rustic taste. If the guava is tart, add a little more sugar until it tastes right. For a more tropical finish, garnish with toasted coconut, sliced strawberries, or small pieces of fresh guava. These changes keep the dessert fun while still staying close to the original Hawaiian Guava Cake flavor.
Mastering Easy Hawaiian Guava Cake: Advanced Tips and Variations
Pro cooking techniques
Small details make a big difference with this recipe. First, use room temperature ingredients for the cream cheese layer so everything blends smoothly. Second, cool the cake fully before adding the toppings. That simple step helps the cream layer stay thick and the guava glaze stay glossy. Third, use a hand whisk or gentle mixing motion for the cake batter so the crumb stays soft.
If you are unsure about sweetness, taste the guava nectar or juice before cooking. Some brands are sweeter than others, and a little extra sugar may not be needed. When making the glaze, stir constantly while the slurry cooks so the cornstarch does not clump or scorch.
Flavor variations
You can keep the tropical theme while changing the look a little. Add shredded coconut on top for a beachy feel, or top with thin guava slices for a fresh finish. A few strawberry slices also look lovely and match the strawberry cake mix. If you want a brighter fruit flavor, use fresh guava puree in the glaze and reduce the sugar slightly to taste.
Presentation tips
For clean slices, chill the cake well and use a sharp knife wiped clean between cuts. Serve it on a simple white platter so the pink and red colors stand out. This dessert looks especially pretty at brunch tables and holiday gatherings. If you are serving a mixed dessert spread, it pairs well with other easy bakes like homemade cinnamon bread.
Make-ahead options
This is a great make-ahead dessert for busy parents and working professionals. Bake the cake layer a day in advance, then cool and cover it tightly. You can also prepare the cream cheese layer and guava gel ahead of time, then assemble everything the next day. The finished cake holds up well in the fridge, and the flavors blend nicely after a few hours of chilling.
How to Store Easy Hawaiian Guava Cake: Best Practices
Refrigeration
Because this cake has cream cheese and whipped topping, it should stay in the refrigerator. Cover the cake tightly with plastic wrap or place slices in an airtight container. Stored properly, Easy Hawaiian Guava Cake stays fresh for 4 to 5 days. For the best texture, let it chill uncovered for about 30 minutes first so the top sets before wrapping.
Freezing
You can freeze the baked cake layer if you want to get ahead on prep. Cool it completely, wrap it tightly in plastic wrap, then foil, and place it in a freezer bag for up to 3 months. Thaw it overnight in the fridge before adding the cream cheese layer and guava topping. This method helps prevent soggy frosting and keeps the final dessert neat.
Reheating
This cake is best served cold, so reheating is not needed. In fact, warming it can soften the cream layer and loosen the guava gel. If the cake has been frozen, thaw it slowly in the refrigerator for the best results.
Meal prep considerations
If you want to prep for a party, make the components separately and assemble on the day you plan to serve it. That way, the layers stay fresh and the topping keeps its shine. This works especially well for potlucks, birthdays, and family gatherings where you want dessert ready without last-minute stress.

FAQs: Frequently Asked Questions About Easy Hawaiian Guava Cake
My guava cake glaze isn’t setting up. What should I do?
Can I freeze Hawaiian guava cake?
What can I substitute for coconut oil in guava cake?
How long does Hawaiian guava cake last in the fridge?
Can I use fresh guavas instead of guava nectar in the cake glaze?

Easy Hawaiian Guava Cake
🍍 Escape to Hawaii with layers of moist guava cake, creamy frosting, and shiny tropical gel for pure bliss.
🥥 Simple box mix magic creates a stunning, crowd-pleasing dessert bursting with fresh island flavors!
- Total Time: 35 minutes + chilling
- Yield: 12 servings
Ingredients
– 1 strawberry cake mix, 15.25 oz for a soft and colorful cake base
– 1 1/3 cups guava nectar or guava juice to bring tropical flavor into the cake batter
– 3 eggs to help the cake rise and hold together
– 1/3 cup coconut oil, room temperature and liquid for moisture and a gentle coconut note
– 8 ounces cream cheese, softened for a rich and tangy filling
– 1/3 cup sugar to sweeten the cream layer
– 1 teaspoon vanilla for warm flavor
– 8 ounces thawed whipped topping to keep the layer light and fluffy
– 2 cups guava nectar or guava juice for the glossy fruit topping
– 1/2 cup sugar to balance the tart fruit flavor
– 1/4 cup cornstarch to thicken the gel
– 3 tablespoons water for the slurry
Instructions
1-First step: Mix the cake batter Start by preheating your oven according to the instructions on the strawberry cake mix box. Lightly grease a 9×13-inch glass baking dish so the cake releases easily after baking. In a mixing bowl, combine the 1 strawberry cake mix, 1 1/3 cups guava nectar or guava juice, 3 eggs, and 1/3 cup coconut oil that is room temperature and liquid. Mix until everything is well combined, but do not overmix. A hand whisk works well here because it helps keep the cake tender instead of tough. Once the batter looks smooth, pour it into the prepared dish and bake according to the package directions. Since oven times can vary a little, start checking a few minutes before the end of the suggested bake time. Insert a toothpick into the center of the cake. If it comes out clean or with just a few moist crumbs, the cake is ready.
2-Second step: Make the cream cheese layer While the cake bakes, prepare the creamy filling. In a medium mixing bowl, beat 8 ounces softened cream cheese with a hand mixer until fluffy. Add 1/3 cup sugar and 1 teaspoon vanilla, then mix until smooth and well blended. Slowly fold in 8 ounces thawed whipped topping until the mixture is light and even. Refrigerate this layer until the cake is fully cool. Room temperature cream cheese mixes more smoothly, so take it out early if you can. This step matters because cold cream cheese can leave lumps in the frosting layer. If you are making dessert for a crowd, you can also prepare this layer ahead of time and keep it chilled for a few hours.
3-Third step: Cook the guava gel topping Next, make the glossy topping that gives this Hawaiian Guava Cake its signature look. In a medium saucepan, add 2 cups guava nectar or guava juice and 1/2 cup sugar. Bring the mixture to a boil over medium heat. In a small bowl, stir 1/4 cup cornstarch with 3 tablespoons water to make a slurry. Remove the guava mixture from the heat, stir in the slurry, then return the pan to the stove and bring it back to a boil for 1 minute while stirring. If you want a thicker set, you can boil the gel slurry for 2 minutes instead of 1, which helps it firm up a little more. After cooking, cool the topping in the refrigerator until it thickens and is easy to spread. If your guava juice tastes very sweet, you can taste and adjust the sugar slightly before boiling.
4-Fourth step: Assemble the cake When the cake has cooled completely, spread the cream cheese mixture evenly over the top. Take your time with this part so the layer looks smooth from edge to edge. A cooled cake is important here, because warm cake can melt the cream filling and make the layers slide. After the cream layer is in place, spoon or pour the guava gel over the top and spread it gently. Cover the entire surface for that bright, shiny finish. Then place the cake in the refrigerator so the layers can set well.
5-Final step: Chill and serve For the best slices, chill the cake for at least 12 hours before serving. This helps the guava topping firm up and makes the cream layer neat and sliceable. If you are short on time, a few hours will work, but overnight chilling gives the cleanest results. Before serving, garnish with fresh guava slices or shredded coconut if you want a tropical look.
Last Step:
Please leave a rating and comment letting us know how you liked this recipe! This helps our business to thrive and continue providing free, high-quality recipes for you.Notes
🍈 Taste guava nectar first and adjust sugar in gel for perfect sweet-tart balance.
🧁 Ensure cake is fully cooled before layering to avoid melting the frosting.
🌺 Garnish with fresh guava slices or shredded coconut for extra tropical flair.
- Prep Time: 10 minutes
- Chilling Time: 12 hours
- Cook Time: 25 minutes
- Category: Desserts
- Method: Bake
- Cuisine: Hawaiian
- Diet: Vegetarian
Nutrition
- Serving Size: 1 slice
- Calories: 416 kcal
- Sugar: 44g
- Sodium: 338mg
- Fat: 17g
- Saturated Fat: 11g
- Unsaturated Fat: 6g
- Trans Fat: 0g
- Carbohydrates: 62g
- Fiber: 1g
- Protein: 4g
- Cholesterol: 65mg


