Ingredients
– 2 to 2.5 pounds pickling cucumbers
– 5 cups filtered or tap water
– 2 tablespoons fine sea salt or Himalayan salt
– 1/4 teaspoon turmeric, optional
– 1 teaspoon fennel seeds
– 1 teaspoon coriander seeds
– 1 teaspoon allspice
– 1 teaspoon peppercorns
– 1 teaspoon dill seeds
– 1 teaspoon mustard seeds
– 1 teaspoon celery seeds
– 10 to 20 garlic cloves, sliced
– 1/2 onion, thinly sliced, optional
– Big handful of fresh dill
– 1 to 3 fresh red chilies, or dried arbol chilies, or chili flakes, optional
– 3 to 4 bay leaves, or a grape leaf, or oak leaf
Instructions
1-First Step: Wash and prep the cucumbers Start by washing the cucumbers well under cool running water. Trim about 1/16 inch from the flower end of each cucumber, because that little tip can make the pickles soften faster. This small step matters a lot if you want crisp fermented pickles that still have a good snap after a few days. Next, place the cucumbers in an ice water bath for 15 to 30 minutes. This helps firm them up before they go into the jar. If you are using especially small cucumbers, keep the soaking time on the shorter side so they do not absorb too much water.
2-Second Step: Make the brine Mix 2 tablespoons of fine sea salt or Himalayan salt with 5 cups of cold filtered or lightly chlorinated tap water. Stir until the salt dissolves fully. The brine should look clear, with no gritty salt left at the bottom of the bowl or measuring jug. This salt level gives you a good traditional ferment. It is strong enough to support safe fermentation while still letting the cucumbers develop that tangy, lively taste people love in homemade fermented pickles. If you are using different jar sizes, keep the same ratio so the brine stays balanced.
3-Third Step: Wash everything that touches the pickles Wash your hands, jars, lids, weights, spoons, and any utensils you plan to use. Clean tools help keep the ferment on the right track. A two-quart mason jar is a great choice for this batch size, and it gives you enough room for the cucumbers, spices, and brine. Clean hands and a clean jar are a big deal here. Fermentation works best when the friendly bacteria have a fresh, tidy place to do their job.
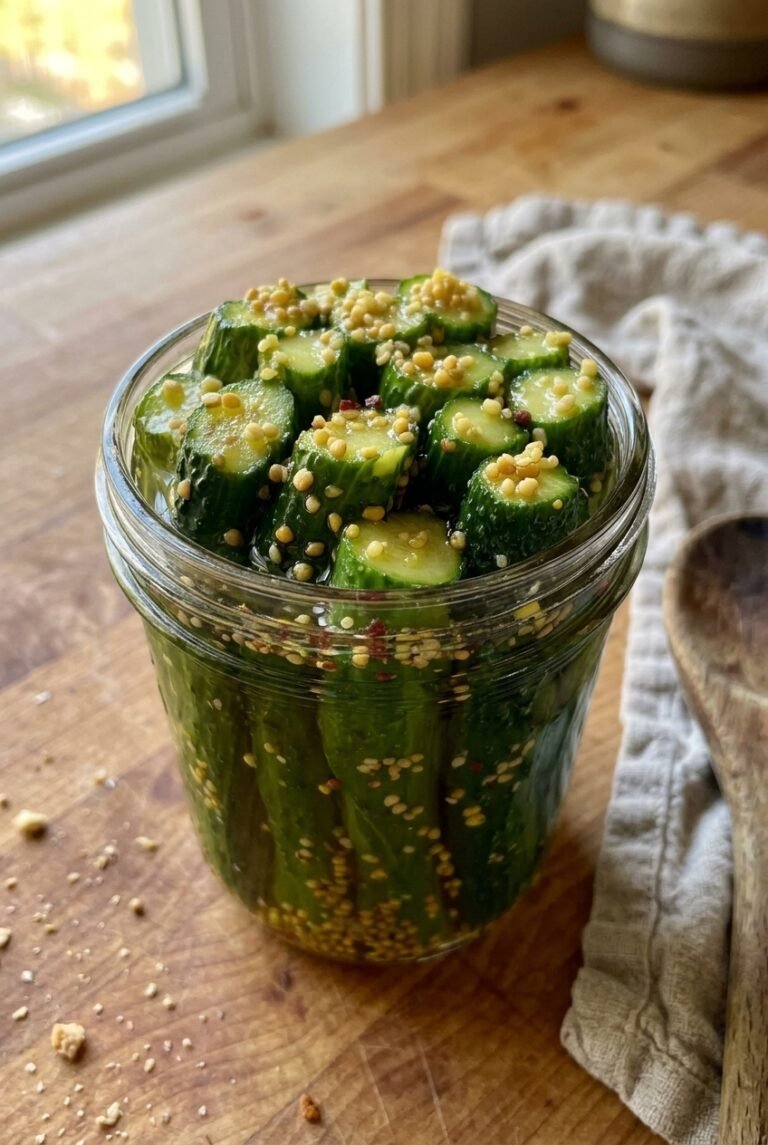
4-Fourth Step: Layer the flavor in the jar Place the spices, fresh dill, sliced garlic, onions if using, and turmeric if using into the bottom of the jar. Then start packing in the cucumbers. Tuck the bay leaves, grape leaf, or oak leaf in between the cucumbers as you go. If you want a spicy batch, add the red chilies, arbol chilies, or chili flakes at this stage too. Press everything in firmly, but do not smash the cucumbers. You want a snug fit so the brine can cover the vegetables well. Packing the jar this way helps the flavors spread evenly through every spear or whole cucumber.
5-Fifth Step: Add the brine and keep everything submerged Pour the salt brine over the cucumbers until they are covered, leaving about 1.5 inches of headroom at the top of the jar. This space helps prevent overflow once fermentation begins. Then place a clean weight on top to keep the cucumbers beneath the brine line. This part is one of the most important steps for fermented pickles. Anything that floats above the brine can turn moldy. If some spices float, try to push them down or remove them from the surface so only the cucumbers and aromatics stay under the liquid.
6-Sixth Step: Cover loosely and ferment Cover the jar loosely and place it in a cool, dark spot for 2 to 3 days. A temperature between 60 and 70°F is ideal if you want crisp pickles. Warmer rooms can move faster, but they may also soften the cucumbers more quickly. After 2 days, check the jar for bubbles or a little overflow. Both are normal signs that the fermentation is active. If the jar looks fizzy, you can tighten the lid and burp it daily to release pressure. Keep the jar out of direct sunlight while it ferments.
7-Seventh Step: Taste, refrigerate, and finish Once the pickles taste tangy and smell fresh, garlicky, and pleasantly sour, move them to the refrigerator. Refrigeration slows the fermentation so the flavor stays where you like it. The pickles can keep developing slowly in the fridge, but the cold will help protect the crunch. If you want a softer, sharper pickle, let them ferment a little longer before chilling. If you like a firmer, milder pickle, move them to the fridge sooner. This recipe has a prep time of about 4 days and a total time of about 4 days, which makes it a great project for a long weekend.
Last Step:
Please leave a rating and comment letting us know how you liked this recipe! This helps our business to thrive and continue providing free, high-quality recipes for you.Notes
🌡️ Ferment 60-70°F for crunchiest results.
⚖️ Weights essential—submerged prevents mold/kahm yeast.
👃 Fresh tangy garlic aroma good; funky smell means discard.
- Prep Time: 30 minutes
- Fermentation: 2-3 days
- Cook Time: 0 minutes
- Category: Condiments
- Method: Ferment
- Cuisine: American
- Diet: Vegan, Gluten-Free, Keto, Low-Calorie
Nutrition
- Serving Size: ¼ cup
- Calories: 16 kcal
- Sugar: 1g
- Sodium: 300mg
- Fat: 0g
- Saturated Fat: 0g
- Unsaturated Fat: 0g
- Trans Fat: 0g
- Carbohydrates: 4g
- Fiber: 1g
- Protein: 1g
- Cholesterol: 0mg