Why You’ll Love These Pickled Vegetables
Pickled Vegetables are one of the easiest ways to turn fresh produce into a tangy, crunchy side dish that fits into busy everyday life. With just a quick boil and a short chill in the fridge, you can make a batch of homemade pickles that work for lunches, snacks, and dinner plates alike. This quick pickled vegetables recipe is especially handy when your fridge is full of garden produce or when you want a simple make-ahead recipe that does not take much time.
- Easy to make: This recipe takes about 15 minutes of prep and 5 minutes of cook time, so it is perfect for home cooks, students, and working professionals who need fast results.
- Fresh and nourishing: Pickled vegetables can be a lighter snack option, especially when made with cucumbers, carrots, radishes, and other colorful produce. A 1/2 cup serving based on cucumber has about 13 calories, making it a smart choice for diet-conscious eaters.
- Flexible for many diets: These quick pickles are naturally vegetarian and vegan, and they can be made gluten-free with simple pantry ingredients. You can also adjust the sugar and salt to fit your needs.
- Bright, bold flavor: Vinegar, garlic, dill, coriander, fennel, and mustard seeds give pickled vegetables a sharp, savory taste that wakes up sandwiches, bowls, grilled meats, and salads.
When you want a fast fridge pickle recipe that brings crunch and color to the table, pickled vegetables are hard to beat.
They also fit well into meal prep because a jar can sit in the fridge and be ready whenever you need a little zip on the side. If you love easy vegetable sides, you may also enjoy our slow cooker veggie tortellini bake for another simple weeknight option.
Jump to:
- Why You’ll Love These Pickled Vegetables
- Essential Ingredients for Pickled Vegetables
- Main Ingredients
- Optional Additions
- Pickling Liquid
- Special Dietary Options
- How to Prepare the Perfect Pickled Vegetables: Step-by-Step Guide
- First Step: Wash and prep the vegetables
- Second Step: Make the brine
- Third Step: Add the aromatics and spices
- Fourth Step: Pack the jars
- Fifth Step: Pour in the hot pickling liquid
- Sixth Step: Cool and refrigerate
- Seventh Step: Serve and enjoy
- Dietary Substitutions to Customize Your Pickled Vegetables
- Protein and Main Component Alternatives
- Vegetable, Sauce, and Seasoning Modifications
- Mastering Pickled Vegetables: Advanced Tips and Variations
- Pro cooking techniques
- Flavor variations
- Presentation tips
- Make-ahead options
- How to Store Pickled Vegetables: Best Practices
- FAQs: Frequently Asked Questions About Pickled Vegetables
- What are the best vegetables to pickle at home?
- How long do homemade pickled vegetables last?
- How do you make quick pickled vegetables?
- Are pickled vegetables healthy?
- How should you store pickled vegetables safely?
- Pickled Vegetables
- Ingredients
- Instructions
- Last Step:
- Notes
- Nutrition
- Did you make this recipe?
Essential Ingredients for Pickled Vegetables
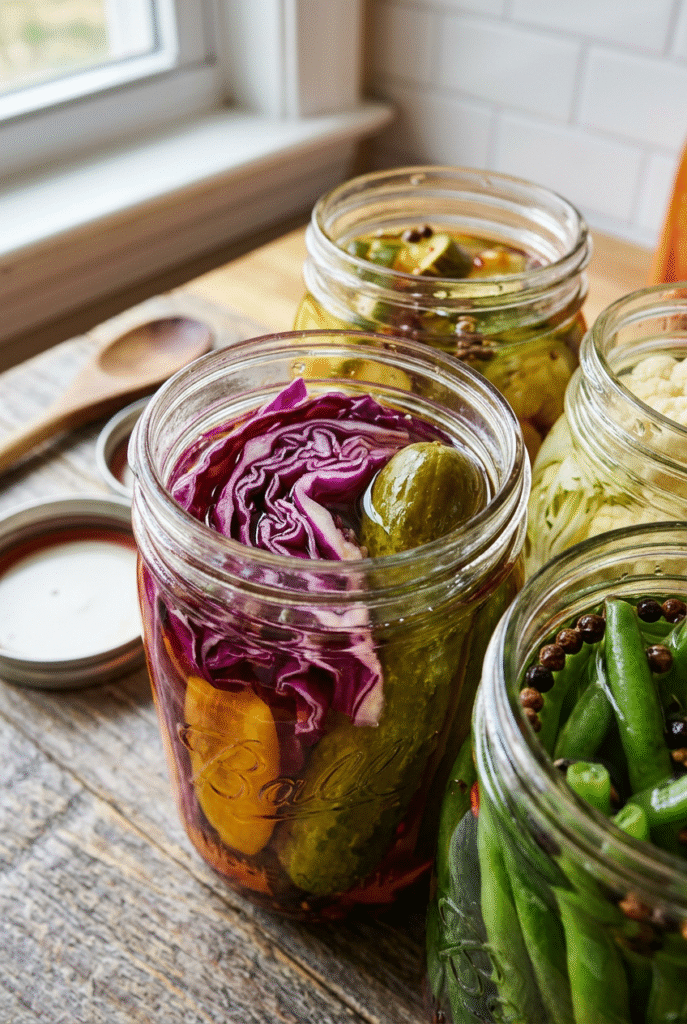
This recipe makes enough pickled vegetables to fill 2 quart-sized mason jars. Use fresh, firm produce for the best crunch, and slice everything in a way that helps the brine soak in evenly.
Main Ingredients
- Fresh raw vegetables, enough to fill 2 quart-sized mason jars: cucumbers, beets, carrots, radishes, turnips, okra, green beans, asparagus, red onion, zucchini, summer squash, cauliflower florets, bell peppers, garlic scapes, and fennel bulbs, washed, sliced, quartered, or cut into spears. These are the stars of the recipe and give you lots of mix-and-match options.
- 1 tablespoon coriander seeds: Adds a warm, citrusy note that pairs beautifully with vinegar brine.
- 2 teaspoons fennel seeds: Brings gentle sweetness and a subtle anise-like flavor.
- 1 teaspoon mustard seeds: Gives the pickles a classic sharp bite and a little texture.
- 6 to 10 cloves garlic, sliced thickly: Adds savory depth and a classic pickling aroma.
- 1/2 onion, sliced: Adds sweetness and a little extra bite.
- A few sprigs fresh dill or other herbs: Dill is traditional, but parsley, cilantro, oregano, basil, thyme, sage, rosemary, chives, scallions, or bay leaves also work well.
Optional Additions
- Whole spices: cloves, dill seeds, allspice, fresh ginger, chilies, celery seeds, peppercorns, cumin seeds, or star anise.
- Extra herbs: parsley, cilantro, oregano, basil, thyme, sage, rosemary, chives, scallions, or bay leaves.
Pickling Liquid
- 2 cups vinegar: white vinegar, red wine vinegar, rice wine vinegar, or apple cider vinegar all work well.
- 2 cups water: Softens the sharpness of the vinegar while keeping the brine balanced.
- 2 tablespoons kosher salt: Helps season the vegetables and support a crisp texture.
- 4 to 6 tablespoons sugar: Adds balance and rounds out the tangy flavor.
Special Dietary Options
- Vegan: This recipe is already plant-based as written.
- Gluten-free: Use certified gluten-free vinegar if needed, and stick with plain spices and herbs.
- Low-calorie: Cut the sugar to the lower end of the range, or use less if you prefer a sharper pickle.
| Ingredient | Amount | Why It Helps |
|---|---|---|
| Fresh vegetables | Enough to fill 2 quart jars | Provide crunch, color, and natural flavor |
| Vinegar | 2 cups | Creates the tangy pickling brine |
| Water | 2 cups | Balances the acidity |
| Kosher salt | 2 tablespoons | Builds flavor and helps with texture |
| Sugar | 4 to 6 tablespoons | Adds mild sweetness and balance |
If you enjoy vegetable-forward meals, these pickles are a great side for dishes like balsamic lemon chicken or a cozy dinner like au gratin potatoes.
How to Prepare the Perfect Pickled Vegetables: Step-by-Step Guide
First Step: Wash and prep the vegetables
Start by washing all the vegetables well under cool running water. Trim them into pieces that will fit neatly into your mason jars, such as slices, quarters, spears, or sticks. Cucumbers can be cut into spears or rounds, carrots can be sliced into coins or batons, and vegetables like cauliflower, zucchini, and red onion work well in bite-size pieces.
If you are using firmer vegetables like beets or carrots, keep in mind that they may need a little extra time to soften. For a crisper bite, leave vegetables raw and let the hot brine do most of the work. For a more tender pickle, briefly simmer those firmer vegetables in the pickling liquid before jarring.
Second Step: Make the brine
Set a medium pot on the stove and add 2 cups vinegar, 2 cups water, 2 tablespoons kosher salt, and 4 to 6 tablespoons sugar. Stir the mixture and bring it to a boil. The sugar and salt should dissolve fully before you take the pot off the heat. This brine gives the pickled vegetables their bright flavor and helps the vegetables absorb seasoning quickly.
You can use white vinegar for a clean, classic taste, or try apple cider vinegar for a softer, slightly fruity finish. Red wine vinegar brings a deeper tang, while rice wine vinegar tastes lighter and gentler.
Third Step: Add the aromatics and spices
While the brine is heating, get your flavor builders ready. Measure out 1 tablespoon coriander seeds, 2 teaspoons fennel seeds, 1 teaspoon mustard seeds, 6 to 10 thickly sliced garlic cloves, 1/2 sliced onion, and a few sprigs of fresh dill. You can also add optional extras like peppercorns, celery seeds, ginger, chilies, allspice, or star anise.
Layer these into the jars with the vegetables so every bite picks up a little bit of spice, herb, and garlic flavor. This is where you can make the recipe your own. A few bay leaves or rosemary sprigs will give the brine a rustic aroma, while ginger or turmeric adds a warmer, more earthy note.
Fourth Step: Pack the jars
Pack the vegetables tightly into two clean quart-sized mason jars. Try to mix colors and shapes for a pretty look, especially if you are using carrots, radishes, green beans, bell peppers, and cauliflower. Leave about 1 inch of headspace at the top so the brine can move around without overflowing.
As you pack, tuck in the garlic slices, onion, whole spices, and herbs between the vegetables. That way, the brine will touch every layer and the flavors will spread more evenly. Clean jars matter here, so wash them well before you begin.
Fifth Step: Pour in the hot pickling liquid
Carefully pour the hot brine over the vegetables in each jar. Make sure everything is fully submerged, and leave at least 1/2 inch from the lid. If some pieces float, use a clean spoon or chopstick to release air bubbles and gently press the vegetables down. Full submersion helps prevent spoilage and gives you better flavor throughout the jar.
For the best refrigerator pickles, keep every vegetable under the brine so the texture stays crisp and the taste stays bright.
Sixth Step: Cool and refrigerate
Let the jars cool on the counter for 1 to 2 hours. Once they are no longer hot, cover them with lids and move them to the refrigerator. The pickled vegetables will taste good after 8 hours, but 24 hours gives the best flavor. If you can wait a full day, the spices and vinegar will settle in nicely.
For busy parents, students, and working professionals, this is one of the best parts of the recipe. You do the quick work now, and later you have a ready-to-use side dish waiting in the fridge.
Seventh Step: Serve and enjoy
Serve your homemade pickled vegetables cold straight from the jar or as part of a meal. They are great with sandwiches, grain bowls, grilled meat, tacos, salads, and cheese boards. A few crunchy pickles can brighten rich meals and make simple lunches feel more fun.
Try them alongside a comforting dinner like slow cooker Italian lemon chicken or serve them with roasted vegetables for a sharp little bite on the side. If you are cooking for a mixed group, the recipe is easy to scale up or down.

Dietary Substitutions to Customize Your Pickled Vegetables
Protein and Main Component Alternatives
Since this recipe is built around vegetables, there is no protein to swap in the usual sense. Instead, think about which vegetables fit your needs, the season, and what you have on hand. Crisp cucumbers and radishes are great for fast fridge pickles, while carrots, beets, turnips, and green beans hold up well for a little longer.
If you want a milder flavor, use more cucumbers, zucchini, summer squash, or cauliflower. If you want a sweeter pickle, choose red onion, bell pepper, or beets. For a brinier and more savory result, add more garlic, mustard seed, and dill.
Vegetable, Sauce, and Seasoning Modifications
You can also swap the vinegar type to match your taste. Apple cider vinegar gives a softer finish, while white vinegar keeps the flavor sharp and classic. If you want less sugar, start with 4 tablespoons and adjust next time. If you want more spice, add chilies, peppercorns, or a pinch of celery seeds.
Fresh herbs are another easy way to change the flavor. Dill gives the most familiar pickle taste, but parsley, cilantro, thyme, rosemary, basil, or bay leaves can take the brine in a different direction. For anyone watching sodium, you can reduce the salt a little, though the texture and flavor may change slightly.
Mastering Pickled Vegetables: Advanced Tips and Variations
Pro cooking techniques
Use clean jars every time, and do not skip the step of fully covering the vegetables with brine. This matters for both flavor and safety. If you are using firmer vegetables like carrots or beets, briefly simmer them in the pickling liquid before jarring so they soften a bit without turning mushy.
If bubbles rise after you pour in the brine, tap the jar gently or run a clean utensil down the sides to release trapped air. This helps the liquid settle around the vegetables. For long-term storage, sterilize the jars, remove air bubbles, and process them in a boiling water bath for 5 minutes.
Flavor variations
Once you know the base recipe, it becomes easy to play with flavor. Try ginger and turmeric for a warmer profile, or add star anise and cloves for a deeper spice note. You can also mix herbs like dill, cilantro, and scallions for a fresher, greener taste. If you like a little heat, add sliced chilies or peppercorns.
Quick pickled vegetables are also a nice way to use up small amounts of produce. A little fennel, a few green beans, and some red onion can all share the same jar. That makes this recipe especially useful for reducing waste and cleaning out the crisper drawer.
Presentation tips
For a pretty jar, layer colorful vegetables in sections so the final pickles look vibrant and inviting. Bright orange carrots, pink radishes, green beans, and red onion create a nice mix. Add a sprig of dill on top for a classic look.
Serve the pickles in a small bowl with a spoon, or place them on a board beside sandwiches and mains. They also make a lovely homemade gift if you prepare a batch for friends, neighbors, or newlyweds.
Make-ahead options
This recipe is already a great make-ahead choice. Make the jars at night, chill them overnight, and they will be ready the next day. If you want a weekend batch, double the recipe and keep one jar for the week ahead. The pickles last up to 2 weeks in the fridge, so they are helpful for meal prep.
How to Store Pickled Vegetables: Best Practices
Store pickled vegetables in clean, airtight glass jars in the refrigerator. Keep them submerged in brine and use a clean fork or spoon each time you serve them. For the best taste and crunch, enjoy them within 2 weeks, though they may last a little longer if handled well.
Freezing is not a good choice for quick pickled vegetables because it softens the texture. These are best enjoyed cold and crisp from the fridge. Reheating is not needed, since these are refrigerator pickles, not a cooked side dish.
For meal prep, portion pickles into smaller jars so they are easy to grab with lunch boxes and weeknight meals. If you want shelf-stable storage, use proper canning methods with sterilized jars and a boiling water bath. That method is different from simple fridge pickles, but it is useful if you want to store jars for longer periods.

FAQs: Frequently Asked Questions About Pickled Vegetables
What are the best vegetables to pickle at home?
How long do homemade pickled vegetables last?
How do you make quick pickled vegetables?
Are pickled vegetables healthy?
How should you store pickled vegetables safely?

Pickled Vegetables
🥒 Crunch into vibrant, tangy pickled veggies bursting with flavor and gut-friendly benefits from quick fermentation.
🫙 Effortless homemade pickles add zing to salads, sandwiches, or snacks without the need for canning equipment!
- Total Time: 20 minutes
- Yield: 2 quarts (16 servings)
Ingredients
– Enough to fill 2 quart jars fresh vegetables for providing crunch, color, and natural flavor
– 2 cups vinegar for creating the tangy pickling brine
– 2 cups water for balancing the acidity
– 2 tablespoons kosher salt for building flavor and helping with texture
– 4 to 6 tablespoons sugar for adding mild sweetness and balance
Instructions
1-First Step: Wash and prep the vegetables Start by washing all the vegetables well under cool running water. Trim them into pieces that will fit neatly into your mason jars, such as slices, quarters, spears, or sticks. Cucumbers can be cut into spears or rounds, carrots can be sliced into coins or batons, and vegetables like cauliflower, zucchini, and red onion work well in bite-size pieces. If you are using firmer vegetables like beets or carrots, keep in mind that they may need a little extra time to soften. For a crisper bite, leave vegetables raw and let the hot brine do most of the work. For a more tender pickle, briefly simmer those firmer vegetables in the pickling liquid before jarring.
2-Second Step: Make the brine Set a medium pot on the stove and add 2 cups vinegar, 2 cups water, 2 tablespoons kosher salt, and 4 to 6 tablespoons sugar. Stir the mixture and bring it to a boil. The sugar and salt should dissolve fully before you take the pot off the heat. This brine gives the pickled vegetables their bright flavor and helps the vegetables absorb seasoning quickly. You can use white vinegar for a clean, classic taste, or try apple cider vinegar for a softer, slightly fruity finish. Red wine vinegar brings a deeper tang, while rice wine vinegar tastes lighter and gentler.
3-Third Step: Add the aromatics and spices While the brine is heating, get your flavor builders ready. Measure out 1 tablespoon coriander seeds, 2 teaspoons fennel seeds, 1 teaspoon mustard seeds, 6 to 10 thickly sliced garlic cloves, 1/2 sliced onion, and a few sprigs of fresh dill. You can also add optional extras like peppercorns, celery seeds, ginger, chilies, allspice, or star anise. Layer these into the jars with the vegetables so every bite picks up a little bit of spice, herb, and garlic flavor. This is where you can make the recipe your own. A few bay leaves or rosemary sprigs will give the brine a rustic aroma, while ginger or turmeric adds a warmer, more earthy note.
4-Fourth Step: Pack the jars Pack the vegetables tightly into two clean quart-sized mason jars. Try to mix colors and shapes for a pretty look, especially if you are using carrots, radishes, green beans, bell peppers, and cauliflower. Leave about 1 inch of headspace at the top so the brine can move around without overflowing. As you pack, tuck in the garlic slices, onion, whole spices, and herbs between the vegetables. That way, the brine will touch every layer and the flavors will spread more evenly. Clean jars matter here, so wash them well before you begin.
5-Fifth Step: Pour in the hot pickling liquid Carefully pour the hot brine over the vegetables in each jar. Make sure everything is fully submerged, and leave at least 1/2 inch from the lid. If some pieces float, use a clean spoon or chopstick to release air bubbles and gently press the vegetables down. Full submersion helps prevent spoilage and gives you better flavor throughout the jar. For the best refrigerator pickles, keep every vegetable under the brine so the texture stays crisp and the taste stays bright.
6-Sixth Step: Cool and refrigerate Let the jars cool on the counter for 1 to 2 hours. Once they are no longer hot, cover them with lids and move them to the refrigerator. The pickled vegetables will taste good after 8 hours, but 24 hours gives the best flavor. If you can wait a full day, the spices and vinegar will settle in nicely. For busy parents, students, and working professionals, this is one of the best parts of the recipe. You do the quick work now, and later you have a ready-to-use side dish waiting in the fridge.
7-Seventh Step: Serve and enjoy Serve your homemade pickled vegetables cold straight from the jar or as part of a meal. They are great with sandwiches, grain bowls, grilled meat, tacos, salads, and cheese boards. A few crunchy pickles can brighten rich meals and make simple lunches feel more fun. Try them alongside a comforting dinner like slow cooker Italian lemon chicken or serve them with roasted vegetables for a sharp little bite on the side. If you are cooking for a mixed group, the recipe is easy to scale up or down.
Last Step:
Please leave a rating and comment letting us know how you liked this recipe! This helps our business to thrive and continue providing free, high-quality recipes for you.Notes
🌶️ Experiment with additions like fresh ginger, chilies, or turmeric for customized flavors.
🥕 Briefly simmer firmer vegetables like carrots or beets in the brine for better texture.
❄️ These pickles last up to 2 weeks in the fridge; always keep submerged to prevent spoilage.
- Prep Time: 15 minutes
- Chilling Time: 8-24 hours
- Cook Time: 5 minutes
- Category: Condiments
- Method: Pickling
- Diet: Vegan, Gluten-Free, Vegetarian
Nutrition
- Serving Size: 1/2 cup
- Calories: 13 kcal
- Sugar: 1.8g
- Sodium: 292mg
- Fat: 0.1g
- Saturated Fat: 0g
- Unsaturated Fat: 0.1g
- Trans Fat: 0g
- Carbohydrates: 3g
- Fiber: 0.3g
- Protein: 0.4g
- Cholesterol: 0mg


