
Stunning 20 Senior Parking Spot Ideas That Steal The Show


Senior year has a way of turning ordinary traditions into core memories, and painted parking spots sit right at the top of that list. Your plain asphalt rectangle is basically a giant personal canvas, which makes this the biggest school craft project of the year. Plan an August paint day, grab your friends, stock up on iced coffees and plenty of brushes, and make it official with a contest. Offer a $20 coffee shop gift card for the favorite design and watch everyone suddenly take their chalk sketches very seriously. These twenty ideas, inspired by the original roundup at StreetStylis, will take you from blank pavement to graduation photo ready. Love big paint projects? My Coolest Painted Furniture Ideas has more brush friendly inspiration.
SENIOR PARKING SPOT IDEAS
Ready to start strong? Each idea below comes with quick how to steps plus supply and difficulty notes, so you can pick a design that matches your skill level and your weekend. From simple stencils to full scene painting, there is a spot idea here with your name on it. Literally.
Quick tip: always check your school’s senior paint day rules and approved paint list before you buy supplies, so your masterpiece stays put all year.
Name in Block Letters Spot
The classic for a reason. Oversized block letters read clearly all the way from the drive lane, so your name becomes the entire design with zero complicated background needed. Sketch your name in chalk first, then use straight edges or letter stencils to keep every line crisp. Want the traditional senior lot look? Add your graduation year underneath.
Difficulty: Easy. Supplies: letter stencils and outdoor paint.
Smiley Flower Spot Design
Cover your spot in pure happiness. These smiley flowers turn plain pavement into a giant notebook doodle from the best school day ever. Start with simple flower circles, add chunky petals, then draw tiny smiles in a few centers. Keep the shapes loose instead of chasing perfect symmetry, and use three or four bright colors so every bloom pops against the gray.
Difficulty: Easy. Supplies: acrylic paint and a small brush.
Checkerboard Border Spot
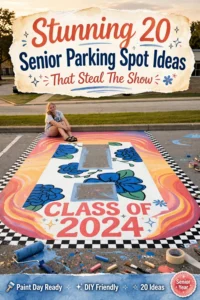
Structure is your friend here. A checkerboard border frames the space instantly, which means the middle can stay simple while the edges do all the decorating. Measure equal squares before you tape so the pattern stays consistent end to end, paint every other square, let it dry, then clean up the edges with a small brush. It looks especially cute around a short name or your graduation year.
Difficulty: Medium. Supplies: masking tape and concrete paint.
Sunset Gradient Spot
This one turns plain asphalt into a sunset sky and yes, people will stop to take photos. Blend three nearby colors, working each transition while the paint is still workable. Grab a roller for the big sections since it covers ground way faster than a tiny brush. Once the background dries completely, paint white lettering over the top for a crisp finish.


Difficulty: Medium. Supplies: 3 colors of paint and paint rollers.
Cow Print Name Spot
No measuring tape required, promise. Irregular cow print spots make a fantastic large background pattern because every patch can be a different size. Paint the base first, then scatter patches of different sizes around your name. Keep the edges uneven since that looseness is exactly what makes the pattern read correctly. Finish with western style lettering for the full effect.
Difficulty: Easy. Supplies: 4 colors of paint and a chip brush.
Disco Ball Theme Spot
Party on pavement, anyone? One large disco ball brings instant sparkly energy that reads clearly on the morning walk past. Draw one large circle, divide it into little mirrored sections, then add highlights where the shine should hit. Keep the rest of the space simple so the disco ball stays the star, and finish with a few tiny sparkle shapes around it.
Difficulty: Medium. Supplies: acrylic paint and a fine brush.
Wave and Sun Design
Hello, last summer before graduation. This wave and sun pairing captures that end of summer feeling without demanding a full detailed beach scene. Block in the sky first, add the sun, then build one curved wave across the lower section. White foam details are the secret, making the water read instantly even from far away.
Difficulty: Medium. Supplies: acrylic paint. Time: 1.5 hours.
Jersey Number Spot
Your jersey number, supersized. This design turns the number everyone already associates with you into the hero of the parking space. Center the number first, then add the jersey outline so it stays readable even when a car is parked nearby. Paint it in your school colors to make it feel personal. Perfect for anyone who has spent high school living out of a sports bag.
Difficulty: Medium. Supplies: number stencil and team colors.
Butterfly Corner Spot
Butterflies bring the movement. Tuck a few into one corner and you still get plenty of open space for your name. Sketch the wings lightly, fill each side with color, then add the dark body and a few simple details. Here is the fun part: the butterflies do not need to match. Different sizes make the corner look more natural and playful.


Difficulty: Easy. Supplies: acrylic paint. Time: 1.5 hours.
Groovy Lettering Spot
Retro yearbook energy, activated. Groovy lettering uses chunky curves so even a short first name fills the whole design. Draw the letters large, round the corners, then add an offset shadow or a second color around them. The lettering can totally carry the space on its own. If an empty corner bugs you, add one tiny flower or star.
Difficulty: Medium. Supplies: bold letters in 2 colors.
Star Border Name Spot
Simple, polished, done. A star border frames a clear name in the middle with just enough detail around the edges to make the space feel finished. A reusable star stencil makes the repeating shapes much easier than drawing every point by hand. Rotate a few stars or change their sizes so the border does not feel stiff. Works in school colors or classic black and white.
Difficulty: Easy. Supplies: star stencil and a mini roller.
Beach Scene Spot
Mini vacation loading. This beach scene keeps the horizon straight and builds everything from broad, forgiving color areas. Paint the sky and sand in big sections, then bring the water across the middle. A few white foam marks are all it takes to define the shoreline. Despite the detailed look, the large color fields make this one surprisingly easy to pull off.
Difficulty: Easy. Supplies: acrylic paint and a flat brush.
School Mascot Spot
Show your school spirit loud and proud. A centered school mascot ties your design straight to your school, and the lot looks extra fun when several seniors pick different school themes. Do not freehand one giant image from memory. Instead, use the grid method: transfer one square at a time, filling the larger color areas before the outlines. It feels slow at first but saves a mountain of corrections later.
Difficulty: Advanced. Supplies: the grid method and team colors.
Daisy Chain Border
Notebook doodles, but make them pavement sized. This daisy chain border brings back the little flowers everyone drew around notebook pages in class. Mark the border first, sketch a loose vine, then place simple daisies along the curves. The flowers do not need to match; a few different sizes make it feel genuinely hand painted. Keep the middle open for a name or short phrase.
Difficulty: Easy. Supplies: pavement paint and sidewalk chalk.
Lightning Bolt Design
Maximum impact, minimum fuss. One oversized lightning bolt fills the space fast, perfect when you want drama without painting tiny details all day. Sketch the main bolt first, then add a glow or a contrasting outline. Darker background colors make the bright center look even stronger. Keep your name small so the lightning keeps all the attention.
Difficulty: Medium. Supplies: 4 colors of paint and a liner brush.
Quote Script Spot
That quote you have saved since freshman year finally gets its moment. Script lettering makes a short phrase feel personal without covering every inch of pavement. Print the wording first, then transfer the outline with graphite paper instead of guessing each letter freehand. Keep the quote short enough to read quickly from a few feet away, and finish with just a tiny underline or flourish.
Difficulty: Easy. Supplies: a printed quote and graphite paper.
Rainbow Arch Spot
Big, cheerful, impossible to miss. The rainbow arch uses wide bands that stay recognizable even when a car covers part of the space. Draw the outer arch first, then work inward so every band follows the same curve. Pick your palette: school colors, soft pastels, or the full rainbow. Budget friendly too, with most versions costing ten to fifty dollars.
Difficulty: Easy. Supplies: 6 or more colors.
Camo Pattern Spot
Cool factor: high. Camo works beautifully as a name background because the shapes can stay loose and organic. Start with the lightest base, then layer irregular patches in two or three darker shades. Leave breathing room between the colors so the pattern does not merge into one giant blob. A bold name over the top keeps everything easy to read.
Difficulty: Easy. Supplies: camo colors and a flat brush.
Heart Cluster Corner
Sweet and simple. A heart cluster works with almost any name or color palette, giving instant scrapbook energy. Use a heart stencil for the cleanest repeat, then overlap a few sizes to build the cluster outward. Mix two nearby colors instead of making every heart identical for extra charm.
Difficulty: Easy. Supplies: a heart stencil and a foam brush.
Movie Poster Style Spot
Save the showstopper for last. The movie poster style is for seniors who believe school events deserve opening credits. Start with one strong central image and a dramatic title, then build the smaller details around those two anchors. Keep your palette limited so the huge design does not turn chaotic. Yes, this one takes more planning than a simple border, but the payoff is a finished space that stops traffic. It is the advanced option that makes the whole senior lot feel like a premiere.
Difficulty: Advanced. Supplies: a poster sketch and acrylic paint.