Why You’ll Love This Orange Creamsicle Mousse
If you want a dessert that feels playful, creamy, and sunshine-bright, Orange Creamsicle Mousse is a great pick. It brings together the classic orange and cream flavor that many people remember from childhood treats, but in a simple no bake dessert that fits busy schedules. This recipe is also a nice match for home cooks who want something sweet without turning on the oven.
- Easy to make: This Orange Creamsicle Mousse takes just 10 minutes to prep, so it works well for weeknights, last-minute guests, and busy parents. You only need one bowl, a mixer, and a few basic ingredients.
- Bright flavor: The mix of orange juice and orange extract gives this mousse that familiar creamsicle taste, with a smooth cream cheese base that makes every bite rich and silky.
- Great for sharing: Because the recipe serves 4, it is a handy dessert for small family meals, date nights, or a sweet finish after dinner with friends.
- Simple to adapt: You can swap in homemade whipped topping, try different fruit flavors, or make small adjustments for your diet and pantry needs.
According to WebMD’s guide to the health benefits of oranges, oranges bring vitamin C and a fresh citrus flavor that works beautifully in desserts like this one. That makes this creamy treat feel a little lighter and brighter without losing its fun, dessert-like charm.
Tip: If you love easy no bake sweets, this mousse fits right in with other simple treats like easy chocolate muffins and cozy make-ahead desserts.
Jump to:
- Why You’ll Love This Orange Creamsicle Mousse
- Essential Ingredients for Orange Creamsicle Mousse
- Main Ingredients
- Special Dietary Options
- How to Prepare the Perfect Orange Creamsicle Mousse: Step-by-Step Guide
- Step 1: Gather and soften your ingredients
- Step 2: Beat the cream cheese until light and fluffy
- Step 3: Add the sugar, orange juice, orange extract, and salt
- Step 4: Fold in the whipped topping gently
- Step 5: Divide into cups and chill
- Step 6: Garnish and serve
- Dietary Substitutions to Customize Your Orange Creamsicle Mousse
- Protein and Main Component Alternatives
- Vegetable, Sauce, and Seasoning Modifications
- Mastering Orange Creamsicle Mousse: Advanced Tips and Variations
- Pro cooking techniques
- Flavor variations
- Presentation tips
- Make-ahead options
- How to Store Orange Creamsicle Mousse: Best Practices
- FAQs: Frequently Asked Questions About Orange Creamsicle Mousse
- Orange Creamsicle Mousse
- Ingredients
- Instructions
- Last Step:
- Notes
- Nutrition
- Did you make this recipe?
Essential Ingredients for Orange Creamsicle Mousse
Here is everything you need for this Orange Creamsicle Mousse recipe. The ingredients are simple, but each one plays an important role in the texture and flavor. For the best results, measure everything before you start.
Main Ingredients
- 12 ounces cream cheese, softened to room temperature – This gives the mousse its rich, creamy base and helps create a smooth texture.
- 1 cup confectioners’ sugar – Adds sweetness and blends easily into the cream cheese without graininess.
- Juice of 1 orange, about 1/4 cup – Brings fresh citrus flavor and gives the mousse its signature creamsicle taste.
- 1 teaspoon orange extract – Deepens the orange flavor and makes the dessert taste extra bright.
- Pinch kosher salt – Balances the sweetness and makes the citrus flavor pop.
- 1 cup whipped topping, plus more for garnish – Lightens the mixture and gives the mousse its fluffy finish.
Special Dietary Options
- Vegan: Use dairy-free cream cheese and a plant-based whipped topping. Keep the orange juice and orange extract the same for flavor.
- Gluten-free: This recipe is naturally gluten-free as written, which makes it an easy dessert choice for many guests.
- Low-calorie: Use a lighter cream cheese, sugar substitute made for baking, and a reduced-sugar whipped topping if preferred.
If you like creamy breakfast or snack ideas with a similar cozy feel, you may also enjoy this quinoa spinach egg bake for another simple recipe to keep in your rotation.
| Ingredient | Purpose in the Recipe | |
|---|---|---|
| Cream cheese | Creates the smooth, thick mousse base | |
| Confectioners’ sugar | Sweetens without leaving a gritty texture | |
| Orange juice | Adds fresh citrus flavor | |
| Orange extract | Boosts the creamsicle taste | |
| Kosher salt | Balances sweetness | |
| Whipped topping | Makes the mousse light and airy |
How to Prepare the Perfect Orange Creamsicle Mousse: Step-by-Step Guide
Step 1: Gather and soften your ingredients
Start by setting out the 12 ounces of cream cheese so it can come to room temperature. This matters because softened cream cheese beats much more smoothly and helps prevent lumps in your Orange Creamsicle Mousse. You should also measure out the confectioners’ sugar, orange juice, orange extract, kosher salt, and whipped topping before you begin. Having everything ready makes the process fast and easy, especially if you are cooking around a busy schedule.
If your cream cheese is still cold, let it sit on the counter for a bit longer. Room temperature cream cheese is one of the most important tips for getting the mousse light and fluffy. Cold cream cheese can leave small bits in the mixture, while softened cream cheese blends into a silky base.
Step 2: Beat the cream cheese until light and fluffy
Place the softened cream cheese in a large bowl and beat it with a hand mixer or stand mixer until it looks smooth, soft, and airy. This first mixing step builds the texture that makes the mousse feel creamy instead of heavy. Take your time here and scrape down the sides of the bowl if needed so everything mixes evenly.
If you are using a homemade whipped topping later, this fluffy base will help support the extra airiness. For a dessert that tastes like a classic creamsicle, a smooth cream cheese base is the key. If you enjoy easy no bake sweets, this technique is also useful in other desserts like a simple sweet monkey bread style treat served for special occasions.
Step 3: Add the sugar, orange juice, orange extract, and salt
Next, add the 1 cup confectioners’ sugar, the juice of 1 orange, about 1/4 cup, the 1 teaspoon orange extract, and the pinch of kosher salt. Beat again until the mixture is fully combined. At this stage, the mousse should smell bright and sweet, with that classic orange cream flavor coming through right away.
If you do not have orange extract, you can substitute 1 tablespoon fresh orange juice for 1/2 teaspoon orange extract. The flavor will be a little softer, but still delicious. This is a nice option for home cooks who want to keep things simple with ingredients they already have on hand.
Step 4: Fold in the whipped topping gently
Add the 1 cup whipped topping and fold it in gently with a spatula. Try not to stir too hard, because you want the mixture to stay light. Folding helps keep air in the mousse, which gives it that fluffy texture people love in a no bake dessert.
If you want to make homemade whipped topping instead, whip 1 cup heavy whipping cream with 1 to 2 tablespoons confectioners’ sugar until stiff peaks form. That homemade version works beautifully in this recipe and can taste extra fresh. It is a handy trick for students, newlyweds, or anyone who wants a simple dessert with a homemade touch.
Step 5: Divide into cups and chill
Spoon the mousse evenly into 4 cups or small dessert dishes. Refrigerate uncovered until thickened, about 1 hour. You can also chill it for up to 24 hours, which makes this a smart make-ahead dessert for parties, holidays, or weeknight dinners.
This chill time is important. It helps the mousse set and gives the flavors time to blend together. If you want the best texture, plan for at least 1 full hour in the fridge. For a softer spoonable dessert, serve it soon after it thickens. For a firmer, more set mousse, let it chill a little longer.
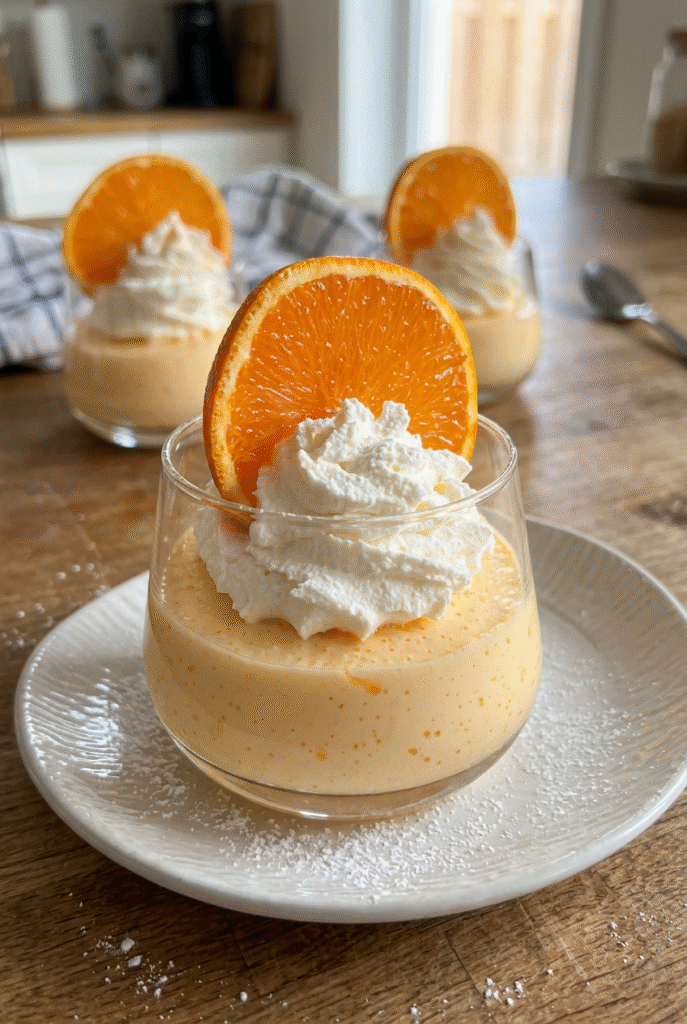
Step 6: Garnish and serve
Before serving, top each cup with a little more whipped topping. You can also add fresh orange slices or a bit of orange zest for a bright, pretty finish. The garnish makes the dessert look special, even though it is very easy to make. That is one reason this Orange Creamsicle Mousse works so well for family dinners and casual entertaining.
Serve it cold and enjoy right away. The flavor is creamy, citrusy, and sweet, with a texture that feels airy and rich at the same time. It is the kind of dessert that makes people smile after the first spoonful.
For a similar easy-to-love dessert idea, readers who enjoy simple sweets may also like the texture and comfort of soft cinnamon bread served with coffee or tea.

Dietary Substitutions to Customize Your Orange Creamsicle Mousse
Protein and Main Component Alternatives
Although this dessert does not rely on a protein like meat or eggs, the main components can still be changed to fit different needs. If you want a lighter version of Orange Creamsicle Mousse, use reduced-fat cream cheese. It will still give you a creamy texture, just with a slightly softer finish. For a dairy-free version, choose a plant-based cream cheese and a non-dairy whipped topping.
If you cannot find orange extract, use extra fresh orange juice as noted above. You can also switch the citrus profile a little by trying lemon or lime in small amounts, though that will change the classic creamsicle flavor. For a richer dessert, keep the full-fat cream cheese and standard whipped topping so the mousse stays thick and silky.
Vegetable, Sauce, and Seasoning Modifications
This recipe does not include vegetables or sauce, but flavor changes are easy. Try pineapple juice for a tropical version, or raspberry juice for a berry-citrus twist. The tip about matching the juice to the topping works well here, so keep the flavor balance in mind. A small amount of lemon zest can also add a sharper citrus note if you like brighter desserts.
For seasoning, the pinch of salt is enough for most people, but you can adjust slightly if you like a stronger sweet-and-salty contrast. If you enjoy making flexible recipes for different eaters, this mousse is a friendly one to keep in your dessert file.
Mastering Orange Creamsicle Mousse: Advanced Tips and Variations
Pro cooking techniques
For the smoothest Orange Creamsicle Mousse, always start with cream cheese at room temperature. Beat it first until it looks light and fluffy before adding the other ingredients. That order matters because it gives you a lump-free base and helps the sugar dissolve more evenly. If your mixer is powerful, use medium speed so the mixture stays creamy instead of getting overworked.
Another helpful tip is to fold the whipped topping in by hand with a spatula. This keeps the mousse airy. If you stir too hard, the texture can become dense. Letting the dessert chill for at least 1 hour also helps it firm up and develop the best spoonable consistency.
Flavor variations
Once you have the base recipe down, you can have fun with flavor changes. Pineapple works well if you want a sunny tropical vibe, while raspberry gives the mousse a pretty pink color and a sweet-tart taste. You can also make a stronger orange version by adding a little extra zest on top. Each variation keeps the same easy no bake style while changing the flavor in a fun way.
Presentation tips
For a lovely finish, serve the mousse in clear cups or small glass jars. This shows off the soft, creamy texture and makes the dessert feel a little more special. Add a swirl of whipped topping right before serving, then finish with orange zest, a thin orange slice, or a small mint leaf. Even a simple garnish can make this dessert look party-ready.
Make-ahead options
This recipe is great for planning ahead. You can make it up to 24 hours before serving, then keep it refrigerated until dessert time. That makes it perfect for holidays, potlucks, travel meals, and busy weeknights. If you are hosting guests, prep the mousse early in the day so you can relax later.
How to Store Orange Creamsicle Mousse: Best Practices
Proper storage keeps Orange Creamsicle Mousse tasting fresh and creamy. Since it is a chilled dessert, refrigeration is the best option for short-term storage. Cover the cups lightly or keep them in an airtight container if you want to hold them longer than a few hours. The mousse is best served cold, and the texture stays nice when it is kept cool.
For refrigeration, store the dessert for up to 24 hours for the best taste and texture. If you make it ahead, wait to add the final whipped topping and garnish until just before serving. That helps the top stay neat and fluffy.
For freezing, the texture may change because cream cheese and whipped topping do not always thaw smoothly. If you do freeze it, use a freezer-safe container and thaw it slowly in the refrigerator. Stir gently before serving, but expect a softer consistency.
Reheating is not recommended. This is a cold dessert, and heat will break the texture. For meal prep, portion the mousse into small jars or cups so it is easy to grab and serve later. That makes it a good choice for planned desserts, especially when you want something sweet without extra work.

FAQs: Frequently Asked Questions About Orange Creamsicle Mousse
Print
Orange Creamsicle Mousse
🍊☁️ Velvety orange creamsicle mousse captures nostalgic popsicle magic—light airy texture, fresh citrus burst.
🍰 10-min no-bake bliss: sets fridge-ready parfaits, whipped topping garnish perfection!
- Total Time: 1 hour 10 minutes
- Yield: 4 servings
Ingredients
– 12 ounces cream cheese, softened to room temperature for smooth, thick mousse base
– 1 cup confectioners’ sugar for sweetening without gritty texture
– Juice of 1 orange, about 1/4 cup for fresh citrus flavor
– 1 teaspoon orange extract for boosting the creamsicle taste
– Pinch kosher salt for balancing sweetness
– 1 cup whipped topping, plus more for garnish for making the mousse light and airy
Instructions
1-Step 1: Gather and soften your ingredients Start by setting out the 12 ounces of cream cheese so it can come to room temperature. This matters because softened cream cheese beats much more smoothly and helps prevent lumps in your Orange Creamsicle Mousse. You should also measure out the confectioners’ sugar, orange juice, orange extract, kosher salt, and whipped topping before you begin. Having everything ready makes the process fast and easy, especially if you are cooking around a busy schedule. If your cream cheese is still cold, let it sit on the counter for a bit longer. Room temperature cream cheese is one of the most important tips for getting the mousse light and fluffy. Cold cream cheese can leave small bits in the mixture, while softened cream cheese blends into a silky base.
2-Step 2: Beat the cream cheese until light and fluffy Place the softened cream cheese in a large bowl and beat it with a hand mixer or stand mixer until it looks smooth, soft, and airy. This first mixing step builds the texture that makes the mousse feel creamy instead of heavy. Take your time here and scrape down the sides of the bowl if needed so everything mixes evenly. If you are using a homemade whipped topping later, this fluffy base will help support the extra airiness. For a dessert that tastes like a classic creamsicle, a smooth cream cheese base is the key. If you enjoy easy no bake sweets, this technique is also useful in other desserts like a simple sweet monkey bread style treat served for special occasions.
3-Step 3: Add the sugar, orange juice, orange extract, and salt Next, add the 1 cup confectioners’ sugar, the juice of 1 orange, about 1/4 cup, the 1 teaspoon orange extract, and the pinch of kosher salt. Beat again until the mixture is fully combined. At this stage, the mousse should smell bright and sweet, with that classic orange cream flavor coming through right away. If you do not have orange extract, you can substitute 1 tablespoon fresh orange juice for 1/2 teaspoon orange extract. The flavor will be a little softer, but still delicious. This is a nice option for home cooks who want to keep things simple with ingredients they already have on hand.
4-Step 4: Fold in the whipped topping gently Add the 1 cup whipped topping and fold it in gently with a spatula. Try not to stir too hard, because you want the mixture to stay light. Folding helps keep air in the mousse, which gives it that fluffy texture people love in a no bake dessert. If you want to make homemade whipped topping instead, whip 1 cup heavy whipping cream with 1 to 2 tablespoons confectioners’ sugar until stiff peaks form. That homemade version works beautifully in this recipe and can taste extra fresh. It is a handy trick for students, newlyweds, or anyone who wants a simple dessert with a homemade touch.
5-Step 5: Divide into cups and chill Spoon the mousse evenly into 4 cups or small dessert dishes. Refrigerate uncovered until thickened, about 1 hour. You can also chill it for up to 24 hours, which makes this a smart make-ahead dessert for parties, holidays, or weeknight dinners. This chill time is important. It helps the mousse set and gives the flavors time to blend together. If you want the best texture, plan for at least 1 full hour in the fridge. For a softer spoonable dessert, serve it soon after it thickens. For a firmer, more set mousse, let it chill a little longer.
6-Step 6: Garnish and serve Before serving, top each cup with a little more whipped topping. You can also add fresh orange slices or a bit of orange zest for a bright, pretty finish. The garnish makes the dessert look special, even though it is very easy to make. That is one reason this Orange Creamsicle Mousse works so well for family dinners and casual entertaining. Serve it cold and enjoy right away. The flavor is creamy, citrusy, and sweet, with a texture that feels airy and rich at the same time. It is the kind of dessert that makes people smile after the first spoonful.
Last Step:
Please leave a rating and comment letting us know how you liked this recipe! This helps our business to thrive and continue providing free, high-quality recipes for you.Notes
🧀 Room-temp cream cheese whips fluffiest—no lumps.
❄️ Chill 1+ hour for perfect mousse texture.
🍊 Homemade whipped cream upgrade: 1 cup heavy cream + 2 tbsp sugar.
- Prep Time: 10 minutes
- Chilling Time: 1 hour
- Cook Time: 0 minutes
- Category: Desserts
- Method: No Bake
- Cuisine: American
- Diet: Vegetarian
Nutrition
- Serving Size: 1 cup
- Calories: 660 kcal
- Sugar: 35g
- Sodium: 350mg
- Fat: 52g
- Saturated Fat: 30g
- Unsaturated Fat: 22g
- Trans Fat: 0g
- Carbohydrates: 45g
- Fiber: 0g
- Protein: 8g
- Cholesterol: 150mg


