Why You’ll Love This No-Bake Summer Berry Trifle
This No-Bake Summer Berry Trifle is the kind of dessert that looks fancy but feels completely doable, even on a busy weeknight. It comes together with simple steps, needs no oven time, and gives you a chilled dessert that feels right for warm weather gatherings, potlucks, and family dinners.
- Easy prep: You only need about 25 minutes of hands-on time, then the fridge does the rest. That makes it a great choice for busy parents, students, and working professionals who want a dessert that does not take over the day.
- Fresh, feel-good ingredients: Strawberries, raspberries, and blueberries bring bright flavor and fiber, while the creamy filling adds a rich, satisfying finish. If you want to read more about the benefits of berries, this guide from Healthline’s berry nutrition overview is a helpful place to start.
- Flexible for different needs: You can swap cream cheese for mascarpone, use pound cake instead of ladyfingers, or make it in smaller glasses for easy portion control. It works well for casual nights or special occasions.
- Beautiful layered flavor: The raspberry jam coats the fruit, the cream mixture adds a light tang, and the ladyfingers soak up the juices just enough to turn soft without losing all their texture.
Best of all, this berry trifle tastes even better after chilling overnight, so it is a smart make-ahead dessert for guests.
If you like simple sweet recipes that still feel special, you may also enjoy these chocolate muffins for an easy baked treat or this soft and cozy monkey bread recipe for a weekend breakfast idea.
| Recipe Snapshot | Details |
|---|---|
| Prep time | 25 minutes |
| Chill time | At least 8 hours |
| Total time | 25 minutes plus chilling |
| Servings | 10 |
| Method | No-bake |
Jump to:
- Why You’ll Love This No-Bake Summer Berry Trifle
- Essential Ingredients for No-Bake Summer Berry Trifle
- Special Dietary Options
- How to Prepare the Perfect No-Bake Summer Berry Trifle: Step-by-Step Guide
- First Step: Prepare the berries
- Second Step: Whip the cream
- Third Step: Make the cream cheese filling
- Fourth Step: Build the base layer
- Fifth Step: Add the berry and cream layers
- Sixth Step: Finish the top and chill
- Dietary Substitutions to Customize Your No-Bake Summer Berry Trifle
- Protein and Main Component Alternatives
- Vegetable, Sauce, and Seasoning Modifications
- Mastering No-Bake Summer Berry Trifle: Advanced Tips and Variations
- Pro cooking techniques
- Flavor variations
- Presentation tips
- Make-ahead options
- How to Store No-Bake Summer Berry Trifle: Best Practices
- FAQs: Frequently Asked Questions About No-Bake Summer Berry Trifle
- No-Bake Summer Berry Trifle
- Ingredients
- Instructions
- Last Step:
- Notes
- Nutrition
- Did you make this recipe?
Essential Ingredients for No-Bake Summer Berry Trifle
Here is the full structured ingredient list for this Summer Berry Trifle Recipe. Every item matters because the fruit, cream, and crisp layers all work together to build the final texture.
- ¾ cup seedless raspberry jam – coats the berries and gives the trifle a glossy, fruity base.
- 1 quart strawberries, hulled and cut into ¼-inch slices – adds sweetness, color, and a soft fresh bite.
- 1 pint raspberries – adds tart flavor and helps balance the sweet cream filling.
- 1 pint blueberries – adds juicy texture and deep color contrast.
- 1 ½ cups cold heavy whipping cream – whips into the fluffy layer that makes the trifle feel light.
- 16 ounces cream cheese, at room temperature – gives the filling body and a smooth, creamy texture.
- 1 ¾ cups confectioners’ sugar – sweetens the cream mixture and helps it stay silky.
- 1 teaspoon vanilla extract – adds warmth and rounds out the flavor.
- 1 7-ounce package crisp ladyfingers – forms the structure of the trifle and soaks up the berry juices.
- Fresh mint sprigs, optional – adds a fresh finish and a nice color contrast on top.
Special Dietary Options
- Vegan: Use dairy-free whipped topping, vegan cream cheese, and vegan ladyfingers if available. The berry and jam layers stay the same.
- Gluten-free: Replace ladyfingers with certified gluten-free sponge cake or gluten-free pound cake.
- Low-calorie: Use reduced-fat cream cheese, a lighter whipped topping, and slightly less confectioners’ sugar. You can also serve smaller portions in individual glasses.
For another breakfast-friendly recipe idea that uses simple ingredients, take a look at this quinoa spinach egg bake or try this hash brown crusted quiche for a savory option.
How to Prepare the Perfect No-Bake Summer Berry Trifle: Step-by-Step Guide
This No-Bake Summer Berry Trifle is simple, but the order matters. If you follow the steps below, your layers will hold together well and the dessert will set up nicely after chilling.
First Step: Prepare the berries
Start by setting aside a few berries for the top of the trifle. This small step helps the finished dessert look fresh and inviting. Place the raspberry jam in a large bowl and microwave it for about 1 minute, just until it becomes hot and liquidy. Stir in the strawberries, raspberries, and blueberries, then toss gently until the fruit is coated in the jam. Let the mixture sit while you work on the cream layers, and stir it every so often so the juices distribute evenly.
Second Step: Whip the cream
In a large bowl, whip the cold heavy cream until stiff peaks form. Stiff peaks mean the cream holds its shape when you lift the whisk. This part gives the trifle a light, airy texture. Once the cream is ready, set it aside so you can work on the cream cheese mixture next.
Third Step: Make the cream cheese filling
In another large bowl, beat the room temperature cream cheese with the confectioners’ sugar until the mixture is smooth and creamy. Room temperature cream cheese blends much more easily, so do not skip that part. Beat in the vanilla extract and about one third of the whipped cream first. Then use a spatula to gently fold in the rest of the whipped cream until everything is fully combined. Folding keeps the filling fluffy instead of dense.
Tip: If you want a smoother trifle with less risk of a runny filling, mix the whipped cream into the cream cheese before adding the sugar.
Fourth Step: Build the base layer
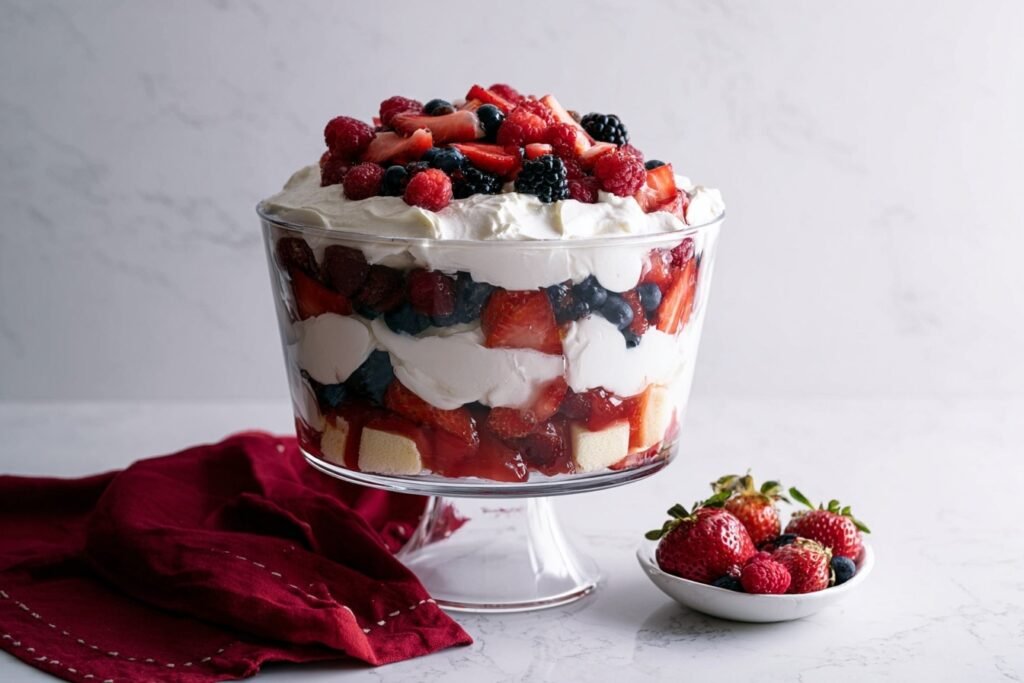
Cover the bottom of a 9-inch trifle dish with a layer of crisp ladyfingers. Break them as needed so they fit snugly. If you do not have a trifle dish, a deep clear glass bowl also works well. The clear sides help show off the layers, which makes this dessert especially pretty for gatherings.
Fifth Step: Add the berry and cream layers
Spoon one third of the berry jam mixture over the ladyfingers, making sure to include some of the juices. Then spread one third of the cream mixture over the berries. Repeat the layering process two more times, ending with the cream mixture on top. Leave about a 1-inch border so a little fruit can show around the edges. That small detail makes the trifle look full and colorful.
Sixth Step: Finish the top and chill
Garnish the top with the reserved berries and fresh mint sprigs if you like a little color and a fresh aroma. Refrigerate the trifle for at least 8 hours, or overnight if possible. This resting time lets the ladyfingers soften and helps the flavors blend together. If you serve it too soon, the layers will taste good, but the texture will not be as balanced.
For more recipe inspiration that works well for brunches and casual entertaining, you might like these Liege waffles or these Moroccan pancakes.

Dietary Substitutions to Customize Your No-Bake Summer Berry Trifle
Protein and Main Component Alternatives
Even though this trifle is dessert and not a protein-heavy dish, there are still a few smart swaps for the main creamy elements. If you prefer a richer flavor, mascarpone can replace the cream cheese. It gives the filling a softer, more delicate taste. If you want a lighter version, use reduced-fat cream cheese and a whipped topping with less fat, though the texture will be a little less rich.
You can also replace the ladyfingers with pound cake if that is what you have on hand. Pound cake makes the dessert a bit denser and sweeter, which some people really enjoy. For a more portion-friendly version, build the trifle in smaller glasses or jars so each serving is easy to control.
Vegetable, Sauce, and Seasoning Modifications
Since this recipe does not use vegetables, the best changes are in the fruit and flavoring. You can swap the berries based on what looks good at the market. Blackberries, sliced peaches, or cherries can join the mix if you want to change the flavor profile. If you like a little extra depth, stir a few tablespoons of Chambord into the jam mixture before layering.
For sweetness, you can slightly reduce the confectioners’ sugar if your berries are very ripe. If you want a more fragrant finish, keep the vanilla extract and add a little lemon zest to the cream mixture. That bright note pairs well with the fruit and keeps the dessert from tasting too heavy.
Mastering No-Bake Summer Berry Trifle: Advanced Tips and Variations
Pro cooking techniques
Use a deep clear glass bowl or trifle dish so the layers show beautifully. This dessert is very forgiving, so do not worry if your layers are not perfect. In fact, a rustic look can make it feel more homemade and inviting. If your berries release extra juice, that is a good thing because it helps the ladyfingers soften and soak up flavor.
To keep the cream stable, make sure the heavy cream is cold before whipping and the cream cheese is softened before mixing. Those small details help the filling come together smoothly. If you are making the dessert for a party, assemble it the day before so it has enough time to chill properly.
Flavor variations
Try swapping in mascarpone for a more luxurious flavor, or add Chambord to the berry layer for a subtle raspberry liqueur note. You can also mix in a little lemon zest or orange zest for a brighter finish. If you want a slightly different texture, use pound cake instead of ladyfingers.
Presentation tips
For a polished look, save your best berries for the top. Place them in a simple pattern and add a few mint sprigs right before serving. For a party, make individual parfaits in small glasses so guests can grab one easily. That works especially well for showers, family dinners, and summer cookouts.
Make-ahead options
This is one of the best desserts to make ahead. Assemble it in the morning or the day before, then chill it until serving time. The texture improves after resting for at least 8 hours, and the flavors blend more fully overnight.
If you are planning for guests, this is a smart dessert because the fridge does most of the work for you.
How to Store No-Bake Summer Berry Trifle: Best Practices
Refrigerate leftover trifle in a covered container or keep it tightly wrapped in the trifle dish for up to 3 days. The berries may release more juice over time, so the texture will get softer, but it will still taste great. For the best look, add mint and any extra fresh berries right before serving.
Freezing is not ideal for this dessert because the cream filling and fresh berries can change texture after thawing. The ladyfingers may also become too soft. If you must freeze it, do so only for a short time and expect the texture to be less smooth.
There is no reheating step for this recipe because it is meant to be served cold. For meal prep, you can make the fruit layer and cream filling separately a day ahead, then assemble the trifle when you are ready. That is a helpful approach if you want to save time before guests arrive.
| Storage Method | Best Practice |
|---|---|
| Refrigeration | Cover and chill for up to 3 days |
| Freezing | Not recommended for best texture |
| Reheating | Not needed, serve cold |
| Meal prep | Prep parts separately, assemble before chilling |

FAQs: Frequently Asked Questions About No-Bake Summer Berry Trifle
Print
No-Bake Summer Berry Trifle
🍓 Indulge in layers of fresh summer berries coated in sweet raspberry jam for a vibrant, antioxidant-rich dessert bursting with flavor!
🥄 Creamy no-bake filling with ladyfingers makes this trifle effortlessly elegant and perfect for summer gatherings or make-ahead treats!
- Total Time: 8 hours 25 minutes
- Yield: 10 servings
Ingredients
– ¾ cup seedless raspberry jam – coats the berries and gives the trifle a glossy, fruity base.
– 1 quart strawberries, hulled and cut into ¼-inch slices – adds sweetness, color, and a soft fresh bite.
– 1 pint raspberries – adds tart flavor and helps balance the sweet cream filling.
– 1 pint blueberries – adds juicy texture and deep color contrast.
– 1 ½ cups cold heavy whipping cream – whips into the fluffy layer that makes the trifle feel light.
– 16 ounces cream cheese, at room temperature – gives the filling body and a smooth, creamy texture.
– 1 ¾ cups confectioners’ sugar – sweetens the cream mixture and helps it stay silky.
– 1 teaspoon vanilla extract – adds warmth and rounds out the flavor.
– 1 7-ounce package crisp ladyfingers – forms the structure of the trifle and soaks up the berry juices.
– Fresh mint sprigs, optional – adds a fresh finish and a nice color contrast on top.
Instructions
1-First Step: Prepare the berries Start by setting aside a few berries for the top of the trifle. This small step helps the finished dessert look fresh and inviting. Place the raspberry jam in a large bowl and microwave it for about 1 minute, just until it becomes hot and liquidy. Stir in the strawberries, raspberries, and blueberries, then toss gently until the fruit is coated in the jam. Let the mixture sit while you work on the cream layers, and stir it every so often so the juices distribute evenly.
2-Second Step: Whip the cream In a large bowl, whip the cold heavy cream until stiff peaks form. Stiff peaks mean the cream holds its shape when you lift the whisk. This part gives the trifle a light, airy texture. Once the cream is ready, set it aside so you can work on the cream cheese mixture next.
3-Third Step: Make the cream cheese filling In another large bowl, beat the room temperature cream cheese with the confectioners’ sugar until the mixture is smooth and creamy. Room temperature cream cheese blends much more easily, so do not skip that part. Beat in the vanilla extract and about one third of the whipped cream first. Then use a spatula to gently fold in the rest of the whipped cream until everything is fully combined. Folding keeps the filling fluffy instead of dense.
4-Fourth Step: Build the base layer Cover the bottom of a 9-inch trifle dish with a layer of crisp ladyfingers. Break them as needed so they fit snugly. If you do not have a trifle dish, a deep clear glass bowl also works well. The clear sides help show off the layers, which makes this dessert especially pretty for gatherings.
5-Fifth Step: Add the berry and cream layers Spoon one third of the berry jam mixture over the ladyfingers, making sure to include some of the juices. Then spread one third of the cream mixture over the berries. Repeat the layering process two more times, ending with the cream mixture on top. Leave about a 1-inch border so a little fruit can show around the edges. That small detail makes the trifle look full and colorful.
6-Sixth Step: Finish the top and chill Garnish the top with the reserved berries and fresh mint sprigs if you like a little color and a fresh aroma. Refrigerate the trifle for at least 8 hours, or overnight if possible. This resting time lets the ladyfingers soften and helps the flavors blend together. If you serve it too soon, the layers will taste good, but the texture will not be as balanced.
Last Step:
Please leave a rating and comment letting us know how you liked this recipe! This helps our business to thrive and continue providing free, high-quality recipes for you.Notes
🥛 Use a deep clear glass trifle dish to beautifully showcase the colorful layers.
⏰ Chill for at least 8 hours to allow flavors to meld and set properly.
🍓 Make individual parfaits in glasses for a fun, portable presentation.
- Prep Time: 25 minutes
- Chill: 8 hours or overnight
- Cook Time: N/A
- Category: Dessert
- Method: No Bake
- Cuisine: American
- Diet: Vegetarian
Nutrition
- Serving Size: 1 serving
- Calories: 554 calories
- Sugar: 41g
- Sodium: 197mg
- Fat: 31g
- Saturated Fat: 18g
- Unsaturated Fat: 13g
- Trans Fat: 0g
- Carbohydrates: 65g
- Fiber: 5g
- Protein: 7g
- Cholesterol: 143mg


