Ingredients
– 1 1/2 cups Blueberries
– 1/4 cup Sugar for berry mixture
– 8 oz Cream cheese, softened
– 1 cup Sugar for base
– 2 cups Cream
– 1 cup Milk
– 1 tsp Vanilla extract
– 1 Tbsp Lemon juice
– 1 tsp Lemon zest
– 2 whole crackers Graham crackers, broken into pieces
Instructions
1-First Step: Make the blueberry sauce Start by adding the 1 1/2 cups blueberries and 1/4 cup sugar to a saucepan. Cook over medium heat for about 7 to 8 minutes, stirring now and then, until the berries burst and the mixture thickens into a sauce. This step builds the fruity swirl that makes Lemon Blueberry Cheesecake Ice Cream so fun to eat. You can use fresh or frozen blueberries here, so this works well year-round. Once the sauce looks thick and glossy, take it off the heat and let it cool. After that, chill it in the fridge. Cold sauce helps the ice cream base freeze faster and keeps the marbling neat later on.
2-Second Step: Beat the cheesecake base In a large bowl, beat the softened 8 oz cream cheese with 1 cup sugar until smooth and fluffy. A hand mixer works well, but a stand mixer is fine too. This is the part that gives the ice cream its cheesecake taste, so make sure there are no lumps left behind. Room-temperature cream cheese blends much easier, so try not to skip that step. If you are cooking with kids or helping a beginner in the kitchen, this is a great moment to show how a few simple ingredients can turn into a dessert that tastes like it took much longer.
3-Third Step: Add the remaining dairy and flavorings Mix in the 2 cups cream, 1 cup milk, 1 tsp vanilla extract, 1 Tbsp lemon juice, and 1 tsp lemon zest. Stir until the base looks smooth and evenly combined. The lemon adds a clean, fresh taste that cuts through the richness of the cream cheese and cream, which is why this Lemon Blueberry Cheesecake Ice Cream tastes so balanced. For the best results, use fresh lemon juice and freshly grated zest. Bottled lemon juice can work in a pinch, but fresh citrus gives the dessert a much brighter flavor. If you are serving guests or making this for a special occasion, that fresh note makes a real difference.
4-Fourth Step: Chill the base well Cover the bowl and chill the ice cream base until it is very cold. This step matters because a cold base churns better and usually gives you a smoother texture. If you are short on time, chill it for at least a few hours, but longer is even better. A well-chilled base is especially helpful for busy cooks who may need to make the sauce in the morning and finish the ice cream later. You can even prepare the sauce the day before, then mix and churn the base when you are ready.
5-Fifth Step: Churn the mixture Pour the chilled base into your ice cream maker and churn it according to the manufacturer instructions. Most machines take about 20 to 30 minutes, but the timing can vary. You are looking for a soft-serve texture that is thick enough to layer but still easy to swirl. If you do not have an ice cream maker, whip the cream first for better consistency, then fold it into the cream cheese mixture. The texture will be a little different, but it can still turn out creamy and satisfying. This makes the recipe more flexible for students, newlyweds, or anyone setting up a simple kitchen.
6-Sixth Step: Save part of the blueberry sauce Before layering, reserve 1/2 cup of the blueberry sauce for topping. This gives you a pretty finish and makes each bowl look extra inviting. The reserved sauce also brings a fresh burst of berry flavor right on top, which is especially nice if the ice cream has been in the freezer for a while. The remaining blueberry sauce will go into the ice cream layers. Keeping some aside gives you a better balance of sauce inside and on top, so every serving tastes complete.
7-Seventh Step: Layer with graham cracker pieces Spoon the churned ice cream base into a freezer container, then layer in the remaining blueberry sauce and the 2 whole graham crackers, broken into pieces. Swirl gently if you want a marbled look, but do not overmix. A little separation between the creamy base, berry sauce, and cracker bits gives the best texture. This is where the dessert really starts to look like cheesecake in frozen form. The graham crackers add that crust-like crunch, which makes the whole thing feel more special and a little nostalgic too.
8-Eighth Step: Freeze until firm Cover the container and freeze the ice cream for 2 to 3 hours, or until firm enough to scoop. If your freezer runs cold, it may set a little faster. If it is still soft after that time, give it a bit longer. For the smoothest scooping, let the container sit at room temperature for a few minutes before serving. That small wait makes a big difference, especially if you want clean scoops for guests or for dessert plates.
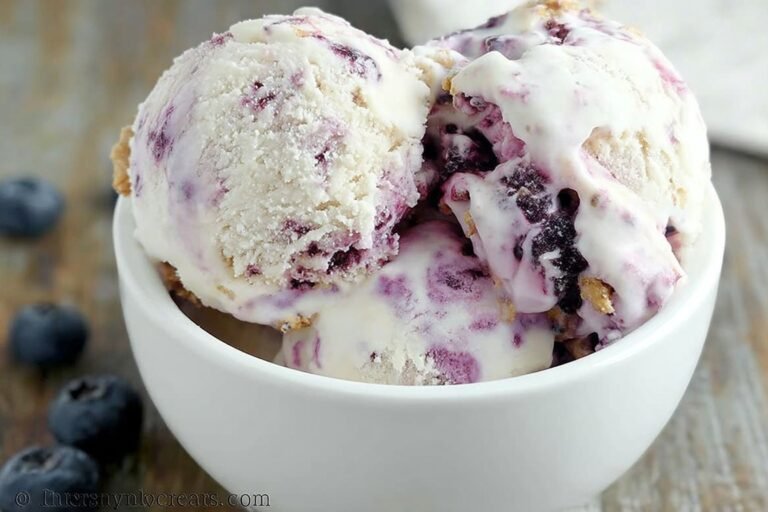
9-Ninth Step: Serve with the reserved sauce Scoop the Lemon Blueberry Cheesecake Ice Cream into bowls or cones and top with the reserved blueberry sauce. You can also add a few extra graham cracker crumbs if you want more crunch. The finished dessert should taste creamy, fruity, tangy, and just sweet enough.
Last Step:
Please leave a rating and comment letting us know how you liked this recipe! This helps our business to thrive and continue providing free, high-quality recipes for you.Notes
🫐 Fresh or frozen blueberries work perfectly for the sauce.
🧀 Full-fat cream cheese and heavy cream yield richest texture.
❄️ Chill base and sauce thoroughly before churning for best results.
- Prep Time: 20 minutes
- Chill, Churn & Freeze: 6 hours
- Cook Time: N/A
- Category: Dessert
- Method: Ice Cream Maker
- Cuisine: American
- Diet: Vegetarian
Nutrition
- Serving Size: 3/4 cup
- Calories: 459 calories
- Sugar: 38g
- Sodium: 119mg
- Fat: 32g
- Saturated Fat: 20g
- Unsaturated Fat: 9g
- Trans Fat: 0g
- Carbohydrates: 40g
- Fiber: 1g
- Protein: 5g
- Cholesterol: 100mg