Why You’ll Love Bakery Style Chocolate Chip Cookies
If you are craving Bakery Style Chocolate Chip Cookies that are thick, chewy, and packed with chocolate in every bite, this recipe is a great one to keep close. It comes together fast, bakes in about 15 minutes, and gives you that classic bakery look without needing fancy tools or hard-to-find ingredients.
- Easy to make: The steps are simple, the prep time is just 15 minutes, and the dough comes together in one bowl plus a mixer. That makes it a smart choice for busy parents, students, and working professionals.
- Great texture: Chilling the dough helps the cookies bake up thick with soft centers and lightly crisp edges. This is one of the best ways to get that bakery style cookie feel at home.
- Flexible for different needs: You can swap in oat flour for a gluten-free version or use plain unsweetened yogurt instead of eggs for an egg-free batch.
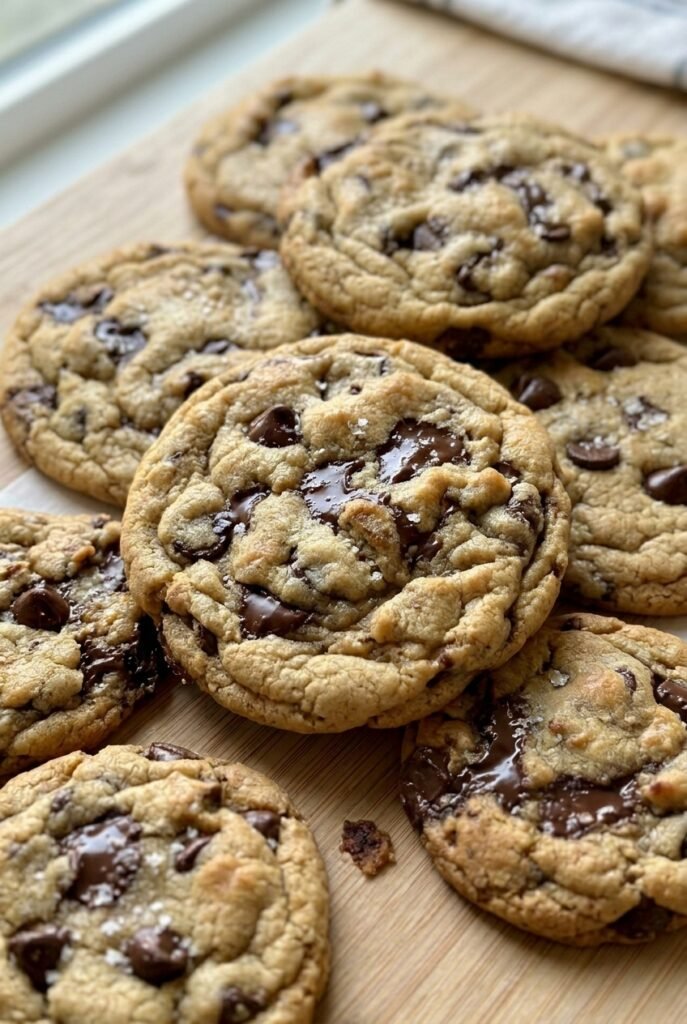
- Big chocolate flavor: With 2 cups of semisweet chocolate chips, every cookie tastes rich, sweet, and satisfying.
These cookies are the kind you can bake on a quiet weekend, share with neighbors, or tuck into lunchboxes for a sweet surprise.
If you enjoy cozy baked treats, you may also like these chocolate muffins or this soft and sweet monkey bread recipe from the blog.
Jump to:
- Why You’ll Love Bakery Style Chocolate Chip Cookies
- Essential Ingredients for Bakery Style Chocolate Chip Cookies
- Main ingredients
- Special dietary options
- How to Prepare the Perfect Bakery Style Chocolate Chip Cookies: Step-by-Step Guide
- First step: get your pans and oven ready
- Second step: mix the dry ingredients
- Third step: cream the butter and sugars
- Fourth step: add the eggs and vanilla
- Fifth step: add the dry mixture
- Sixth step: stir in the chocolate chips
- Seventh step: portion the dough
- Eighth step: bake until golden
- Ninth step: cool before moving
- Quick timing guide
- Dietary Substitutions to Customize Your Bakery Style Chocolate Chip Cookies
- Protein and main component alternatives
- Vegetable, sauce, and seasoning modifications
- Mastering Bakery Style Chocolate Chip Cookies: Advanced Tips and Variations
- Pro cooking techniques
- Flavor variations
- Presentation tips
- Make-ahead options
- How to Store Bakery Style Chocolate Chip Cookies: Best Practices
- Refrigeration
- Freezing
- Reheating
- Meal prep considerations
- FAQs: Frequently Asked Questions About Bakery Style Chocolate Chip Cookies
- Why are my chocolate chip cookies flat?
- Why are my chocolate chip cookies puffy and dry?
- Can I double the bakery style chocolate chip cookie recipe?
- How do I make my chocolate chip cookies perfectly round?
- Can I make bakery style chocolate chip cookies gluten-free?
- Bakery Style Chocolate Chip Cookies
- Ingredients
- Instructions
- Last Step:
- Notes
- Nutrition
- Did you make this recipe?
Essential Ingredients for Bakery Style Chocolate Chip Cookies
Before you begin, gather every ingredient so the baking process feels smooth and relaxed. Measuring correctly matters a lot in this cookie recipe, especially for flour and sugar.
Main ingredients
- 3 cups all-purpose flour – Gives the cookies structure and helps them stay thick.
- 1 teaspoon baking soda – Helps the cookies rise and spread in a balanced way.
- 1 teaspoon fine sea salt – Brings out the flavor and blends evenly through the dough.
- 2 sticks unsalted butter at cool room temperature – Adds richness and creates a soft, bakery-style texture.
- 1/2 cup granulated sugar – Helps with spread and gives a light sweetness.
- 1 1/4 cups lightly packed light brown sugar – Adds moisture, chewiness, and a deeper caramel-like flavor.
- 2 teaspoons vanilla – Brings warm flavor and makes the cookies taste homemade.
- 2 large eggs at room temperature – Bind the dough and help create a soft center.
- 2 cups semisweet chocolate chips – Give each bite plenty of chocolate flavor.
Special dietary options
- Vegan: Use a plant-based butter and replace each egg with a vegan egg substitute that works well in baking.
- Gluten-free: Swap the all-purpose flour with oat flour at a 1:1 ratio for a more gluten-friendly version.
- Low-calorie: Reduce portion size slightly and use fewer chocolate chips per cookie while keeping the base dough the same.
| Ingredient | Why it matters | Helpful note |
|---|---|---|
| Flour | Builds structure | Measure with a digital kitchen scale for accuracy |
| Butter | Adds flavor and softness | Keep it around 67°F so cookies do not spread too much |
| Brown sugar | Adds chewiness | Do not cut back or the cookies may turn dry |
| Chocolate chips | Bring rich chocolate flavor | Semisweet chips balance the sweetness well |
How to Prepare the Perfect Bakery Style Chocolate Chip Cookies: Step-by-Step Guide
First step: get your pans and oven ready
Start by preheating the oven to 350 degrees Fahrenheit. Then line your baking sheets with parchment paper so the cookies release easily after baking. This small step also makes cleanup much easier, which is always a win on a busy day.
At this stage, make sure your butter is at cool room temperature, around 67 degrees Fahrenheit. It should be soft enough to press lightly, but not greasy or melted. That texture helps the cookies keep their shape and bake up thick instead of flat.
Second step: mix the dry ingredients
In a medium bowl, combine the 3 cups of all-purpose flour, 1 teaspoon of baking soda, and 1 teaspoon of fine sea salt. Whisk them together so the leavening and salt are spread through the flour evenly. This helps the cookies bake with a better rise and more even flavor.
If you are using a scale, weigh the flour for the best results. A digital kitchen scale gives you more consistent dough and helps prevent dry cookies from too much flour.
Third step: cream the butter and sugars
In an electric mixer, beat the 2 sticks of unsalted butter, 1/2 cup granulated sugar, and 1 1/4 cups lightly packed light brown sugar until creamy, about 2 minutes. The mixture should look lighter in color and feel fluffy. This step adds air to the dough, which helps create that bakery style cookie texture.
Scrape down the bowl so everything mixes evenly. If you skip this part, some butter or sugar can stay stuck to the sides and leave the dough uneven.
Fourth step: add the eggs and vanilla
Add 2 teaspoons of vanilla and the 2 large eggs at room temperature. Beat until everything is fully combined. The dough may look a little loose at first, but it will come together once the flour goes in.
Room temperature eggs mix in more smoothly, which gives the cookies a better texture. If your eggs are cold, you can place them in warm water for a few minutes before using them.
Fifth step: add the dry mixture
Gradually beat in the flour mixture. Add it in a few parts instead of all at once so the mixer can handle it more easily. Once the flour disappears into the dough, stop mixing right away.
Try not to overmix at this stage. Overworking the dough can make the cookies tough instead of soft and chewy.
Sixth step: stir in the chocolate chips
Fold in 2 cups of semisweet chocolate chips. You can do this with the mixer on low or by hand with a spatula if the dough feels thick. Make sure the chips are spread through the dough so each cookie has plenty of chocolate.
For a more bakery-style look, save a handful of chips to press into the tops of the dough balls before baking. That gives each cookie a pretty finish.
Seventh step: portion the dough
Divide the dough into 3-tablespoon sized balls and drop them onto the prepared baking sheets. Leave enough room between each scoop so the cookies can spread while baking. The large size is part of what gives these cookies their bakery style look.
If you want the best flavor and texture, refrigerate the dough scoops for at least 24 hours if possible. You can chill them for 24 to 72 hours for even better results. The longer rest helps the dough develop a richer flavor and keeps the cookies thick in the oven.
Eighth step: bake until golden
Bake the cookies for 11 to 13 minutes, or until they turn golden brown around the edges. The centers may still look a little soft, and that is exactly what you want. They will finish setting as they cool on the pan.
Ovens can vary, so check the cookies near the end of the baking time. If you like a slightly firmer cookie, give them the full 13 minutes. If you want extra soft centers, pull them out when the edges are golden and the centers look just set.
Ninth step: cool before moving
Let the cookies cool for 5 minutes on the baking sheet before removing them to wire racks. This short wait helps them firm up enough to move without breaking. After that, transfer them carefully so air can circulate underneath and finish the cooling process.
If you want perfectly round cookies, use a cookie cutter or a round glass to gently shape the edges right after baking. A light swirl around the cookie can tidy the sides without flattening them.
Quick timing guide
- Prep time: 15 minutes
- Cook time: 15 minutes
- Total time: 30 minutes

Dietary Substitutions to Customize Your Bakery Style Chocolate Chip Cookies
Protein and main component alternatives
If you need an egg-free version, replace each egg with 50 grams of plain unsweetened yogurt. This works well for a softer cookie and keeps the dough moist. It is a simple swap for anyone who wants a more flexible cookie recipe without losing that homemade feel.
For a gluten-free version, use oat flour at a 1:1 ratio in place of all-purpose flour. Oat flour creates a gentle nutty taste and a softer bite. It is a good choice for readers who need a gluten-free cookie recipe but still want thick chocolate chip cookies.
Vegetable, sauce, and seasoning modifications
This cookie recipe does not call for vegetables or sauce, but you can still adjust flavor and texture in small ways. Fine sea salt is the best salt for this dough because it disperses evenly and gives balanced flavor in every bite. If you like a little extra depth, keep the brown sugar amount exactly as written, since it adds moisture and chew.
Do not reduce the sugar too much, because it affects both spread and softness. If you want a slightly richer cookie, press a few extra chocolate chips on top before baking. For a fun change, use a mix of semisweet chips and chopped chocolate, but keep the total amount close to 2 cups so the dough stays balanced.
Mastering Bakery Style Chocolate Chip Cookies: Advanced Tips and Variations
Pro cooking techniques
For the best homemade bakery style chocolate chip cookies, pay attention to temperature and mixing. Cool butter is a big deal here. If it is too warm, the dough spreads fast and the cookies can go flat. A digital kitchen scale also helps a lot because too much flour can make the cookies dry and puffy instead of chewy.
Chilling the dough for 24 to 72 hours is one of the best tricks for flavor. It gives the flour time to hydrate and makes the cookies taste deeper and richer. It also helps the dough bake thicker, which is exactly what you want for chewy bakery style cookies.
Flavor variations
You can keep the classic flavor or add small changes for a personal touch. Try swapping in dark chocolate chips for a less sweet cookie, or mix in a handful of chopped walnuts if your family likes a little crunch. A tiny sprinkle of flaky salt on top after baking can also make the chocolate taste pop.
If you want a slightly softer result, bake the cookies just until the edges are golden and the centers still look pale. That is the sweet spot for a thick chocolate chip cookies recipe.
Presentation tips
For a bakery case look, save a few chocolate chips to place on top of each dough ball before baking. After the cookies come out of the oven, use a cookie cutter to round the edges while they are still warm. This makes them look neat and uniform for gifting or serving on a platter.
Make-ahead options
You can refrigerate the scooped dough for up to 72 hours, which is perfect if you want fresh cookies later in the week. You can also freeze dough balls for up to 2 months. Bake them from frozen at 325 degrees Fahrenheit for 13 to 15 minutes. That makes these easy bakery style chocolate chip cookies a great choice for meal prep, school snacks, and last-minute desserts.
If you enjoy make-ahead bakes, you may also like this cinnamon bread recipe for cozy mornings.
How to Store Bakery Style Chocolate Chip Cookies: Best Practices
Refrigeration
Store baked cookies in an airtight container at room temperature for the best soft texture over the first few days. If you want to keep the dough ready to bake, refrigerate the scooped dough for up to 72 hours. That makes it easy to bake a few fresh cookies whenever you want them.
Freezing
Freeze dough balls for up to 2 months in a sealed container or freezer bag. Bake from frozen at 325 degrees Fahrenheit for 13 to 15 minutes. This is a smart option for busy weeks or when you want fresh cookies without making a full batch.
Reheating
To bring back that warm bakery feel, heat a baked cookie in the microwave for 8 to 10 seconds. You can also warm a few cookies in a low oven for a couple of minutes. If you want them to stay soft in storage, place a piece of bread in the container with the cookies.
Meal prep considerations
These cookies are a great batch-baking recipe for school lunches, office snacks, and weekend treats. Because the dough freezes well, you can portion it ahead of time and bake only what you need. That helps reduce waste and keeps fresh cookies close by whenever a craving hits.

FAQs: Frequently Asked Questions About Bakery Style Chocolate Chip Cookies
Why are my chocolate chip cookies flat?
Why are my chocolate chip cookies puffy and dry?
Can I double the bakery style chocolate chip cookie recipe?
How do I make my chocolate chip cookies perfectly round?
Can I make bakery style chocolate chip cookies gluten-free?

Bakery Style Chocolate Chip Cookies
🍪 Giant bakery-style chocolate chip cookies boast crisp edges, gooey centers—superior chewy texture rivals pro bakeries.
🥄 24-hour chill unlocks deep flavor: easy home hack for irresistible, crowd-wowing treats!
- Total Time: 24 hours 30 minutes
- Yield: 24 cookies
Ingredients
– 3 cups all-purpose flour
– 1 teaspoon baking soda
– 1 teaspoon fine sea salt
– 2 sticks unsalted butter at cool room temperature
– 1/2 cup granulated sugar
– 1 1/4 cups lightly packed light brown sugar
– 2 teaspoons vanilla
– 2 large eggs at room temperature
– 2 cups semisweet chocolate chips
Instructions
1-First step: get your pans and oven ready Start by preheating the oven to 350 degrees Fahrenheit. Then line your baking sheets with parchment paper so the cookies release easily after baking. This small step also makes cleanup much easier, which is always a win on a busy day. At this stage, make sure your butter is at cool room temperature, around 67 degrees Fahrenheit. It should be soft enough to press lightly, but not greasy or melted. That texture helps the cookies keep their shape and bake up thick instead of flat.
2-Second step: mix the dry ingredients In a medium bowl, combine the 3 cups of all-purpose flour, 1 teaspoon of baking soda, and 1 teaspoon of fine sea salt. Whisk them together so the leavening and salt are spread through the flour evenly. This helps the cookies bake with a better rise and more even flavor. If you are using a scale, weigh the flour for the best results. A digital kitchen scale gives you more consistent dough and helps prevent dry cookies from too much flour.
3-Third step: cream the butter and sugars In an electric mixer, beat the 2 sticks of unsalted butter, 1/2 cup granulated sugar, and 1 1/4 cups lightly packed light brown sugar until creamy, about 2 minutes. The mixture should look lighter in color and feel fluffy. This step adds air to the dough, which helps create that bakery style cookie texture. Scrape down the bowl so everything mixes evenly. If you skip this part, some butter or sugar can stay stuck to the sides and leave the dough uneven.
4-Fourth step: add the eggs and vanilla Add 2 teaspoons of vanilla and the 2 large eggs at room temperature. Beat until everything is fully combined. The dough may look a little loose at first, but it will come together once the flour goes in. Room temperature eggs mix in more smoothly, which gives the cookies a better texture. If your eggs are cold, you can place them in warm water for a few minutes before using them.
5-Fifth step: add the dry mixture Gradually beat in the flour mixture. Add it in a few parts instead of all at once so the mixer can handle it more easily. Once the flour disappears into the dough, stop mixing right away. Try not to overmix at this stage. Overworking the dough can make the cookies tough instead of soft and chewy.
6-Sixth step: stir in the chocolate chips Fold in 2 cups of semisweet chocolate chips. You can do this with the mixer on low or by hand with a spatula if the dough feels thick. Make sure the chips are spread through the dough so each cookie has plenty of chocolate. For a more bakery-style look, save a handful of chips to press into the tops of the dough balls before baking. That gives each cookie a pretty finish.
7-Seventh step: portion the dough Divide the dough into 3-tablespoon sized balls and drop them onto the prepared baking sheets. Leave enough room between each scoop so the cookies can spread while baking. The large size is part of what gives these cookies their bakery style look. If you want the best flavor and texture, refrigerate the dough scoops for at least 24 hours if possible. You can chill them for 24 to 72 hours for even better results. The longer rest helps the dough develop a richer flavor and keeps the cookies thick in the oven.
8-Eighth step: bake until golden Bake the cookies for 11 to 13 minutes, or until they turn golden brown around the edges. The centers may still look a little soft, and that is exactly what you want. They will finish setting as they cool on the pan. Ovens can vary, so check the cookies near the end of the baking time. If you like a slightly firmer cookie, give them the full 13 minutes. If you want extra soft centers, pull them out when the edges are golden and the centers look just set.
9-Ninth step: cool before moving Let the cookies cool for 5 minutes on the baking sheet before removing them to wire racks. This short wait helps them firm up enough to move without breaking. After that, transfer them carefully so air can circulate underneath and finish the cooling process. If you want perfectly round cookies, use a cookie cutter or a round glass to gently shape the edges right after baking. A light swirl around the cookie can tidy the sides without flattening them.
Last Step:
Please leave a rating and comment letting us know how you liked this recipe! This helps our business to thrive and continue providing free, high-quality recipes for you.Notes
⚖️ Weigh flour (375g) with digital scale for consistent chewy results.
🧈 Cool butter (67°F) prevents greasy, flat cookies.
❄️ Chill dough 24-72 hours—flavor and texture transform magically.
- Prep Time: 15 minutes
- Chilling Time: 24 hours
- Cook Time: 15 minutes
- Category: Desserts
- Method: Bake
- Cuisine: American
- Diet: Vegetarian
Nutrition
- Serving Size: 1 cookie
- Calories: 300 kcal
- Sugar: 22g
- Sodium: 200mg
- Fat: 16g
- Saturated Fat: 9g
- Unsaturated Fat: 7g
- Trans Fat: 0g
- Carbohydrates: 36g
- Fiber: 1g
- Protein: 3g
- Cholesterol: 35mg


