Why You’ll Love This Baked Alaska
If you have ever wanted a dessert that looks fancy but still feels fun to make at home, this Baked Alaska recipe is a great pick. With a fudgy brownie base, cold ice cream, and a fluffy meringue topping, it gives you that wow factor without requiring bakery-level skills. It is the kind of treat that makes people pause after the first bite, then ask how you pulled it off.
- Easy to prepare: This Brownie Baked Alaska Recipe uses simple steps and familiar ingredients. You bake the brownie base, shape the ice cream, whip the meringue, then brown the top quickly for a showy finish.
- Great for sharing: Since this Baked Alaska serves a group well, it works for birthdays, family dinners, potlucks, and holiday tables. It feels special, but you do not need a long list of hard-to-find items.
- Flexible for different eaters: You can swap flavors of ice cream, adjust the brownie base, or use gluten-free cake options if needed. That makes this dessert a smart choice for mixed groups.
- Bold flavor contrast: The best part of Baked Alaska is the mix of textures and temperatures. Cold ice cream, rich brownie, and toasted meringue create a dessert that tastes as exciting as it looks.
For readers who enjoy easy dessert wins, this recipe is a fun place to start. If you like simple sweets with a big payoff, you may also enjoy more reader-friendly dessert ideas on Recipes Valentina.
Tip: The magic of Baked Alaska is the quick browning step. The dessert looks dramatic, but the process is easier than many first-time bakers expect.
Jump to:
- Why You’ll Love This Baked Alaska
- Essential Ingredients for Baked Alaska
- Main Ingredients
- Special Dietary Options
- How to Prepare the Perfect Baked Alaska: Step-by-Step Guide
- First Step: Bake and cool the brownie base
- Second Step: Shape the ice cream layer
- Third Step: Make the meringue
- Fourth Step: Assemble the dessert
- Fifth Step: Brown the meringue
- Final Step: Serve right away
- Dietary Substitutions to Customize Your Baked Alaska
- Protein and Main Component Alternatives
- Vegetable, Sauce, and Seasoning Modifications
- Mastering Baked Alaska: Advanced Tips and Variations
- Pro cooking techniques
- Flavor variations
- Presentation tips
- Make-ahead options
- How to Store Baked Alaska: Best Practices
- Refrigeration
- Freezing
- Reheating
- Meal prep considerations
- FAQs: Frequently Asked Questions About Baked Alaska
- What is Baked Alaska?
- How do you make Baked Alaska at home?
- Why doesn’t the ice cream melt in Baked Alaska?
- Can you make Baked Alaska without a torch?
- What are common mistakes when making Baked Alaska?
- Baked Alaska
- Ingredients
- Instructions
- Last Step:
- Notes
- Nutrition
- Did you make this recipe?
Essential Ingredients for Baked Alaska
To make this Brownie Baked Alaska Recipe, gather everything first so assembly moves smoothly. The ingredient list is short, but each item plays an important role in the final texture and taste.
Main Ingredients
- Two 1.5 quarts of any flavor ice cream: This is the cold center of your Baked Alaska. Choose classic vanilla, chocolate, strawberry, or a flavor you love most.
- Enough brownie batter for a 9-inch pan: The brownie base gives the dessert structure and a rich chocolate layer that pairs well with the ice cream and meringue.
- 4 large egg whites at room temperature: These whip into the fluffy meringue that protects the ice cream while adding a light, toasted finish.
- 1 cup granulated sugar: Sugar sweetens the meringue and helps create a glossy, stable texture.
- 1/2 teaspoon cream of tartar: This helps the egg whites hold their shape and whip into firm peaks.
- 1/2 teaspoon pure vanilla extract: Vanilla adds a warm, sweet flavor to the meringue and rounds out the dessert.
Special Dietary Options
- Vegan: Use dairy-free ice cream, a vegan brownie batter, and aquafaba instead of egg whites for the topping.
- Gluten-free: Choose a gluten-free brownie base or flour blend so the dessert works for gluten-sensitive guests.
- Low-calorie: Use light ice cream, a smaller brownie portion, and reduce the sugar slightly in the meringue if desired.
If you enjoy building desserts with balanced texture and flavor, you might also like our guide to easy brownie desserts for busy home bakers.
| Ingredient | Purpose | Helpful Tip |
|---|---|---|
| Ice cream | Creates the cold center | Use a flavor that pairs well with chocolate |
| Brownie batter | Forms the base | Cool completely before assembling |
| Egg whites | Make the meringue | Start at room temperature for better volume |
| Sugar | Sweetens and stabilizes | Add slowly while whipping |
| Cream of tartar | Supports meringue structure | Do not skip it if you want firmer peaks |
| Vanilla extract | Adds flavor | Use pure vanilla for the best taste |
How to Prepare the Perfect Baked Alaska: Step-by-Step Guide
This is the part where the dessert starts to feel exciting. The process is simple if you plan ahead, keep everything cold, and move with purpose. A Brownie Baked Alaska Recipe works best when the brownie is fully cool and the ice cream stays firm from the first step to the last.
First Step: Bake and cool the brownie base
Start by preparing enough brownie batter for a 9-inch pan. Bake it according to your recipe or box directions, then let it cool completely. This matters because warm brownie can melt the ice cream too fast during assembly.
Once cooled, place the brownie on a serving plate or baking sheet lined with parchment. If you want extra stability, trim the brownie into a neat round or square shape that matches your final presentation. A sturdy base helps the Baked Alaska hold together.
Second Step: Shape the ice cream layer
Take your two 1.5 quarts of any flavor ice cream and let them soften just enough to scoop, not melt. Line a bowl or loaf pan with plastic wrap, then pack the ice cream into the shape you want. Press it firmly so there are no air pockets. Freeze it until solid again, at least 4 hours or overnight for the best results.
If you are making this dessert for a group, this is also the moment to think about flavor pairing. Vanilla ice cream gives a classic taste, while chocolate or strawberry adds a playful twist. Choose what matches the mood of your table.
Third Step: Make the meringue
In a clean mixing bowl, beat the 4 large egg whites at room temperature until foamy. Add 1/2 teaspoon cream of tartar and continue whisking until soft peaks form. Slowly pour in 1 cup granulated sugar, a little at a time, while beating on medium-high speed.
When the mixture turns glossy and holds stiff peaks, blend in 1/2 teaspoon pure vanilla extract. The meringue should look thick, shiny, and able to hold its shape. If it looks grainy, keep beating a little longer until the sugar dissolves fully.
Good meringue should be glossy and firm. If it slumps, it may need a few more minutes of whipping or a little more time for the sugar to dissolve.
Fourth Step: Assemble the dessert
Remove the ice cream from the freezer and place it on top of the brownie base. Work quickly here, but do not rush so much that the shape gets messy. Use a spatula or piping bag to cover the ice cream completely with meringue.
The key is to seal every edge. The meringue should touch the brownie all around so the ice cream stays insulated. Pile it high for a dramatic look, then use the back of a spoon to make soft swirls or peaks.
If you are making the dessert for different dietary needs, this is a good time to double-check that your brownie base and ice cream choice match your guests’ needs. A gluten-free or dairy-free version can still look just as beautiful.
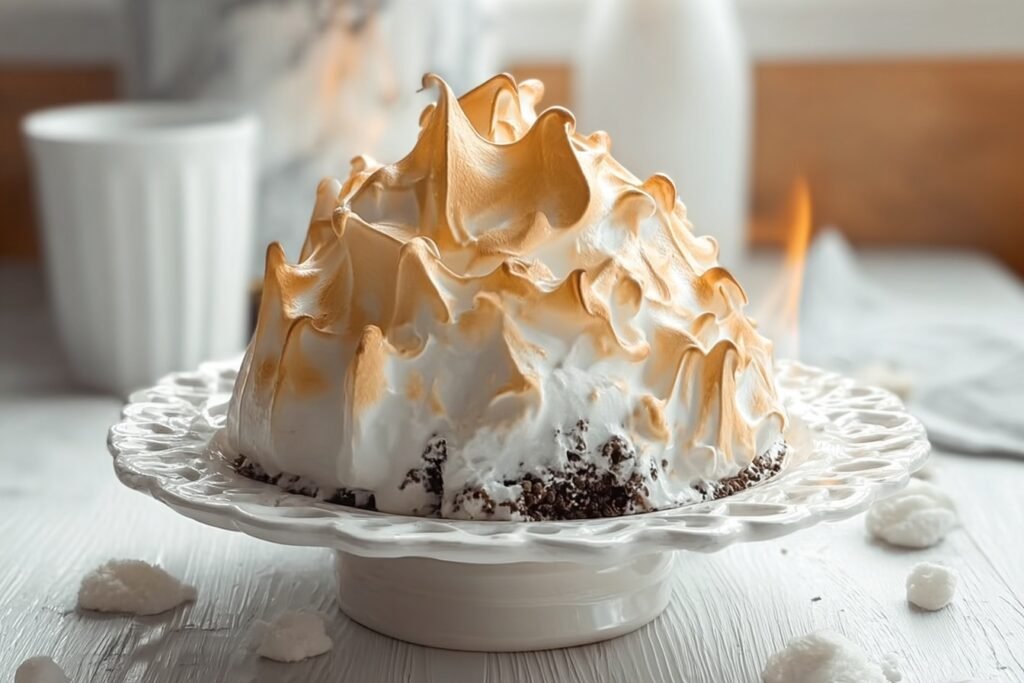
Fifth Step: Brown the meringue
Preheat your broiler or heat your kitchen torch. If using a broiler, place the assembled Baked Alaska on a foil-lined tray and set it 3 to 5 inches from the heat source. Watch it closely. The meringue browns fast, usually in 2 to 4 minutes.
If you use a torch, move it in small circles so the browning stays even. You want a golden finish, not burnt spots. Some parts may color faster than others, so keep the torch moving.
Final Step: Serve right away
Once the top is toasted, bring the dessert to the table immediately. Slice with a sharp knife dipped in warm water for cleaner cuts. Serve each slice while the meringue is still warm and the ice cream is still cold.
The contrast is what makes Baked Alaska so memorable. That first bite gives you rich brownie, cool ice cream, and soft toasted meringue all at once. It is simple, fun, and always a little dramatic in the best way.

Dietary Substitutions to Customize Your Baked Alaska
Protein and Main Component Alternatives
If you want to make this dessert fit different diets, there are plenty of easy swaps. For the ice cream, choose dairy-free coconut, oat, or almond-based versions. For the brownie base, use a vegan brownie mix or a homemade recipe with plant-based butter and egg replacement.
Instead of egg whites, some bakers use aquafaba, which is the liquid from canned chickpeas. It whips up into a light foam that can stand in for meringue in many desserts. This option works well for vegan versions of Baked Alaska, though it may brown a little differently.
If gluten is a concern, use a certified gluten-free brownie mix or a flour blend made for baking. That way, you still get the rich chocolate base without changing the spirit of the recipe.
Vegetable, Sauce, and Seasoning Modifications
While Baked Alaska does not usually include vegetables, you can still change the flavor profile with simple additions. Try cinnamon in the brownie batter, espresso powder for a deeper chocolate note, or orange zest for a brighter finish. These small changes can make the dessert feel new without adding much work.
For sauce ideas, a drizzle of raspberry sauce, chocolate syrup, or caramel can add color and flavor when serving. If you want a lighter finish, keep the toppings simple and let the toasted meringue shine on its own. The Brownie Baked Alaska Recipe is flexible enough for quiet weeknight desserts or special occasions.
Mastering Baked Alaska: Advanced Tips and Variations
Pro cooking techniques
For the best Baked Alaska results, keep your tools cold and your timing tight. Chill the brownie base before adding ice cream, and freeze the shaped ice cream long enough that it feels solid all the way through. If you want cleaner edges, line your mold with plastic wrap and press the ice cream firmly into place.
Another helpful trick is to freeze the assembled dessert for 20 to 30 minutes before browning. That extra chill gives you more time under the broiler or torch. It also helps the meringue stay set while the top gets golden.
Flavor variations
You can change the dessert by switching ice cream flavors. Mint chocolate chip gives a fresh taste, strawberry feels bright and fruity, and coffee ice cream works nicely with chocolate brownie. You can also add mini chocolate chips, chopped nuts, or a thin layer of jam between the brownie and ice cream for more contrast.
Presentation tips
Serve your Baked Alaska on a simple white platter so the colors stand out. Add berries, cocoa powder, or a light dusting of powdered sugar around the plate. A few mint leaves can also make the dessert look polished without much effort.
Make-ahead options
This dessert is very friendly for busy schedules. You can bake the brownie base a day ahead, shape the ice cream well in advance, and make the meringue just before serving. If you want to get even more ahead, freeze the fully assembled dessert before browning, then finish it right before guests arrive.
How to Store Baked Alaska: Best Practices
Baked Alaska is best served fresh, but leftovers can still be kept with a little care. Because of the ice cream center, storage is all about keeping the dessert cold and protected from air.
Refrigeration
Short-term refrigeration is not the best choice for this dessert. The ice cream will soften quickly, and the meringue can lose its shape. If you need to pause for a very short time, keep the dessert in the coldest part of the fridge for only a few minutes.
Freezing
The freezer is the proper place for leftovers or make-ahead storage. Wrap slices tightly in plastic wrap, then place them in an airtight container. They can stay frozen for up to 3 days, though the meringue is best on day one.
Reheating
Do not reheat Baked Alaska in the microwave. That will melt the ice cream and ruin the texture. If you want to refresh the top, use a brief torch pass only on the meringue after freezing, but keep it very light.
Meal prep considerations
If you are planning for a party or a busy week, prep the brownie and ice cream shape ahead of time, then save the meringue for the final step. This keeps the dessert looking neat and tasting fresh when it is time to serve.

FAQs: Frequently Asked Questions About Baked Alaska
What is Baked Alaska?
How do you make Baked Alaska at home?
Why doesn’t the ice cream melt in Baked Alaska?
Can you make Baked Alaska without a torch?
What are common mistakes when making Baked Alaska?

Baked Alaska
🍫 Fudgy brownie dome encasing layered ice cream, crowned with torched meringue peaks – dramatic, decadent showstopper dessert!
🧊 Frozen center with warm crisp exterior, perfect for celebrations, impresses with science-meets-sweet magic.
- Total Time: 7 hours 15 minutes
- Yield: 8 servings
Ingredients
– Two 1.5 quarts of any flavor ice cream for the cold center
– Enough brownie batter for a 9-inch pan for the base
– 4 large egg whites at room temperature for the meringue
– 1 cup granulated sugar for sweetening and stabilizing
– 1/2 teaspoon cream of tartar for meringue structure
– 1/2 teaspoon pure vanilla extract for flavor
Instructions
1-First Step: Bake and cool the brownie base
Start by preparing enough brownie batter for a 9-inch pan. Bake it according to your recipe or box directions, then let it cool completely. This matters because warm brownie can melt the ice cream too fast during assembly.
Once cooled, place the brownie on a serving plate or baking sheet lined with parchment. If you want extra stability, trim the brownie into a neat round or square shape that matches your final presentation. A sturdy base helps the Baked Alaska hold together.
2-Second Step: Shape the ice cream layer
Take your two 1.5 quarts of any flavor ice cream and let them soften just enough to scoop, not melt. Line a bowl or loaf pan with plastic wrap, then pack the ice cream into the shape you want. Press it firmly so there are no air pockets. Freeze it until solid again, at least 4 hours or overnight for the best results.
If you are making this dessert for a group, this is also the moment to think about flavor pairing. Vanilla ice cream gives a classic taste, while chocolate or strawberry adds a playful twist. Choose what matches the mood of your table.
3-Third Step: Make the meringue
In a clean mixing bowl, beat the 4 large egg whites at room temperature until foamy. Add 1/2 teaspoon cream of tartar and continue whisking until soft peaks form. Slowly pour in 1 cup granulated sugar, a little at a time, while beating on medium-high speed.
When the mixture turns glossy and holds stiff peaks, blend in 1/2 teaspoon pure vanilla extract. The meringue should look thick, shiny, and able to hold its shape. If it looks grainy, keep beating a little longer until the sugar dissolves fully.
4-Fourth Step: Assemble the dessert
Remove the ice cream from the freezer and place it on top of the brownie base. Work quickly here, but do not rush so much that the shape gets messy. Use a spatula or piping bag to cover the ice cream completely with meringue.
The key is to seal every edge. The meringue should touch the brownie all around so the ice cream stays insulated. Pile it high for a dramatic look, then use the back of a spoon to make soft swirls or peaks.
If you are making the dessert for different dietary needs, this is a good time to double-check that your brownie base and ice cream choice match your guests’ needs. A gluten-free or dairy-free version can still look just as beautiful.
5-Fifth Step: Brown the meringue
Preheat your broiler or heat your kitchen torch. If using a broiler, place the assembled Baked Alaska on a foil-lined tray and set it 3 to 5 inches from the heat source. Watch it closely. The meringue browns fast, usually in 2 to 4 minutes.
If you use a torch, move it in small circles so the browning stays even. You want a golden finish, not burnt spots. Some parts may color faster than others, so keep the torch moving.
6-Final Step: Serve right away
Once the top is toasted, bring the dessert to the table immediately. Slice with a sharp knife dipped in warm water for cleaner cuts. Serve each slice while the meringue is still warm and the ice cream is still cold.
The contrast is what makes Baked Alaska so memorable. That first bite gives you rich brownie, cool ice cream, and soft toasted meringue all at once. It is simple, fun, and always a little dramatic in the best way.
Last Step:
Please leave a rating and comment letting us know how you liked this recipe! This helps our business to thrive and continue providing free, high-quality recipes for you.Notes
🏺 Use a metal oven-safe bowl for even baking and easy unmolding of the brownie dome.
🧊 Freeze ice cream layers solidly (overnight best) to prevent melting during browning.
🔥 Brown meringue quickly with a torch; if broiling, freeze dome 30 min first.
- Prep Time: 45 minutes
- Freezing Time: 6 hours
- Cook Time: 30 minutes
- Category: Desserts
- Method: Bake
- Cuisine: American
Nutrition
- Serving Size: 1 slice
- Calories: 550
- Sugar: 65g
- Sodium: 200mg
- Fat: 22g
- Saturated Fat: 13g
- Unsaturated Fat: 9g
- Trans Fat: 0g
- Carbohydrates: 85g
- Fiber: 2g
- Protein: 8g
- Cholesterol: 120mg


