Magic Custard Cake, The Fail Proof Method
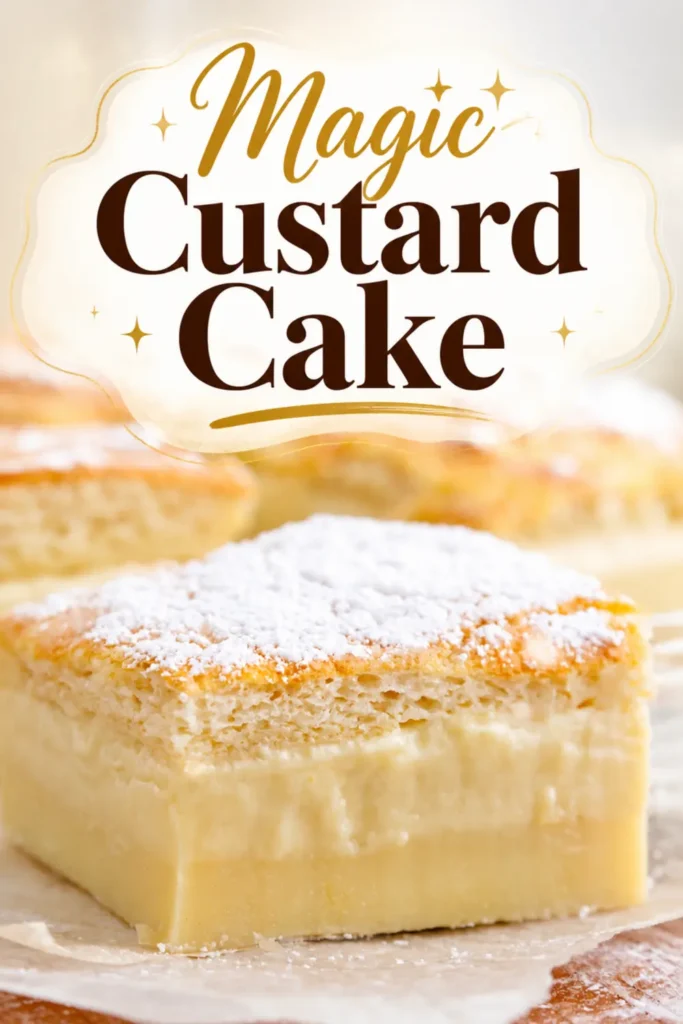
I still remember the first time I pulled this cake out of the oven. I had read about a dessert that starts as one thin, runny batter and somehow bakes into three separate layers, and honestly I did not believe it until I sliced into it.
The knife went through a soft sponge top, then a silky custard middle, then a slightly denser custard base. Three textures from one pan, one batter, and one trip to the oven.
That is the kind of kitchen magic that keeps me baking on a random Tuesday afternoon.

The method itself is almost suspiciously simple. You whisk egg yolks with sugar until creamy, swirl in melted butter and vanilla, fold in the flour, and then pour in warm milk and cream in a slow, gentle stream.
Whipped egg whites get floated over the top of that thin batter, and the oven does the rest of the work. The heat coaxes the mixture apart into layers that look like they were prepared one at a time by a very patient baker.
The result is a comforting, old fashioned style dessert that still feels fancy enough for company. If you fall in love with the idea, a pumpkin magic cake is a lovely flavor variation to try next, and it uses the same magic of one batter becoming something layered and impressive.
Jump to:
- Magic Custard Cake, The Fail Proof Method
- Magic Custard Cake Ingredients
- Tried and Tested Pro Tips
- Serving Ideas
- How To Store
- One Easy Batter, Three Gorgeous Layers
- Final Thoughts
- Ingredients
- Instructions
- Notes
- Recipe details
- FAQs
- What is magic custard cake and how do the layers form?
- How long do I need to bake magic custard cake and how do I know it is done?
- What size pan should I use for magic custard cake?
- Can I freeze magic custard cake for later use?
- Magic Custard Cake
- Ingredients
- Instructions
- Last Step:
- Nutrition
- Did you make this recipe?
Magic Custard Cake Ingredients
Here is everything you need for the batter. Read the sugar note before you start, because it genuinely matters for the final texture.
- 4 large eggs, separated and at room temperature
- 1 cup baker’s sugar or superfine sugar
- ½ cup salted butter, melted and cooled
- 2 teaspoons vanilla extract
- 1 cup all purpose flour
- 1 ½ cups whole milk, lukewarm
- ½ cup heavy cream, lukewarm
Baker’s sugar is not the same thing as granulated sugar or confectioner’s sugar, and this recipe calls for it specifically. Look for a package labeled superfine or caster sugar.
If you cannot find it, you can make your own substitute: run 1 cup plus 2 teaspoons of granulated sugar through a food processor for about 30 seconds and you have a very close match.
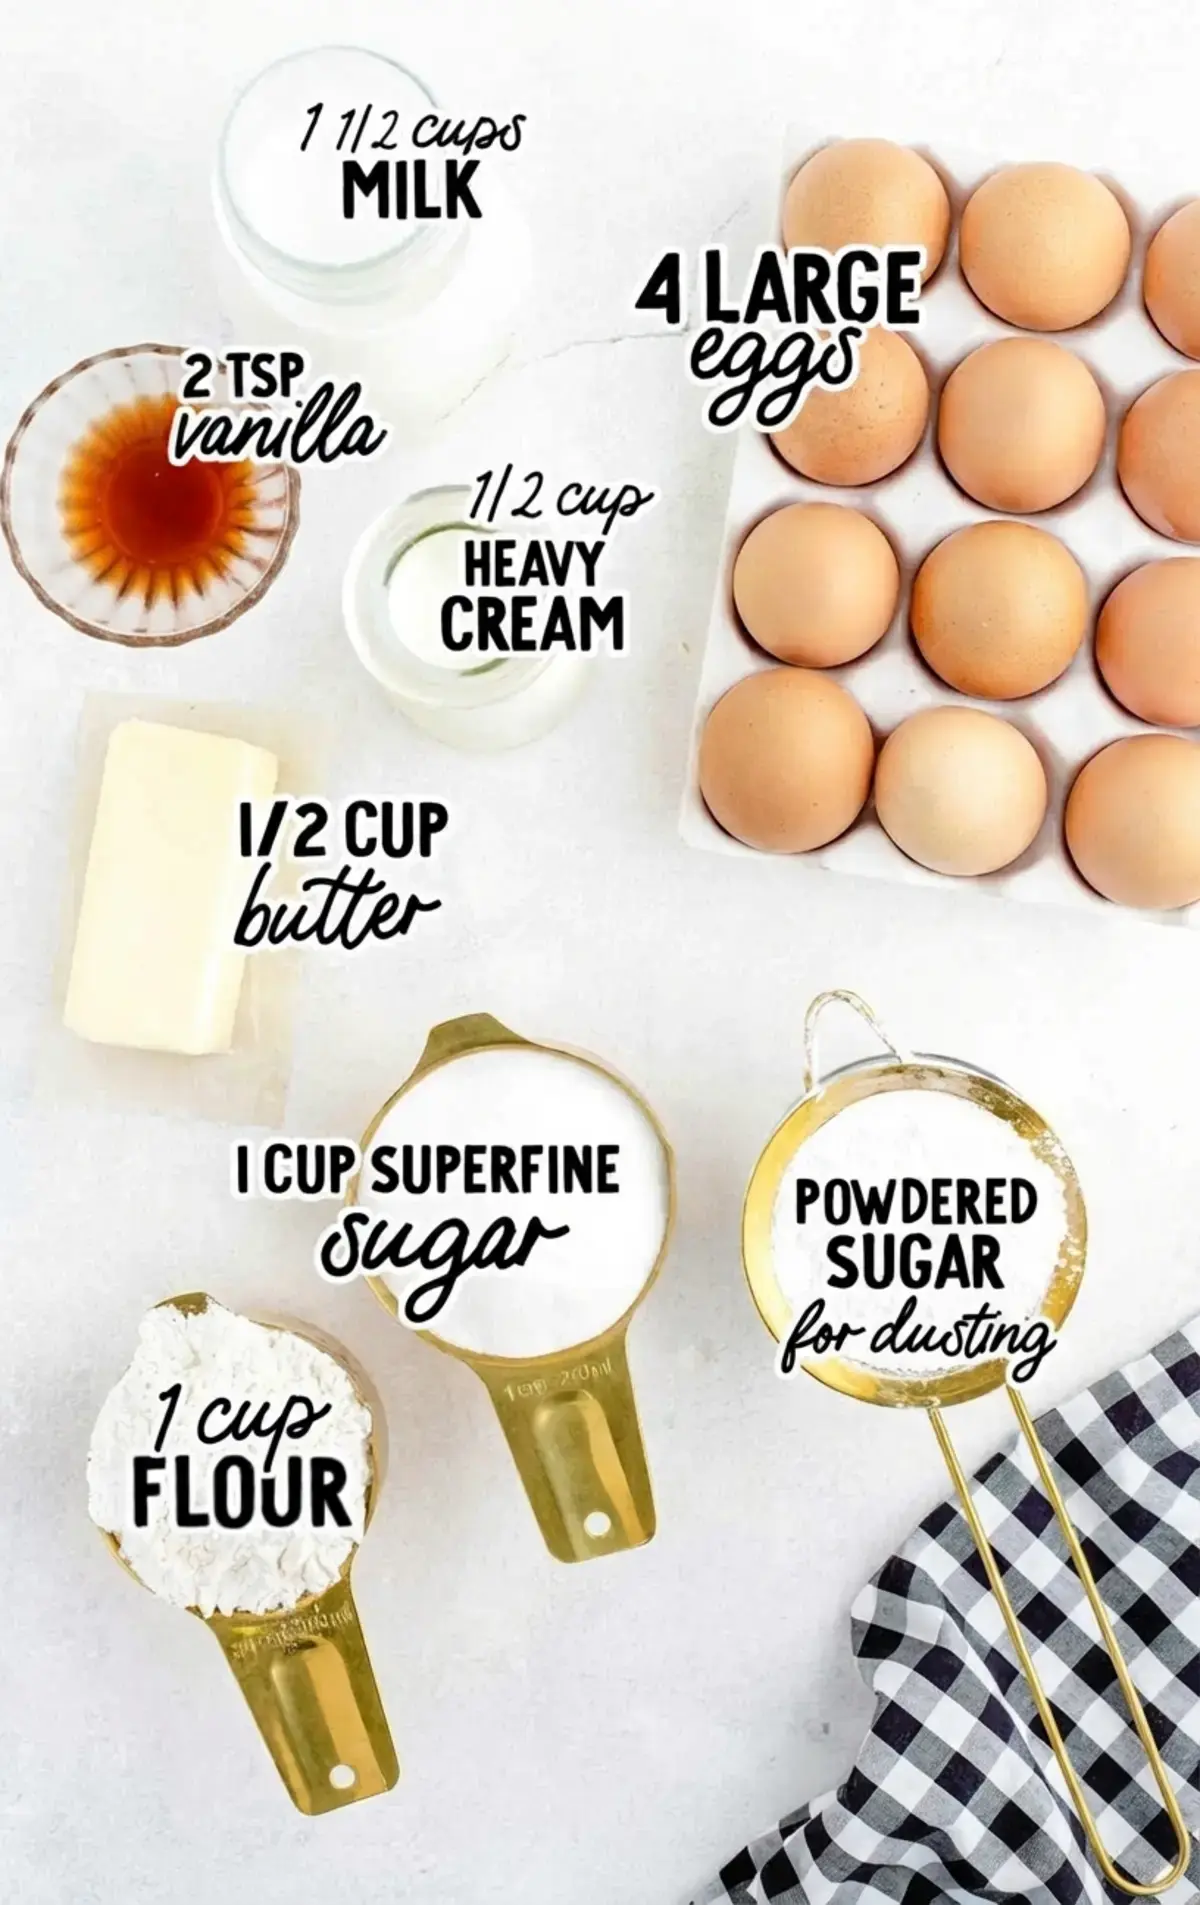
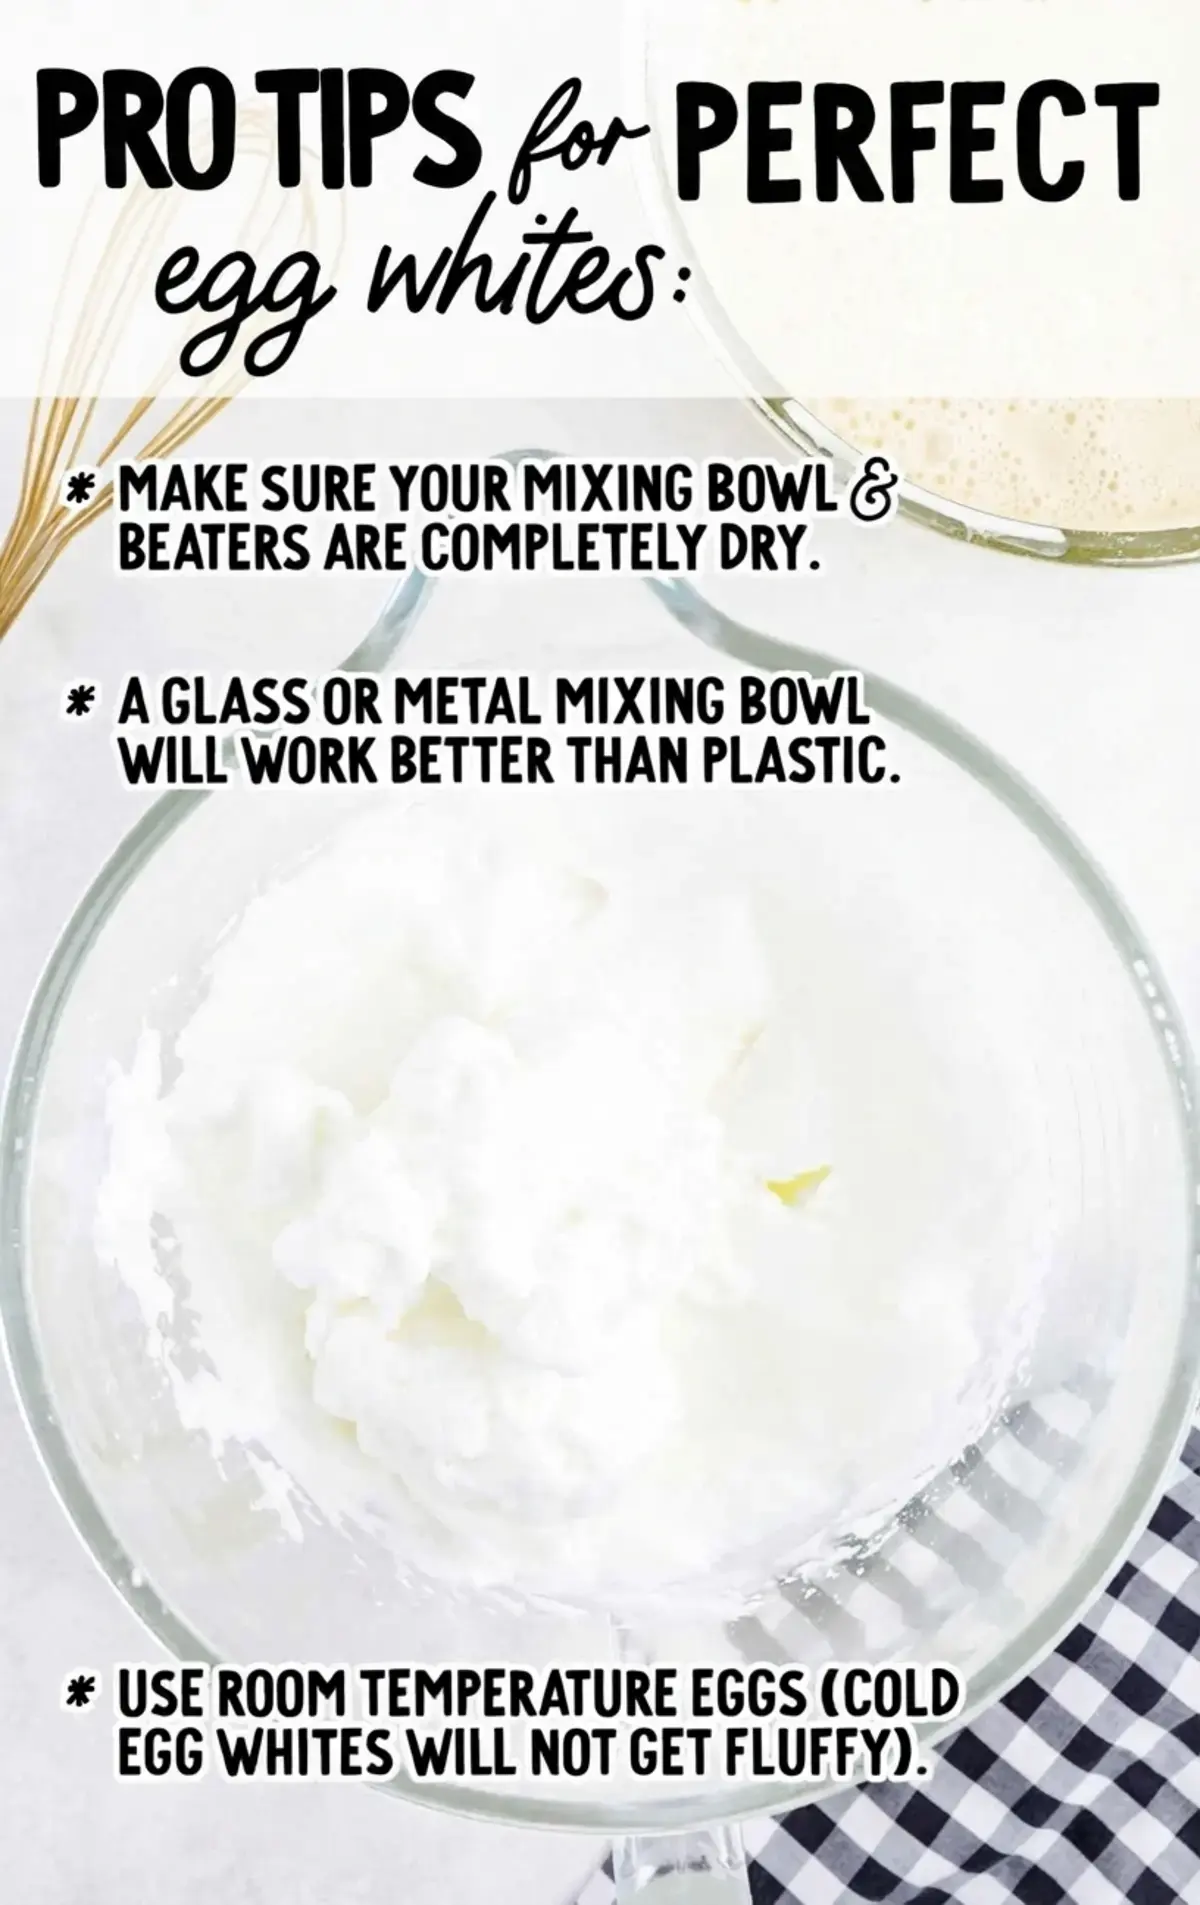
The recipe also asks for room temperature eggs and lukewarm milk and cream. Room temperature eggs whip up fluffier, which is exactly what you want for that cloud like top layer, and warm milk and cream blend into the batter without shocking it.
Custard is such a friendly base for desserts, which is why you see it in classics like custard pie and cream puff dessert, but this cake uses it in a way that feels completely its own.
Tried and Tested Pro Tips
The complete step by step instructions are in the recipe card below, but these tips are the difference between three beautiful layers and one flat, ordinary cake.
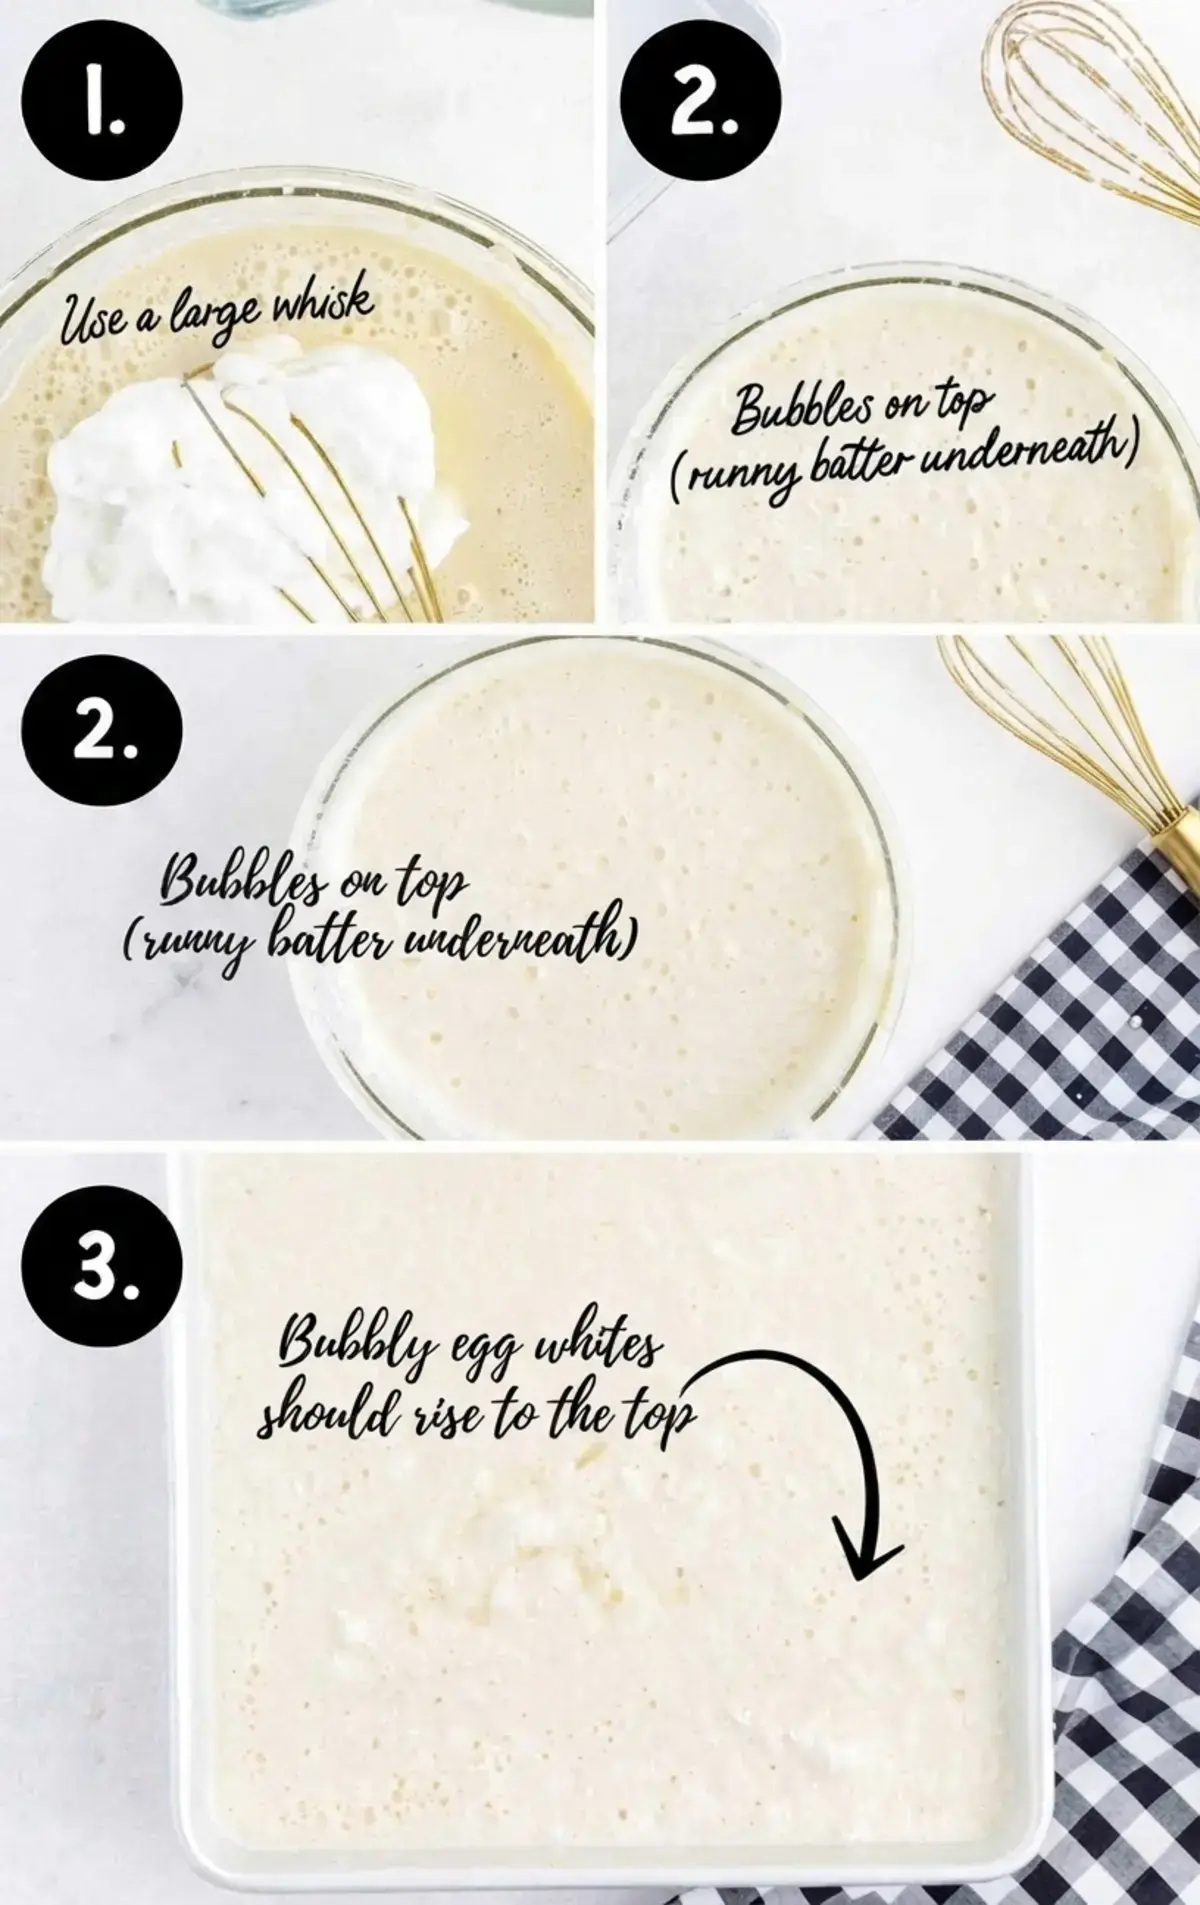
The whole secret is respecting the batter’s two personalities. You have a runny custard base on the bottom and airy egg whites on top. The batter should look very thin and runny, and that is not a mistake.
That thin consistency is exactly what allows the layers to form in the oven, so do not panic and start adding extra flour.
When you add the whipped egg whites, whisk them in gently. You want them to stay partly visible in the batter rather than disappearing completely into it.
Whip those whites in a dry glass or metal bowl with room temperature eggs, and if you beat them in hard at the end you lose the lift that gives you the sponge top.
Use an 8×8 inch square pan. This is not a suggestion you can swap out for whatever is in the cupboard. A larger pan spreads the batter too thin for the custard layer to form, and the batter will not fit in a smaller pan. Square, 8×8, every single time.
How do you know it is done? The top should be golden and the center should be just a bit jiggly. Think gentle wobble, not soup like slosh. If the batter still sloshes when you nudge the pan, give it a few more minutes and check again.
Serving Ideas
Patience pays off here. Let the cake sit for 2 to 3 hours before you serve it. The layers need that time to settle, and the whole cake firms up into something you can slice cleanly.
For presentation, dust the top with confectioner’s sugar and add fresh berries. A spoonful of homemade whipped cream on the side turns it into something extra indulgent, and the cool cream against the soft custard is a lovely contrast on the plate.
One practical tip I learned the hard way: remove pieces from the pan one at a time instead of trying to lift the whole cake out. The custard layer is delicate, and a single slice comes out far more neatly.
For clean edges, chill your knife in the freezer before cutting. The cold blade slides through the custard instead of dragging it.
How To Store
This three layer custard cake is at its best eaten soon after it is made. Fresh is really the whole point of this dessert.
If you do need to keep it, refrigerate it in an airtight container or covered in aluminum foil for no more than two days. Freezing is not recommended, because the custard texture suffers once it thaws.
One Easy Batter, Three Gorgeous Layers
There is something deeply satisfying about a dessert that looks complicated and simply is not.
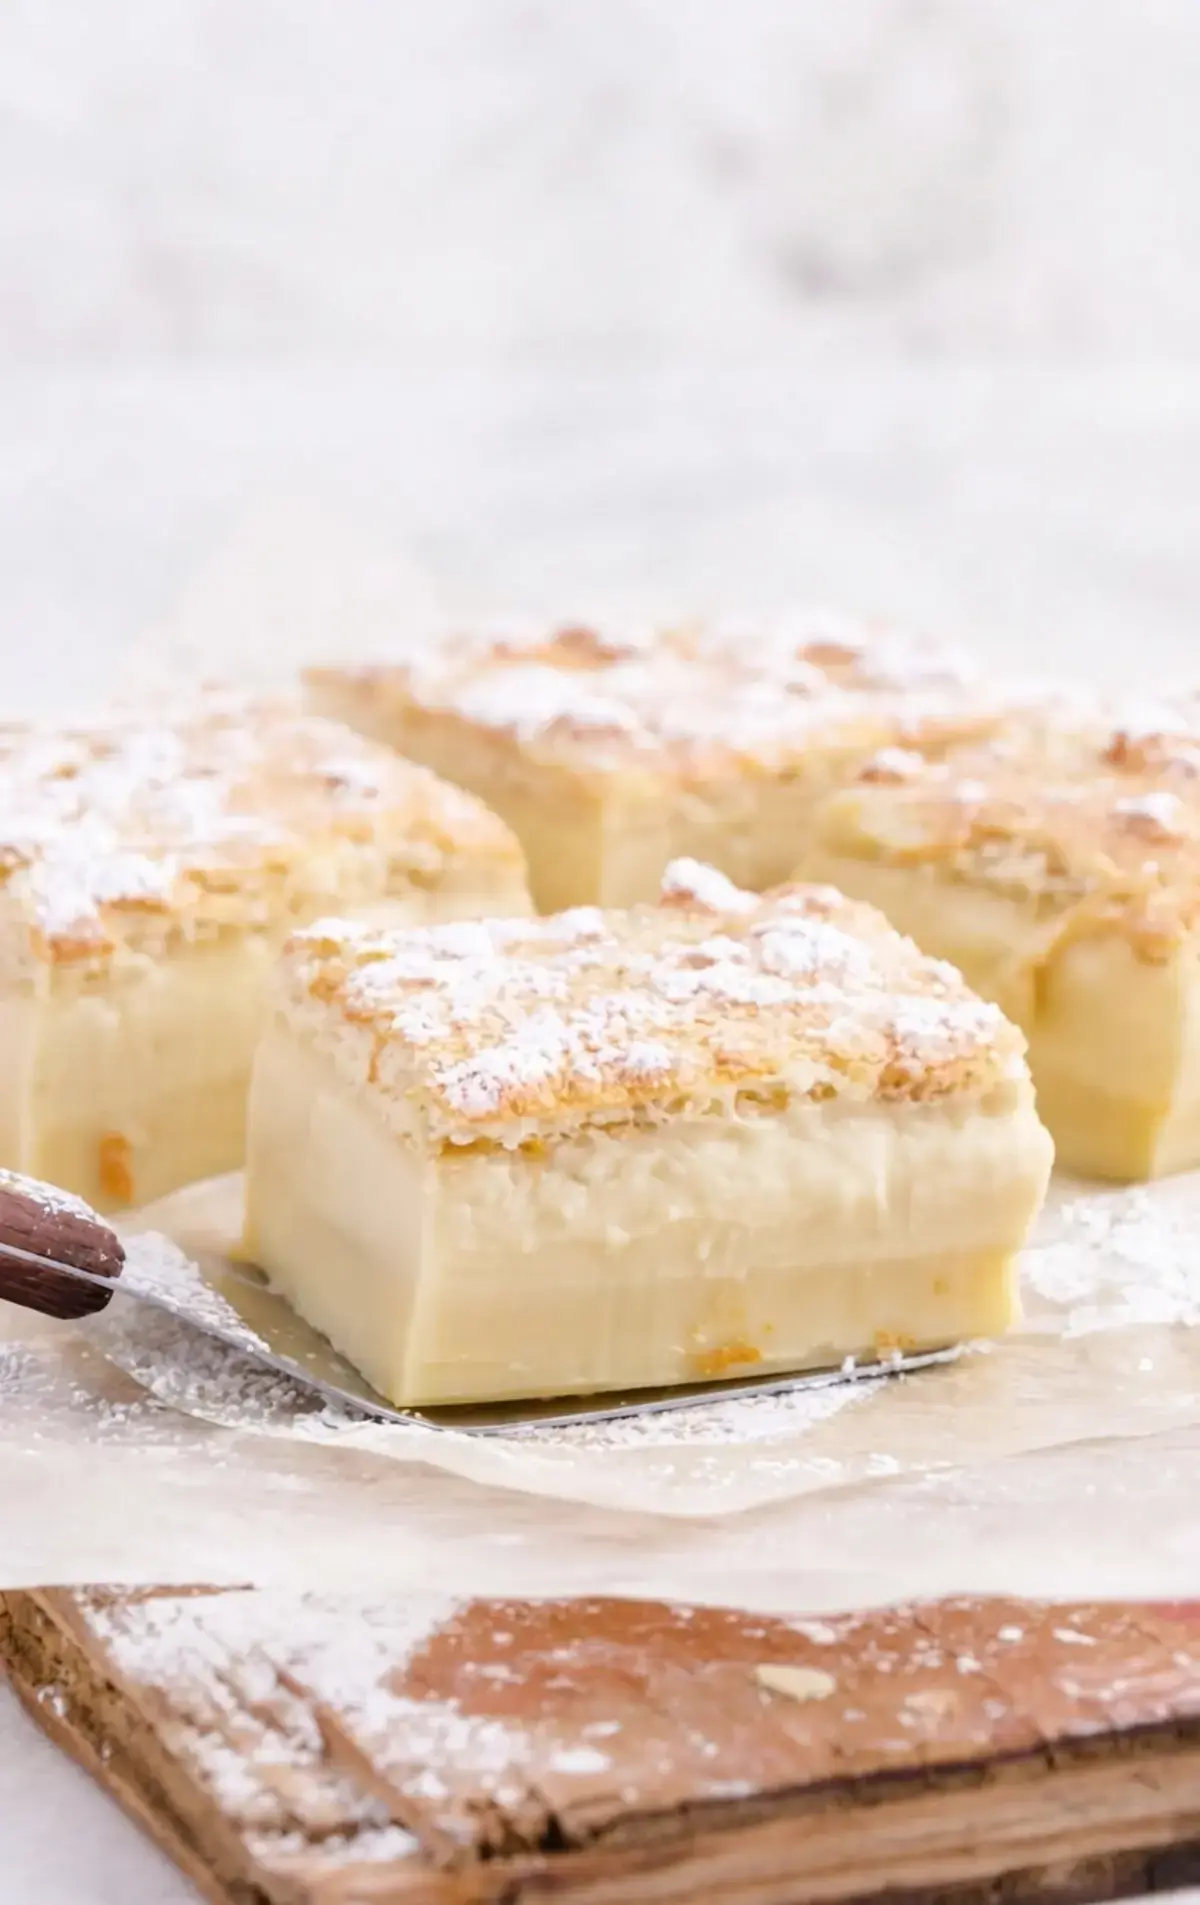
One bowl of thin batter goes into the oven and comes out as a cake with a light sponge top, a soft custard center, and a firmer custard base.
Final Thoughts
This custard cake is a case where basic ingredients produce a genuinely surprising result. After years of testing and fine tuning, the method reliably delivers three layers: a light sponge top, a silky custard center, and a firm base.
That consistency is what makes it a recipe I trust enough to hand to a friend without a long list of warnings.
It suits a holiday table or a dinner party, and it works just as well on a quiet Sunday with no occasion at all. The tips matter, especially the ones about whipping the egg whites properly and keeping that batter thin and runny.
Follow those and you get a dessert that looks impressive and tastes like comfort, which is a very good combination.
Ingredients
Here are the exact amounts, straight from the recipe card.
| Ingredient | Amount | Notes |
|---|---|---|
| Eggs | 4 large | Separated and at room temperature |
| Baker’s sugar | 1 cup | Superfine or caster sugar |
| Salted butter | ½ cup | Melted and cooled |
| Vanilla extract | 2 teaspoons | |
| All purpose flour | 1 cup | |
| Whole milk | 1 ½ cups | Lukewarm |
| Heavy cream | ½ cup | Lukewarm |
This makes 9 servings from an 8×8 inch square pan.
Instructions
- Preheat the oven to 325°F. Butter an 8×8 inch square baking pan.
- In a mixing bowl, beat the egg yolks and sugar until pale yellow and creamy, about 1 to 2 minutes.
- Add the melted and cooled butter and the vanilla extract and beat to combine fully.
- Beat in the flour.
- Combine the milk and cream together, then slowly pour the mixture into the batter while mixing to combine.
- Beat the egg whites in a standing mixer with the whisk attachment until stiff peaks form.
- Use a large whisk to lightly incorporate the egg whites into the batter. Add them in 2 to 3 additions and whisk only slightly. The batter will have two distinct textures, a very thin runny batter with the lightly incorporated egg whites floating on top.
- Pour the batter into the prepared baking pan.
- Bake for approximately 40 to 45 minutes. The cake is done when the center is still jiggly but the batter does not slosh in the pan, and the top is lightly browned.
- Remove the cake from the oven and allow it to cool completely.
- Let the cake sit for 2 to 3 hours, then dust with powdered sugar and cut into 9 pieces. It is best to remove the pieces from the pan one at a time rather than trying to remove the entire cake at once.
Notice how loose that batter looks before it goes in the oven. That is the moment most bakers start second guessing themselves. Trust the process, slide the pan onto the middle rack, and let the heat work its magic.
Notes
Take one piece of cake out of the pan at a time. That is the easiest way to keep those delicate custard layers intact on the plate.
If you really want to remove the whole cake at once, lining the pan with parchment paper may make it easier to lift out.
Be aware that some custard may still ooze from the side, so set the cake on a rimmed plate or a sheet of parchment if you decide to try it. Serving straight from the pan is honestly the safer and simpler route.
Recipe details
Prep time is 15 minutes and cook time is 45 minutes, with 9 servings in total.
The recipe card lists a total time of 4 hours. That number makes sense once you remember the cake needs to cool completely and then rest for 2 to 3 hours before slicing, so plan ahead if you are making it for a specific occasion.
Nutrition information as listed in the source recipe card:
| Nutrient | Amount |
|---|---|
| Calories | 332 kcal |
| Carbohydrates | 35 g |
| Protein | 6 g |
| Fat | 19 g |
| Saturated fat | 11 g |
| Fiber | 1 g |
| Sugar | 24 g |
| Sodium | 145 mg |
| Cholesterol | 132 mg |
FAQs
What is magic custard cake and how do the layers form?
How long do I need to bake magic custard cake and how do I know it is done?
What size pan should I use for magic custard cake?
Can I freeze magic custard cake for later use?

Magic Custard Cake
Magic Custard Cake, The Fail Proof Method I still remember the first time I pulled this cake out of the oven. I had read about a dessert that starts as one thin, runny batter and somehow bakes into three separate layers, and honestly I did not believe it until I sliced into it.
- Total Time: 1 hour
- Yield: 9 1x
Ingredients
Ingredients
4 large eggs, separated and at room temperature
1 cup baker’s sugar, superfine sugar
½ cup salted butter, melted and cooled
2 teaspoons vanilla extract
1 cup all-purpose flour
1 ½ cups whole milk, lukewarm
½ cup heavy cream, lukewarm
Instructions
1-Preheat oven to 325°F: Preheat oven to 325°F. Butter an 8”x8” square baking pan.
2-In a mixing bowl, beat the egg: In a mixing bowl, beat the egg yolks and sugar until pale yellow and creamy, about 1 to 2 minutes.
3-Add the melted and cooled butter and: Add the melted and cooled butter and vanilla extract and beat to combine fully.
4-Beat in the flour: Beat in the flour.
5-Combine the milk and cream together and: Combine the milk and cream together and slowly pour into the batter, mixing to combine.
6-Beat egg whites in a standing mixer: Beat egg whites in a standing mixer with the whisk attachment until stiff peaks form.
7-Use a large whisk to lightly incorporate: Use a large whisk to lightly incorporate egg whites into the batter. Add in 2 to 3 additions and only whisk slightly. The batter will have two distinct textures – a very thin, runny batter with the lightly incorporated egg whites floating on the top of the batter.
8-Pour batter into the prepared baking pan: Pour batter into the prepared baking pan.
9-Bake for approximately 40 to 45 minutes: Bake for approximately 40 to 45 minutes. The cake is done when the center is still jiggly, but the batter does not slosh in the pan. The top will be lightly browned.
10-Remove from the oven and allow to: Remove from the oven and allow to cool completely.
11-Allow the cake to sit for 2: Allow the cake to sit for 2 to 3 hours before dusting with powdered sugar and cutting into 9 pieces. It is best to remove the pieces from the pan one at a time rather than trying to remove the entire cake at once.
Last Step:
Please leave a rating and comment letting us know how you liked this recipe! This helps our business to thrive and continue providing free, high-quality recipes for you.- Prep Time: 15 min
- Cook Time: 45 min
- Method: bake
Nutrition
- Calories: 332kcal
- Sugar: 24g
- Sodium: 145mg
- Fat: 19g
- Saturated Fat: 11g
- Carbohydrates: 35g
- Fiber: 1g
- Protein: 6g
- Cholesterol: 132mg