Why You’ll Love This Cookie Butter
If you have ever found yourself enchanted by the magical taste of cookie butter, you are not alone. This homemade cookie butter recipe brings all those incredible flavors right into your kitchen with minimal effort and maximum reward. Unlike store-bought versions, this easy cookie butter recipe puts you in control of the ingredients, allowing you to create a spread that perfectly matches your taste preferences and dietary needs.
Ease of Preparation
Making your own cookie butter might sound intimidating, but this simple homemade cookie butter comes together in just minutes. No special equipment or culinary skills are required. You will need a food processor or high-powered blender, and you will have a creamy, delicious spread ready to enjoy in no time. The straightforward process means even novice cooks can achieve professional results with this diy cookie butter recipe.
Health Benefits
Creating your own cookie spread allows you to control what goes into it. Many commercial versions contain preservatives, artificial flavors, and excessive sugar that many prefer to avoid. With this recipe, you can adjust the sweetness level and select higher quality ingredients that align with your health goals. Plus, you can add nutritious enhancements like nuts, seeds, or protein powder to boost the nutritional value.
Versatility
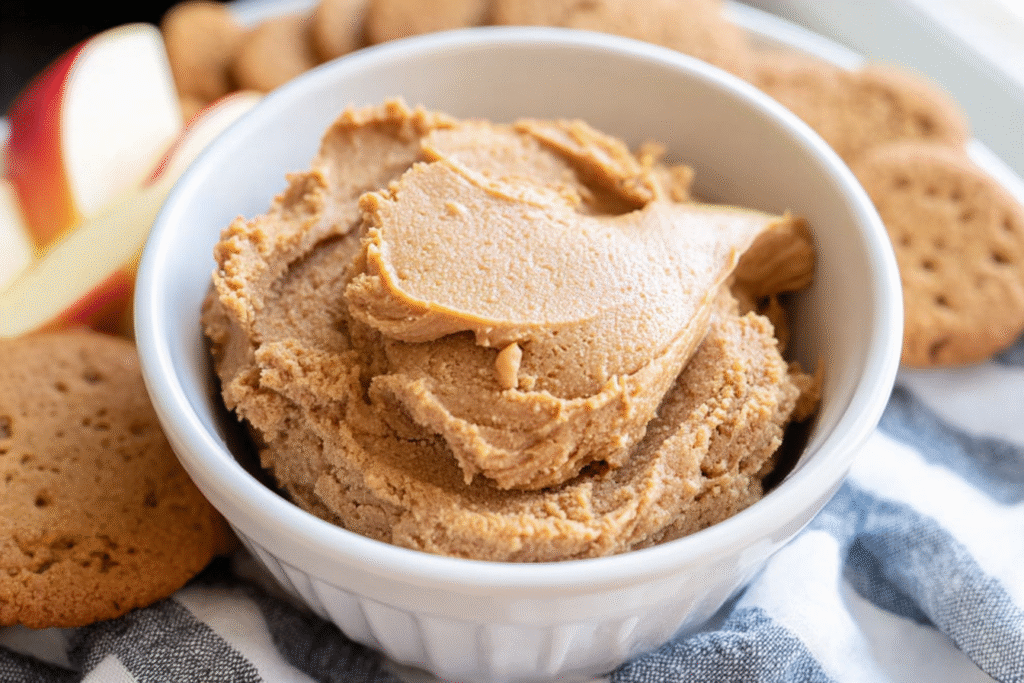
One of the greatest things about homemade cookie butter is its incredible versatility. This creamy cookie butter spread works beautifully as a dip for fresh fruits, a spread on toast or waffles, a filling for cookies and cakes, or simply enjoyed by the spoonful straight from the jar. Its adaptability extends to dietary preferences as well, with easy modifications for vegan, gluten-free, and reduced-sugar versions to accommodate various needs.
Distinctive Flavor
Nothing compares to the warm, caramelized taste of freshly made cookie butter. The combination of spiced cookies, rich butter, and creamy milk creates a depth of flavor that store-bought versions struggle to match. The homemade approach allows you to customize the spice profile, adjusting cinnamon, nutmeg, and other seasonings to create your perfect flavor combination. This distinctive taste experience is what keeps cookie butter enthusiasts coming back for more.
“Once you experience the joy of making your own cookie butter, you will wonder why you ever bought it from the store. The difference in quality and flavor is truly remarkable.”
Jump to:
- Why You’ll Love This Cookie Butter
- Ease of Preparation
- Health Benefits
- Versatility
- Distinctive Flavor
- Essential Ingredients for Cookie Butter
- How to Prepare the Perfect Cookie Butter: Step-by-Step Guide
- First Step: Preparation and Mise en Place
- Second Step: Crushing the Cookies
- Third Step: Adding Wet Ingredients
- Fourth Step: Achieving the Perfect Consistency
- Final Step: Finishing and Serving
- Dietary Substitutions to Customize Your Cookie Butter
- Protein and Main Component Alternatives
- Vegetable, Sauce, and Seasoning Modifications
- Mastering Cookie Butter: Advanced Tips and Variations
- Pro Cooking Techniques
- Flavor Variations
- Presentation Tips
- Make-Ahead Options
- How to Store Cookie Butter: Best Practices
- Refrigeration
- Freezing
- Reheating
- Meal Prep Considerations
- FAQs: Frequently Asked Questions About Cookie Butter
- Cookie Butter
- Ingredients
- Instructions
- Last Step:
- Notes
- Nutrition
- Did you make this recipe?
Essential Ingredients for Cookie Butter
The secret to creating an outstanding cookie butter lies in selecting quality ingredients that complement each other perfectly. This recipe uses straightforward components that come together to form something truly magical. Below, you will find everything you need to create your own batch of delicious cookie butter.
Main Ingredients:
- 2 cups Speculoos or Biscoff cookies – These spiced shortbread cookies provide the distinctive caramelized flavor base for the spread
- 1/2 cup sweetened condensed milk – Creates the rich, creamy consistency and adds balanced sweetness
- 2 tablespoons unsalted butter, melted – Adds richness and helps achieve a smooth texture
- 1 teaspoon pure vanilla extract – Enhances the overall flavor profile with warm notes
- 1/2 teaspoon ground cinnamon – Contributes classic spice elements that complement the cookies
- 1/4 teaspoon sea salt – Balances the sweetness and highlights other flavors
- 1-2 tablespoons neutral oil (coconut or canola) – Optional ingredient to achieve desired consistency
Special Dietary Options:
| Dietary Need | Substitutes |
|---|---|
| Vegan | Use vegan cookies, plant-based sweetened condensed milk, coconut oil or vegan butter |
| Gluten-free | Replace with gluten-free speculoos or gingersnap cookies |
| Low-calorie | Use reduced-sugar condensed milk and limit butter to 1 tablespoon |
These simple ingredients come together to create a cookie butter that rivals any store-bought version while allowing you to control exactly what goes into your spread. Each component plays a crucial role in developing the signature texture and flavor that makes cookie butter so irresistible.
How to Prepare the Perfect Cookie Butter: Step-by-Step Guide
Creating your own cookie butter at home is a rewarding process that yields delicious results. This section will guide you through each step of the process, ensuring you achieve the perfect consistency and flavor every time. Whether you are a seasoned cook or a kitchen novice, these detailed instructions will help you master the art of making cookie butter.
First Step: Preparation and Mise en Place
Begin by gathering all your ingredients and equipment. You will need a food processor or high-powered blender to create the smooth texture that defines excellent cookie butter. Measure out all ingredients before starting to streamline the process. If your cookies are particularly large, break them into smaller pieces to help your processor work more efficiently. This preparation step ensures a smooth cooking experience without interruptions.
Second Step: Crushing the Cookies
Place your speculoos or Biscoff cookies into the food processor. Pulse the machine several times to begin breaking down the cookies. Continue processing until you have fine, uniform crumbs. This usually takes about 1-2 minutes of processing time. The texture should resemble fine sand or breadcrumbs without large chunks remaining. These fine crumbs are essential for creating the smooth, creamy consistency that makes cookie butter so appealing.
Third Step: Adding Wet Ingredients
With the processor running, slowly pour in the sweetened condensed milk. This gradual addition helps the ingredients incorporate smoothly without creating lumps. Continue processing as you add the melted butter, vanilla extract, cinnamon, and salt. If you are using the optional oil for a smoother consistency, add it now as well. Let the mixture process for 2-3 minutes, occasionally stopping to scrape down the sides of the bowl with a spatula.
Fourth Step: Achieving the Perfect Consistency
After 3-4 minutes of processing, your cookie butter should be coming together beautifully. At this stage, the mixture should be smooth, glossy, and spreadable. If the consistency seems too thick, add the remaining oil one teaspoon at a time until you reach your desired texture. If it appears too thin, add a few more cookie crumbs and process briefly. The perfect cookie butter should hold its shape on a spoon while still being easily spreadable.
During this step, you can also adjust the flavor profile. Taste your cookie butter and decide if it needs more cinnamon, salt, or sweetness. Small adjustments at this stage can customize the final flavor to your exact preferences. Remember that the flavors will continue to meld as the mixture rests, so be conservative with any additions.
Final Step: Finishing and Serving
Once you are satisfied with both the texture and flavor of your cookie butter, transfer it to an airtight container. Glass jars work particularly well as they showcase the beautiful caramel color of the spread. Smooth the top with a spatula for a professional appearance. Allow the cookie butter to cool completely before covering and storing. This cooling period helps the flavors develop and the texture stabilize.
Your homemade cookie butter is now ready to enjoy! Spread it on toast, swirl it into oatmeal, dip apple slices into it, or simply eat it by the spoonful. Unlike store-bought versions, this homemade creation contains no preservatives, so remember to store it properly and enjoy it within the recommended time frame.
For more detailed information on making homemade cookie butter, you can check out this helpful guide on homemade cookie butter techniques from Serious Eats. They offer additional insights that might help you perfect your recipe.

Dietary Substitutions to Customize Your Cookie Butter
One of the wonderful aspects of making your own cookie butter is the ability to customize it to fit your dietary needs and preferences. Whether you are following a specific diet or simply want to experiment with different flavors, these substitution options will help you create a version of cookie butter that works perfectly for you.
Protein and Main Component Alternatives
The traditional speculoos or Biscoff cookies can be replaced with various alternatives to create different flavor profiles or meet dietary restrictions. For those seeking a protein boost, consider using protein cookies or adding a scoop of your favorite protein powder during the processing stage. Almond flour cookies provide a lower-carb option with a delicate nutty flavor that pairs beautifully with the traditional spices.
For those with allergies or sensitivities, gluten-free gingersnaps make an excellent substitute that maintains the characteristic spiced taste. Cashew-based cookies offer a creamier result and add healthy fats to the spread. If you prefer a different flavor profile entirely, chocolate sandwich cookies create a decadent chocolate cookie butter that many find irresistible. Simply process any cookie variety into fine crumbs and follow the same method outlined above.
Vegetable, Sauce, and Seasoning Modifications
While cookie butter is typically a sweet spread, creative cooks have found ways to incorporate unexpected ingredients that elevate both flavor and nutrition. For those seeking a healthier version, try adding pureed pumpkin or sweet potato. These vegetables add natural sweetness, fiber, and vitamins while creating a velvety texture. About 2-3 tablespoons of puree can replace an equal amount of sweetened condensed milk.
The sauce component of the recipe can also be adapted. Coconut cream creates a dairy-free version with a subtle tropical note that complements the spices beautifully. For those watching their sugar intake, unsweetened almond milk with a natural sweetener like maple syrup or honey can replace the sweetened condensed milk, though the texture will be slightly less creamy.
Seasoning modifications offer another avenue for customization. While cinnamon remains the classic choice, you might experiment with cardamom for a more exotic flair, ginger for extra warmth, or even a pinch of cayenne pepper for those who enjoy a spicy kick. Nutmeg, allspice, and cloves can also be added in small amounts to create a more complex spice profile reminiscent of the holiday season.
These substitutions allow you to create a cookie butter that not only tastes delicious but also aligns with your specific dietary requirements and flavor preferences. Don’t be afraid to experiment and find the combination that works best for you.
Mastering Cookie Butter: Advanced Tips and Variations
Once you have mastered the basic cookie butter recipe, you might want to explore more advanced techniques and creative variations. These expert tips will help you elevate your cookie butter to new heights and impress friends and family with your culinary creativity.
Pro Cooking Techniques
For an exceptionally smooth cookie butter, try processing the cookie crumbs alone for longer before adding the wet ingredients. This extended grinding time breaks down the cookies even further, creating an ultra-smooth base. When adding the wet ingredients, ensure they are at room temperature to prevent the butter from seizing or creating lumps. If you have a high-powered blender, it can often achieve an even smoother texture than a standard food processor.
Another professional technique is to briefly toast your cookies in a 300°F oven for 5-7 minutes before processing. This intensifies their caramelized flavor and creates a more complex taste profile in the finished spread. Allow them to cool completely before processing to prevent heat damage to your equipment.
Flavor Variations
The possibilities for flavor variations are nearly endless when it comes to cookie butter. For a chocolate lovers’ version, add 2 tablespoons of cocoa powder during the processing stage. Coffee lovers can incorporate 1 teaspoon of instant espresso powder for a mocha twist. Peanut butter adds protein and creates a cookie-nut butter hybrid that many find irresistible.
Fruit additions can transform your cookie butter into something truly special. Try adding 1-2 tablespoons of fruit preserves like raspberry or apricot for a fruity variation. Orange zest pairs beautifully with the warm spices, adding a bright, citrusy note. For a more decadent version, fold in chocolate chips, toffee bits, or chopped nuts after processing for added texture and flavor.
Presentation Tips
The presentation of your cookie butter can make it even more appealing. When storing in jars, create a decorative pattern on top by dragging a toothpick through the surface. Consider layering different flavors in clear jars for a stunning visual effect. Gifting homemade cookie butter in beautifully labeled jars makes for a thoughtful and impressive present that recipients will love.
For serving, try warming the cookie butter slightly to create a pourable consistency perfect for drizzling over ice cream, pancakes, or waffles. A dollop on top of oatmeal or yogurt adds visual interest and incredible flavor. You can also pipe it onto cupcakes or between cookie layers for a professional bakery look.
Make-Ahead Options
Cookie butter is an excellent candidate for meal prep and advance preparation. You can easily double or triple the recipe and store multiple jars in the refrigerator or freezer. This approach saves time and ensures you always have this delicious spread on hand. Prepare a batch on Sunday and enjoy it throughout the week as a quick breakfast addition or satisfying snack.
For holidays or special occasions, consider making different flavored batches weeks in advance. The flavors continue to develop over time, often improving after a week or two in the refrigerator. This make-ahead strategy reduces stress during busy entertaining periods while providing impressive homemade treats for guests.
How to Store Cookie Butter: Best Practices
Proper storage ensures your homemade cookie butter maintains its quality, flavor, and safety over time. Since this recipe lacks the preservatives found in commercial versions, following these storage guidelines is particularly important for extending its shelf life while maintaining the best possible taste and texture.
Refrigeration
Store your cookie butter in an airtight container in the refrigerator for up to 3 weeks. Glass jars with tight-fitting lids work particularly well as they prevent moisture absorption and flavor contamination. Before refrigerating, ensure the cookie butter has cooled completely to room temperature to prevent condensation inside the container. When stored properly, refrigerated cookie butter will firm up slightly but should remain easily spreadable.
Freezing
For longer storage, cookie butter freezes exceptionally well. Transfer it to freezer-safe containers, leaving about half an inch of space at the top to allow for expansion. Frozen cookie butter will maintain its quality for up to 3 months. To thaw, simply transfer the container to the refrigerator overnight or leave at room temperature for a few hours. Once thawed, give it a quick stir to restore the smooth texture before using.
Reheating
If your refrigerated or frozen cookie butter becomes too firm for spreading, gentle reheating can restore its creamy consistency. Microwave it in 10-second intervals, stirring between each, until it reaches your desired consistency. Alternatively, you can place the container in a bowl of warm water for 10-15 minutes. Avoid overheating, which can cause the ingredients to separate.
Meal Prep Considerations
For efficient meal prep, consider dividing your cookie butter into smaller portions rather than one large container. This approach reduces the number of times you open and close the container, minimizing exposure to air and potential contaminants. Label each container with the date it was made to help you track freshness. Portion-sized containers are also convenient for grab-and-go breakfasts or snacks.
Following these storage practices will ensure your homemade cookie butter remains delicious and safe to enjoy for as long as possible. With proper handling, you can savor every last spoonful of this delectable spread.

FAQs: Frequently Asked Questions About Cookie Butter
Print
Cookie Butter
🍪🧈 Whip up silky, spiced homemade cookie butter in minutes – addictive creamy spread for toast, fruit, pancakes, or eating by the spoonful!
🥄✨ Customizable, fresher than store-bought, uses simple ingredients; versatile pantry staple for breakfasts, desserts, or snacks!
- Total Time: 10 minutes
- Yield: 2 cups
Ingredients
– 2 cups Speculoos or Biscoff cookies for distinctive caramelized flavor base
– 1/2 cup sweetened condensed milk for rich creamy consistency and sweetness
– 2 tablespoons unsalted butter, melted for richness and smooth texture
– 1 teaspoon pure vanilla extract for enhancing flavor profile
– 1/2 teaspoon ground cinnamon for classic spice elements
– 1/4 teaspoon sea salt for balancing sweetness
– 1-2 tablespoons neutral oil (coconut or canola) for desired consistency
Instructions
1-First Step: Preparation and Mise en Place Begin by gathering all your ingredients and equipment. You will need a food processor or high-powered blender to create the smooth texture that defines excellent cookie butter. Measure out all ingredients before starting to streamline the process. If your cookies are particularly large, break them into smaller pieces to help your processor work more efficiently. This preparation step ensures a smooth cooking experience without interruptions.
2-Second Step: Crushing the Cookies Place your speculoos or Biscoff cookies into the food processor. Pulse the machine several times to begin breaking down the cookies. Continue processing until you have fine, uniform crumbs. This usually takes about 1-2 minutes of processing time. The texture should resemble fine sand or breadcrumbs without large chunks remaining. These fine crumbs are essential for creating the smooth, creamy consistency that makes cookie butter so appealing.
3-Third Step: Adding Wet Ingredients With the processor running, slowly pour in the sweetened condensed milk. This gradual addition helps the ingredients incorporate smoothly without creating lumps. Continue processing as you add the melted butter, vanilla extract, cinnamon, and salt. If you are using the optional oil for a smoother consistency, add it now as well. Let the mixture process for 2-3 minutes, occasionally stopping to scrape down the sides of the bowl with a spatula.
4-Fourth Step: Achieving the Perfect Consistency After 3-4 minutes of processing, your cookie butter should be coming together beautifully. At this stage, the mixture should be smooth, glossy, and spreadable. If the consistency seems too thick, add the remaining oil one teaspoon at a time until you reach your desired texture. If it appears too thin, add a few more cookie crumbs and process briefly. The perfect cookie butter should hold its shape on a spoon while still being easily spreadable. During this step, you can also adjust the flavor profile. Taste your cookie butter and decide if it needs more cinnamon, salt, or sweetness. Small adjustments at this stage can customize the final flavor to your exact preferences. Remember that the flavors will continue to meld as the mixture rests, so be conservative with any additions.
5-Final Step: Finishing and Serving Once you are satisfied with both the texture and flavor of your cookie butter, transfer it to an airtight container. Glass jars work particularly well as they showcase the beautiful caramel color of the spread. Smooth the top with a spatula for a professional appearance. Allow the cookie butter to cool completely before covering and storing. This cooling period helps the flavors develop and the texture stabilize. Your homemade cookie butter is now ready to enjoy! Spread it on toast, swirl it into oatmeal, dip apple slices into it, or simply eat it by the spoonful. Unlike store-bought versions, this homemade creation contains no preservatives, so remember to store it properly and enjoy it within the recommended time frame.
Last Step:
Please leave a rating and comment letting us know how you liked this recipe! This helps our business to thrive and continue providing free, high-quality recipes for you.Notes
🔥 Use a high-powered food processor or blender for ultra-smooth texture.
🥛 Adjust milk gradually – start less for thicker spread, more for pourable sauce.
❄️ Keeps in fridge up to 2 weeks; bring to room temp for best spreadability.
- Prep Time: 10 minutes
- Category: Desserts
- Method: No-Bake
- Cuisine: American
- Diet: Vegetarian
Nutrition
- Serving Size: 2 tablespoons
- Calories: 180 kcal
- Sugar: 12g
- Sodium: 100mg
- Fat: 10g
- Saturated Fat: 7g
- Unsaturated Fat: 2.5g
- Trans Fat: 0g
- Carbohydrates: 22g
- Fiber: 1g
- Protein: 2g
- Cholesterol: 2mg


