Why You’ll Love This Andes Mint Cookies
If you’re looking for a treat that combines the rich decadence of chocolate with the refreshing coolness of mint, these Andes Mint Cookies are about to become your new favorite. This delightful recipe delivers the perfect balance of flavors that will have your family and friends coming back for more. Here are just a few reasons why this recipe stands out:- Ease of preparation: With just about 20 minutes of prep time and simple steps, even beginners can master these cookies. The recipe uses basic pantry staples, making it accessible to everyone regardless of baking experience. You don’t need fancy equipment or hard-to-find ingredients to create bakery-worthy treats at home.
- Health benefits: While these are certainly an indulgent treat, dark chocolate contains antioxidants that may benefit heart health. The mint adds a refreshing twist without adding calories, and when enjoyed in moderation, these cookies can be part of a balanced diet. Plus, homemade cookies allow you to control the quality of ingredients, avoiding preservatives found in store-bought alternatives.
- Versatility: This recipe adapts beautifully to different dietary needs without sacrificing flavor or texture. Whether you need gluten-free, vegan, or lower-sugar options, simple substitutions make these cookies accessible to everyone at your table. The basic recipe serves as an excellent canvas for creativity, allowing you to customize based on what you have available.
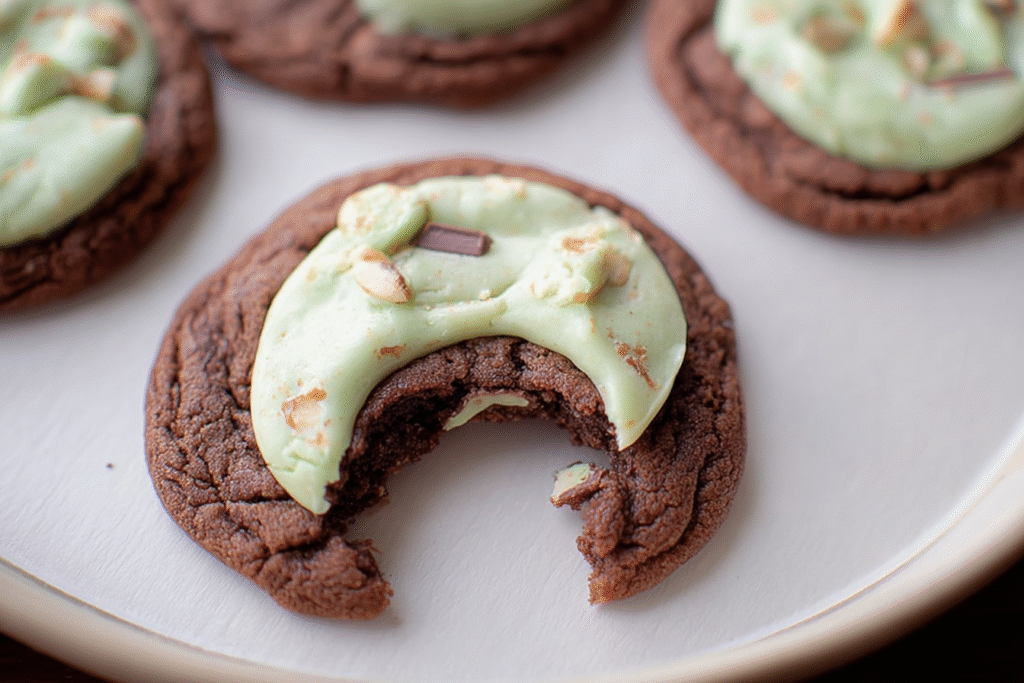
- Distinctive flavor: The combination of rich chocolate cookies with pockets of creamy Andes mints creates a sophisticated taste profile that sets these apart from ordinary chocolate chip cookies. The slight melting of the mints during baking creates a marbled effect that looks as impressive as it tastes, making them perfect for special occasions or everyday treats.
Jump to:
- Why You’ll Love This Andes Mint Cookies
- Essential Ingredients for Andes Mint Cookies
- Main Ingredients:
- Special Dietary Options:
- How to Prepare the Perfect Andes Mint Cookies: Step-by-Step Guide
- First Step: Preparation and Mise en Place
- Second Step: Creaming the Butter and Sugars
- Third Step: Adding Eggs and Vanilla
- Fourth Step: Mixing the Dry Ingredients
- Fifth Step: Combining Wet and Dry Ingredients
- Sixth Step: Folding in the Andes Mints
- Seventh Step: Shaping and Baking
- Final Step: Cooling and Serving
- Dietary Substitutions to Customize Your Andes Mint Cookies
- Protein and Main Component Alternatives
- Vegetable, Sauce, and Seasoning Modifications
- Mastering Andes Mint Cookies: Advanced Tips and Variations
- Pro Cooking Techniques
- Flavor Variations
- Presentation Tips
- Make-Ahead Options
- How to Store Andes Mint Cookies: Best Practices
- Refrigeration
- Freezing
- Reheating
- Meal Prep Considerations
- FAQs: Frequently Asked Questions About Andes Mint Cookies
- What are Andes mint cookies?
- How do you make Andes mint cookies from scratch?
- Can you substitute ingredients in Andes mint cookies?
- How should you store Andes mint cookies?
- Can you freeze Andes mint cookie dough?
- Andes Mint Cookies
- Ingredients
- Instructions
- Last Step:
- Notes
- Nutrition
- Did you make this recipe?
Essential Ingredients for Andes Mint Cookies
Before diving into the baking process, let’s gather everything you’ll need to create these delightful cookies. Having all your ingredients measured and ready will make the process smooth and enjoyable.Main Ingredients:
- 1 cup butter – Provides the rich, tender base for your cookies; use unsalted butter for best control over saltiness
- 1 cup white sugar – Creates sweetness and contributes to the crispy edges of the cookies
- 1 cup brown sugar – Adds moisture and depth of flavor with its molasses content
- 2 eggs – Bind the ingredients together and add structure to the dough
- 1 teaspoon vanilla extract – Enhances the overall flavor profile and complements the chocolate
- 2 cups all-purpose flour – Forms the structure of the cookies
- 1 cup cocoa powder – Provides the intense chocolate flavor; use unsweetened cocoa for best results
- 1 teaspoon baking soda – Helps the cookies rise and achieve the perfect texture
- 1/2 teaspoon salt – Balances the sweetness and enhances all the flavors
- 1.5 cups chopped Andes mints – The star ingredient that creates those delicious pockets of minty goodness
- Powdered sugar – For dusting on top for a beautiful finishing touch (optional)
Special Dietary Options:
| Dietary Need | Substitutions |
|---|---|
| Vegan | Replace butter with coconut oil or vegan butter; use flax eggs (1 tbsp ground flaxseed + 3 tbsp water per egg); ensure Andes mints are vegan-friendly |
| Gluten-free | Use a 1:1 gluten-free flour blend; ensure all ingredients, including baking soda and Andes mints, are certified gluten-free |
| Low-calorie | Reduce sugar by 1/4 cup; substitute half the butter with unsweetened applesauce; use dark cocoa powder for intense flavor with fewer calories |
How to Prepare the Perfect Andes Mint Cookies: Step-by-Step Guide
Now that we have our ingredients ready, let’s walk through the process of creating these irresistible Andes Mint Cookies. Following these steps will help you achieve consistent, delicious results every time.The secret to perfect texture lies in proper temperature control. Start with room temperature ingredients and don’t skip the chilling step if you want thick, chewy cookies with crisp edges.
First Step: Preparation and Mise en Place
Before you begin mixing, prepare your baking space. Preheat your oven to 350°F (175°C) and line your baking sheets with parchment paper or silicone baking mats. This ensures your cookies won’t stick and makes cleanup effortless. Chop your Andes mints into small, uniform pieces about the size of regular chocolate chips. This ensures even distribution throughout the dough and consistent melting during baking. Having everything measured and ready before you start makes the process more enjoyable and helps prevent mistakes.Second Step: Creaming the Butter and Sugars
In a large mixing bowl, combine the softened butter, white sugar, and brown sugar. Using an electric mixer on medium speed, beat these ingredients together until the mixture is light and fluffy, about 2-3 minutes. This process, called creaming, incorporates air into the dough, which helps create a lighter texture. The sugars should be well-dissolved into the butter, and the mixture should appear pale in color. Scrape down the sides of the bowl periodically to ensure all ingredients are incorporated evenly. This step is crucial for achieving the right cookie texture, so don’t rush it.Third Step: Adding Eggs and Vanilla
Add the eggs one at a time to the creamed butter mixture, beating well after each addition. This ensures proper emulsification and distribution. After the eggs are fully incorporated, add the vanilla extract and mix briefly to combine. The mixture should appear glossy and smooth. Avoid overmixing at this stage, as too much air incorporation can lead to cookies that spread too much in the oven. If you’re looking for more baking inspiration for simple and accessible recipes, this technique is foundational to many successful cookie recipes.Fourth Step: Mixing the Dry Ingredients
In a separate medium bowl, whisk together the flour, cocoa powder, baking soda, and salt until well combined. This step ensures that the leavening agent is evenly distributed throughout the flour, which helps the cookies rise uniformly. The cocoa powder tends to clump, so thorough whisking is essential for a consistent chocolate flavor throughout your cookies. Sifting these ingredients together can also help achieve a lighter texture, especially if your flour or cocoa has settled in the pantry.Fifth Step: Combining Wet and Dry Ingredients
With your mixer on low speed, gradually add the dry ingredients to the wet mixture. Mix only until just combined, being careful not to overmix. Overmixing develops gluten in the flour, which can lead to tough cookies. You should stop mixing as soon as you no longer see streaks of dry flour. The dough will be thick and dark chocolate in color. This gentle mixing approach preserves the tender texture that makes these cookies so delightful. If you notice any dry pockets at the bottom of the bowl, finish mixing by hand with a spatula to avoid overworking the dough.Sixth Step: Folding in the Andes Mints
Remove the bowl from the mixer and use a spatula to fold in the chopped Andes mints by hand. This gentle folding technique prevents the mints from breaking down too much and ensures they’re evenly distributed throughout the dough. The contrast between the dark chocolate dough and the green and white mint pieces creates a beautiful visual appeal. If you prefer larger chunks of melted mint, reserve some of the larger pieces to press onto the tops of the cookies before baking. This technique creates extra pockets of minty goodness on the surface of each cookie.Seventh Step: Shaping and Baking
For optimal results, chill the dough for at least 30 minutes before baking. This step prevents the cookies from spreading too much in the oven and helps develop the flavors. Once chilled, scoop tablespoon-sized portions of dough onto your prepared baking sheets, spacing them about 2 inches apart to allow for spreading. For uniform cookies, use a cookie scoop or measure the dough with a tablespoon. Bake at 350°F for 10-12 minutes, or until the edges are set but the centers still look slightly soft. The cookies will continue to cook on the baking sheet after removal from the oven, so removing them while slightly underbaked ensures a perfectly chewy texture.Final Step: Cooling and Serving
Allow the cookies to cool on the baking sheet for about 5 minutes before transferring them to a wire rack to cool completely. This short rest period allows them to set and makes them easier to move without breaking. Once cooled, you can dust them lightly with powdered sugar for a snowy appearance that’s perfect for holiday occasions. These Andes Mint Cookies are delicious served warm, when the chocolate is still slightly melted, or at room temperature. Pair them with a glass of cold milk or a cup of hot coffee for the ultimate treat. Enjoy the compliments that will surely follow when you share these delightful cookies with friends and family.
Dietary Substitutions to Customize Your Andes Mint Cookies
One of the wonderful aspects of this Andes Mint Cookies recipe is its adaptability. Whether you have dietary restrictions or simply want to experiment with different ingredients, these cookies can be customized to suit various needs without sacrificing taste or texture.Protein and Main Component Alternatives
For those looking to modify the protein content or accommodate dietary preferences, several alternatives work well in this recipe. If you’re avoiding eggs, flax eggs made from one tablespoon of ground flaxseed mixed with three tablespoons of water per egg provide excellent binding properties. Another option is using commercial egg replacers, which are specifically formulated for baking. For a protein boost, consider adding a scoop of unflavored or chocolate protein powder, though this may slightly alter the texture. If you’re following a dairy-free diet, coconut oil or high-quality vegan butter substitutes work beautifully in place of regular butter. Just remember that coconut oil will impart a subtle coconut flavor, which can actually complement the mint quite nicely. For those who cannot find Andes mints or prefer alternatives, several substitutions provide similar results. Mint chocolate chips offer convenience and distribute evenly throughout the dough. Chopped York Peppermint Patties provide a more intense mint flavor with a slightly different texture. For a more sophisticated variation, try using high-quality dark chocolate chunks with a few drops of peppermint extract. This gives you control over the intensity of the mint flavor while still delivering that refreshing taste. Andes mint cookie crunch pieces can also add texture and flavor variety to your cookies.Vegetable, Sauce, and Seasoning Modifications
While vegetables might not be the first thing you think to add to chocolate mint cookies, certain additions can enhance both nutrition and texture. Pureed avocado or zucchini can replace some of the butter, adding moisture and nutrients while cutting calories. These vegetables have mild flavors that won’t compete with the chocolate and mint. Simply reduce the butter by half and add an equal amount of pureed vegetable. This modification works particularly well if you’re looking to create a slightly denser, fudgier cookie. For sauce variations, consider adding a swirl of mint buttercream between two cookies to create sandwich cookies. Alternatively, a drizzle of melted white chocolate on top adds visual appeal and complements the dark chocolate base. Regarding seasonings, a pinch of cinnamon or espresso powder can deepen the chocolate flavor without overpowering the mint. Some bakers enjoy adding a tiny amount of sea salt on top of the cookies before baking, which creates a delightful salted chocolate effect. For those who enjoy extra spice, a dash of cayenne pepper provides a surprising warmth that pairs interestingly with the cooling mint.Mastering Andes Mint Cookies: Advanced Tips and Variations
Once you’ve mastered the basic Andes Mint Cookies recipe, you might want to elevate your baking skills with these advanced techniques and creative variations. These tips will help you achieve professional-quality results and impress even the most discerning cookie connoisseurs.Pro Cooking Techniques
The temperature of your ingredients significantly impacts the final result. Using room temperature butter and eggs ensures proper emulsification and consistent texture. For an extra chewy cookie, try browning your butter before creaming it with the sugars. This technique adds a nutty, caramel flavor that deepens the overall taste profile. When measuring flour, use the spoon and level method rather than dipping the measuring cup directly into the flour, which can lead to compacted flour and dry cookies. Professional bakers often weigh their ingredients for absolute precision, but careful measuring with cups and spoons also yields excellent results. Another pro technique involves creating the perfect cookie shape. For uniformly round cookies, roll the dough balls between your hands after scooping, then slightly press down with the bottom of a glass to create an even thickness. If you prefer thicker cookies with fewer cracks, chill the dough balls for 15 minutes before baking. For a bakery-style appearance with crinkled tops, skip the additional chilling time after shaping. Understanding how these small adjustments affect the final product gives you control over the texture and appearance of your cookies.Flavor Variations
While the classic combination of chocolate and mint is undeniably delicious, several flavor variations offer exciting alternatives. For a mocha mint version, replace 1 tablespoon of the flour with instant espresso powder. This addition intensifies the chocolate flavor and adds a subtle coffee note that complements the mint beautifully. Orange extract or zest can transform these into chocolate mint orange cookies, reminiscent of a classic York Peppermint Pattie but with a citrus twist. For a more decadent treat, stuff each dough ball with a small piece of dark chocolate before baking, creating a molten center that oozes when you bite into the cookie. Seasonal variations allow you to enjoy these cookies year-round. During winter holidays, add a sprinkle of crushed candy canes on top of each cookie before baking for extra festive flair. In the spring, consider using pastel-colored mint baking chips instead of traditional Andes mints for a lighter appearance. Summer versions might include a white chocolate drizzle that mimics the appearance of melting ice cream. These simple modifications keep the recipe feeling fresh and exciting while maintaining the core flavor profile that makes these cookies so beloved.Presentation Tips
Beautiful presentation elevates even simple cookies to special occasion treats. For a professional look, use a small mesh sieve to dust the cooled cookies with powdered sugar, creating a delicate snow-like coating that contrasts beautifully with the dark chocolate. Serving these cookies on a white or light-colored plate makes their color pop. For gift-giving, arrange them in a clear tin with layers separated by parchment paper, and tie with a ribbon that matches the green of the Andes mints. For a more elaborate dessert presentation, serve two cookies with a scoop of mint chocolate chip ice cream sandwiched between them. This creates a decadent ice cream sandwich that’s perfect for summer gatherings. Alternatively, crumble cooled cookies over vanilla ice cream or chocolate mousse for a crunchy, minty topping. These presentation ideas transform simple cookies into impressive desserts suitable for entertaining.Make-Ahead Options
Busy schedules shouldn’t prevent you from enjoying freshly baked cookies. This dough freezes exceptionally well, allowing you to have freshly baked treats whenever the craving strikes. Simply portion the dough into balls and freeze them on a baking sheet before transferring to a freezer bag. When ready to bake, add just 1-2 minutes to the baking time and bake from frozen. This method actually produces cookies with thicker edges and softer centers because the cold dough takes longer to spread in the oven. You can also bake the cookies completely and freeze them for later. Double-wrap the baked cookies in plastic wrap and place them in a freezer-safe container. They’ll maintain their quality for up to three months. To refresh frozen baked cookies, warm them briefly in a 300°F oven for 5-7 minutes. This brings back the freshly baked aroma and softens the texture slightly. Making a double batch and freezing half ensures you always have homemade treats ready for unexpected guests or last-minute gift needs.How to Store Andes Mint Cookies: Best Practices
Proper storage ensures your Andes Mint Cookies maintain their delicious texture and flavor for as long as possible. Following these guidelines will help you enjoy your baking efforts for days or even weeks after making them.Refrigeration
For short-term storage, keeping your cookies at room temperature is generally the best approach. Place cooled cookies in an airtight container, separating layers with parchment paper to prevent sticking. This method preserves the soft, chewy texture that makes these cookies so delightful. At room temperature, properly stored Andes Mint Cookies will maintain their quality for up to five days. Avoid storing them in the refrigerator unless absolutely necessary, as the cool temperature can cause the chocolate to develop sugar bloom a white, powdery appearance that affects the look but not the taste of the cookies.Freezing
For long-term storage, freezing is an excellent option. To freeze baked cookies, first arrange them in a single layer on a baking sheet and place them in the freezer until firm. This prevents them from sticking together. Then transfer the frozen cookies to a freezer-safe bag or container, removing as much air as possible before sealing. Properly frozen cookies will maintain their quality for up to three months. For added convenience, consider labeling your storage container with the date and a simple “bake from frozen” instruction if you’re also storing dough.Reheating
When you’re ready to enjoy frozen cookies, thaw them at room temperature for about 30 minutes. For a freshly baked taste, warm them in a 300°F oven for 5-7 minutes. This gentle reheating refreshes the texture without risking burning the chocolate. Avoid microwaving these cookies, as the uneven heating can create hot spots that melt the chocolate too much while leaving other parts cold. If you prefer warm cookies, the oven method yields the most consistent results with the best texture.Meal Prep Considerations
For efficient meal prep, consider making a double batch and storing both dough and baked cookies. This gives you the flexibility to bake fresh cookies quickly when needed while also having ready-to-eat treats on hand. Portion the dough into balls before freezing so you can bake exactly the number of cookies you need without thawing the entire batch. This approach is perfect for busy parents, working professionals, or anyone who wants fresh homemade cookies without the daily commitment of baking. With proper storage and preparation, you can enjoy delicious Andes Mint Cookies whenever the craving strikes.
FAQs: Frequently Asked Questions About Andes Mint Cookies
What are Andes mint cookies?
How do you make Andes mint cookies from scratch?
Can you substitute ingredients in Andes mint cookies?
How should you store Andes mint cookies?
Can you freeze Andes mint cookie dough?

Andes Mint Cookies
🍫🌿 Fudgy chocolate cookies packed with creamy Andes mint chips – minty chocolate bliss in every bite!
🎄 Perfect holiday treat with soft centers and crisp edges; easy to bake and share with loved ones.
- Total Time: 55 minutes
- Yield: 36 cookies
Ingredients
– 1 cup butter for rich, tender base
– 1 cup white sugar for sweetness and crispy edges
– 1 cup brown sugar for moisture and depth of flavor
– 2 eggs to bind ingredients and add structure
– 1 teaspoon vanilla extract to enhance flavor
– 2 cups all-purpose flour for structure
– 1 cup cocoa powder for intense chocolate flavor
– 1 teaspoon baking soda to help cookies rise
– 1/2 teaspoon salt to balance sweetness
– 1.5 cups chopped Andes mints for minty goodness
– Powdered sugar for dusting (optional)
Instructions
1-First Step: Preparation and Mise en Place Before you begin mixing, prepare your baking space. Preheat your oven to 350°F (175°C) and line your baking sheets with parchment paper or silicone baking mats. This ensures your cookies won’t stick and makes cleanup effortless. Chop your Andes mints into small, uniform pieces about the size of regular chocolate chips. This ensures even distribution throughout the dough and consistent melting during baking. Having everything measured and ready before you start makes the process more enjoyable and helps prevent mistakes.
2-Second Step: Creaming the Butter and Sugars In a large mixing bowl, combine the softened butter, white sugar, and brown sugar. Using an electric mixer on medium speed, beat these ingredients together until the mixture is light and fluffy, about 2-3 minutes. This process, called creaming, incorporates air into the dough, which helps create a lighter texture. The sugars should be well-dissolved into the butter, and the mixture should appear pale in color. Scrape down the sides of the bowl periodically to ensure all ingredients are incorporated evenly. This step is crucial for achieving the right cookie texture, so don’t rush it.
3-Third Step: Adding Eggs and Vanilla Add the eggs one at a time to the creamed butter mixture, beating well after each addition. This ensures proper emulsification and distribution. After the eggs are fully incorporated, add the vanilla extract and mix briefly to combine. The mixture should appear glossy and smooth. Avoid overmixing at this stage, as too much air incorporation can lead to cookies that spread too much in the oven. If you’re looking for more baking inspiration for simple and accessible recipes, this technique is foundational to many successful cookie recipes.
4-Fourth Step: Mixing the Dry Ingredients In a separate medium bowl, whisk together the flour, cocoa powder, baking soda, and salt until well combined. This step ensures that the leavening agent is evenly distributed throughout the flour, which helps the cookies rise uniformly. The cocoa powder tends to clump, so thorough whisking is essential for a consistent chocolate flavor throughout your cookies. Sifting these ingredients together can also help achieve a lighter texture, especially if your flour or cocoa has settled in the pantry.
5-Fifth Step: Combining Wet and Dry Ingredients With your mixer on low speed, gradually add the dry ingredients to the wet mixture. Mix only until just combined, being careful not to overmix. Overmixing develops gluten in the flour, which can lead to tough cookies. You should stop mixing as soon as you no longer see streaks of dry flour. The dough will be thick and dark chocolate in color. This gentle mixing approach preserves the tender texture that makes these cookies so delightful. If you notice any dry pockets at the bottom of the bowl, finish mixing by hand with a spatula to avoid overworking the dough.
6-Sixth Step: Folding in the Andes Mints Remove the bowl from the mixer and use a spatula to fold in the chopped Andes mints by hand. This gentle folding technique prevents the mints from breaking down too much and ensures they’re evenly distributed throughout the dough. The contrast between the dark chocolate dough and the green and white mint pieces creates a beautiful visual appeal. If you prefer larger chunks of melted mint, reserve some of the larger pieces to press onto the tops of the cookies before baking. This technique creates extra pockets of minty goodness on the surface of each cookie.
7-Seventh Step: Shaping and Baking For optimal results, chill the dough for at least 30 minutes before baking. This step prevents the cookies from spreading too much in the oven and helps develop the flavors. Once chilled, scoop tablespoon-sized portions of dough onto your prepared baking sheets, spacing them about 2 inches apart to allow for spreading. For uniform cookies, use a cookie scoop or measure the dough with a tablespoon. Bake at 350°F for 10-12 minutes, or until the edges are set but the centers still look slightly soft. The cookies will continue to cook on the baking sheet after removal from the oven, so removing them while slightly underbaked ensures a perfectly chewy texture.
8-Final Step: Cooling and Serving Allow the cookies to cool on the baking sheet for about 5 minutes before transferring them to a wire rack to cool completely. This short rest period allows them to set and makes them easier to move without breaking. Once cooled, you can dust them lightly with powdered sugar for a snowy appearance that’s perfect for holiday occasions. These Andes Mint Cookies are delicious served warm, when the chocolate is still slightly melted, or at room temperature. Pair them with a glass of cold milk or a cup of hot coffee for the ultimate treat. Enjoy the compliments that will surely follow when you share these delightful cookies with friends and family.
Last Step:
Please leave a rating and comment letting us know how you liked this recipe! This helps our business to thrive and continue providing free, high-quality recipes for you.Notes
❄️ Chill dough 30 minutes if too soft for thicker cookies.
🍫 Chop Andes mints into varied sizes for gooey pockets.
🌿 Press extra mint pieces on top before baking for visual pop.
- Prep Time: 15 minutes
- Chill: 30 minutes
- Cook Time: 10 minutes
- Category: Dessert
- Method: Baking
- Cuisine: American
- Diet: Vegetarian
Nutrition
- Serving Size: 1 cookie
- Calories: 160 calories
- Sugar: 14g
- Sodium: 130mg
- Fat: 8g
- Saturated Fat: 5g
- Unsaturated Fat: 2g
- Trans Fat: 0g
- Carbohydrates: 21g
- Fiber: 1g
- Protein: 2g
- Cholesterol: 25mg


