Why You’ll Love This Chocolate Whipped Cream
If you have ever wanted to add a rich, creamy touch to your desserts without spending hours in the kitchen, this recipe is for you. Chocolate whipped cream is a game changer for home bakers and food enthusiasts alike. It strikes the perfect balance between the airy lightness of traditional whipped topping and the deep, satisfying flavor of cocoa. Whether you are topping a pie, filling a cake, or just eating it by the spoonful, this easy chocolate whipped cream recipe delivers incredible results with minimal effort.
- Ease of preparation: You do not need to be a professional pastry chef to master this homemade whipped cream. With just a few simple ingredients and a hand mixer, you can whip up a batch in under ten minutes. It is so simple that even beginners can achieve bakery-quality results on the first try.
- Versatility: This cocoa whipped cream is incredibly adaptable. It works beautifully as a frosting for cakes, a topping for hot cocoa, or a filling for crepes. You can easily adjust the sweetness or cocoa intensity to suit your specific taste, making it a go-to recipe for any occasion.
- Distinctive flavor: Unlike store-bought versions that often taste artificial, this chocolate whipped cream recipe uses real cocoa powder and fresh cream. The result is a fresh, vibrant chocolate flavor that stands out. The addition of a pinch of salt helps to balance the sweetness and makes the chocolate taste even more intense.
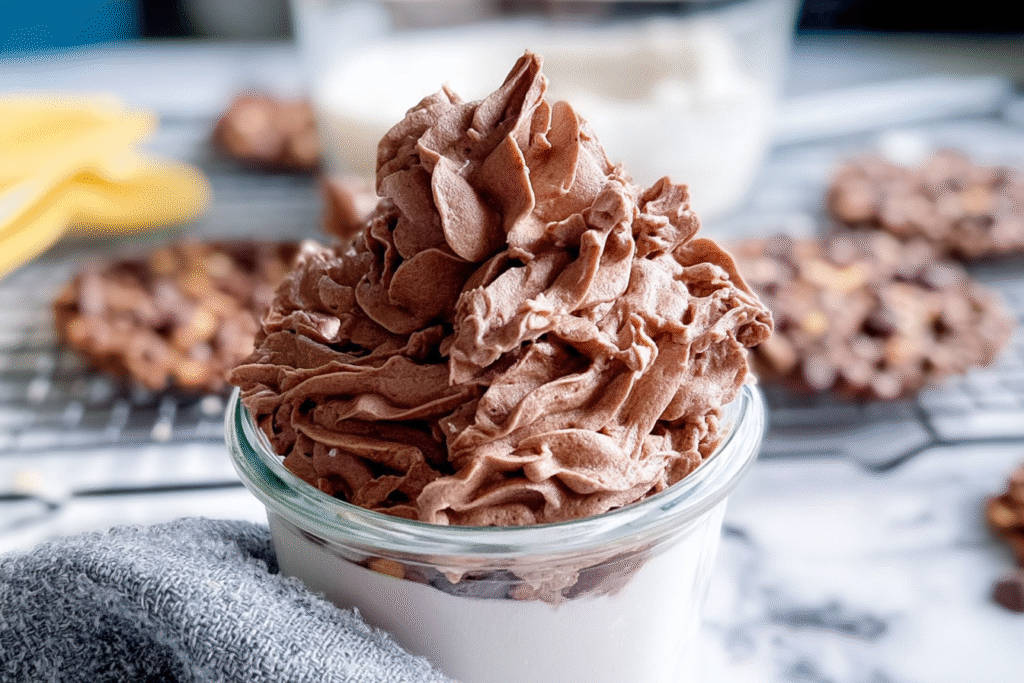
- Texture: When made correctly, this cream holds its shape well, making it perfect for piping. It creates beautiful swirls on cupcakes and stable layers in trifles. If you need it to last even longer, you can easily turn it into stabilised whipped cream with a simple addition.
Jump to:
- Why You’ll Love This Chocolate Whipped Cream
- Essential Ingredients for Chocolate Whipped Cream
- Special Dietary Options
- How to Prepare the Perfect Chocolate Whipped Cream: Step-by-Step Guide
- First Step: Preparation and Mise en Place
- Second Step: Whipping the Cream
- Third Step: Adding Flavor and Sweetness
- Fourth Step: Achieving Stiff Peaks
- Final Step: Serving and Storage
- Dietary Substitutions to Customize Your Chocolate Whipped Cream
- Protein and Main Component Alternatives
- Vegetable, Sauce, and Seasoning Modifications
- Mastering Chocolate Whipped Cream: Advanced Tips and Variations
- Pro Cooking Techniques
- Flavor Variations
- Presentation Tips
- Make-Ahead Options
- How to Store Chocolate Whipped Cream: Best Practices
- Refrigeration
- Freezing
- Meal Prep Considerations
- FAQs: Frequently Asked Questions About Chocolate Whipped Cream
- How do I make chocolate whipped cream from scratch?
- What ingredients are needed for homemade chocolate whipped cream?
- How long does chocolate whipped cream last in the fridge?
- Can I make chocolate whipped cream without heavy cream?
- What are the best ways to use chocolate whipped cream?
- Chocolate Whipped Cream
- Ingredients
- Instructions
- Last Step:
- Notes
- Nutrition
- Did you make this recipe?
Essential Ingredients for Chocolate Whipped Cream
Creating the best chocolate whipped cream starts with high-quality ingredients. Because the recipe has so few components, each one plays a crucial role in the final texture and taste. Using fresh, cold dairy is the secret to achieving those perfect stiff peaks.
Here are the main ingredients you will need to make this delicious topping:
- 1 cup cold heavy whipping cream – This is the base of the recipe. You need cream with at least 36% fat content to get the best volume and structure.
- 3 tablespoons unsweetened cocoa powder – This provides the rich chocolate flavor without adding extra sugar or seizing the mixture like melted chocolate might.
- 3-4 tablespoons powdered sugar – Powdered sugar dissolves easily into the cream, preventing a grainy texture. Adjust the amount based on how sweet you like it.
- ½ teaspoon vanilla extract – This adds a warm, aromatic depth that complements the cocoa perfectly.
- Pinch of salt – A small amount of salt helps to cut the sweetness and brighten the chocolate flavor.
Special Dietary Options
One of the great things about making your own heavy cream chocolate topping is that you can control what goes into it. If you have specific dietary needs, you can easily modify the recipe to suit you.
- Vegan: Use full-fat coconut cream that has been chilled overnight. Scoop out the solid part only and whip it with the cocoa and a plant-based powdered sugar.
- Gluten-free: This recipe is naturally gluten-free, provided you ensure your cocoa powder and vanilla extract are certified gluten-free to avoid cross-contamination.
- Low-calorie: While hard to replicate the exact texture, you can try using a blend of Greek yogurt and a lighter whipped topping, though the stability will differ.
How to Prepare the Perfect Chocolate Whipped Cream: Step-by-Step Guide
Making chocolate whipped cream is a straightforward process, but paying attention to the details will ensure you get the best texture every time. The most critical rule to remember is to keep everything cold. Warm cream will not whip properly and will result in a runny mess rather than a fluffy topping.
First Step: Preparation and Mise en Place
Before you start mixing, you need to prepare your tools and ingredients. Place your metal mixing bowl and the whisk attachment or beaters from your hand mixer into the freezer for at least 15 to 20 minutes. This step is vital because a cold bowl helps the cream whip up faster and hold its shape better. While your tools are chilling, measure out all your ingredients so they are ready to go.
Ensure your heavy whipping cream is straight from the refrigerator, not room temperature. If you are using vanilla extract, have it measured and waiting. Sifting your cocoa powder before you start is also a good idea to prevent lumps from forming in your finished chocolate whipped cream.
Second Step: Whipping the Cream
Remove the chilled bowl and beaters from the freezer. Pour the cold heavy whipping cream into the bowl. Begin beating on medium speed. You want to incorporate air into the cream gradually. Starting on medium speed prevents splashing and helps build a stable structure.
Watch the cream closely as it mixes. It will go from a liquid state to frothy, and then start to thicken. You are looking for the “soft peak” stage. This is when you lift the beaters out of the cream, and the peaks that form droop over slightly at the tips. This usually takes about 1 to 2 minutes. Do not rush this step, as the foundation you build now determines the final volume.
Third Step: Adding Flavor and Sweetness
Once you have achieved soft peaks, it is time to add the flavor. Reduce the mixer speed to low to prevent a cloud of cocoa powder from puffing out of the bowl. Sprinkle in the unsweetened cocoa powder, the powdered sugar, the salt, and the vanilla extract.
Once the ingredients are added, increase the speed back to medium-high. Continue to whip the mixture until all the dry ingredients are fully incorporated. Scrape down the sides of the bowl with a spatula to make sure no pockets of cocoa powder are hiding at the bottom. You want the color to be uniform and a rich, deep brown.
Fourth Step: Achieving Stiff Peaks
Increase the mixer to high speed. Continue whipping until the cream reaches the “stiff peak” stage. This is the crucial moment for perfect chocolate whipped cream. When you lift the beaters, the peaks should stand up straight without drooping or folding over. The mixture should look thick and glossy.
Be very careful not to overwhip at this stage. If you whip too long, the cream will start to turn grainy and eventually separate into butter and buttermilk. If you notice the mixture looking slightly yellow or curdled, you have gone too far. Stop the mixer as soon as you see stiff peaks form.
Final Step: Serving and Storage
Your homemade chocolate whipped cream is now ready to use. You can transfer it to a piping bag fitted with a decorative tip to frost cakes or top cupcakes. Alternatively, simply spoon it over your favorite desserts like brownies, pies, or fresh berries.
For a richer flavor, you can gently fold in 2 tablespoons of melted dark chocolate at the very end using a spatula. This adds a luxurious texture and depth. Serve immediately for the fluffiest texture, or store it in the refrigerator if you are prepping ahead. This recipe yields about 2 cups, which is enough to top 8 to 10 servings.
Pro Tip: Room temperature ingredients deflate the cream, so keep everything cold. If your kitchen is warm, try placing your bowl of cream inside a larger bowl filled with ice while you whip it.

Dietary Substitutions to Customize Your Chocolate Whipped Cream
Cooking should be flexible and fun, allowing you to adapt recipes to fit your lifestyle or what you have in your pantry. This best chocolate whipped cream recipe is very forgiving and lends itself well to substitutions.
Protein and Main Component Alternatives
The main component of this recipe is the heavy cream, which provides the fat necessary for structure. If you cannot use dairy or want to try something different, there are options available. For a vegan alternative that still provides a great texture, use the solid cream from a can of full-fat coconut milk. Chill the can overnight, scoop out the solid part, and whip it just like dairy cream. It does have a slight coconut flavor, but it pairs exceptionally well with chocolate.
Another option for those avoiding dairy is using aquafaba, which is the liquid from a can of chickpeas. While it lacks the creaminess of fat, it can be whipped to stiff peaks. You will need about 6 tablespoons of aquafaba. Whip it with cream of tartar for stability, then fold in your cocoa powder. This creates a very light, airy whipped topping that is completely fat-free.
Vegetable, Sauce, and Seasoning Modifications
While this recipe is not vegetable-heavy, you can certainly modify the seasonings to create unique flavor profiles. If you enjoy a mocha flavor, add 1 teaspoon of instant espresso powder to the dry ingredients before whipping. The coffee intensifies the chocolate taste without overpowering it.
For a spicy kick, try adding a pinch of cayenne pepper or cinnamon along with the cocoa. This gives the chocolate whipped cream frosting a warm, complex flavor that works well on autumnal desserts. If you prefer a fruity note, a drop or two of orange or almond extract can transform the profile entirely, reminding you of classic chocolate orange candies.
Mastering Chocolate Whipped Cream: Advanced Tips and Variations
Once you have mastered the basic recipe, there are several techniques and variations you can try to take your chocolate whipped cream to the next level. These tips will help you achieve professional results in your home kitchen.
Pro Cooking Techniques
For the most stable stabilised whipped cream, consider adding a teaspoon of unflavored gelatin. Bloom the gelatin in a tablespoon of cold water, then microwave it for a few seconds until melted. With the mixer running, slowly drizzle the gelatin into the cream once it has reached soft peaks. This allows the cream to hold its shape for days, even at room temperature, making it perfect for decorating wedding cakes or outdoor party treats.
Flavor Variations
Do not be afraid to experiment with different types of chocolate. While cocoa powder is standard, you can infuse the cream with other flavors. Heat the cream gently on the stove with whole coffee beans or tea leaves, let it steep, then chill it thoroughly before whipping. This infuses the cream with subtle flavors that make the homemade chocolate whipped cream taste sophisticated and unique.
Presentation Tips
When serving, use a star tip to pipe elegant rosettes. For a finishing touch, grate some high-quality dark chocolate over the top or sprinkle with sea salt. This contrasts the creamy texture and adds visual appeal. If you are using it for a cake, apply a crumb coat first, chill the cake, and then apply a thicker layer of the chocolate frosting for a smooth finish.
Make-Ahead Options
You can make the cream a day in advance if you store it properly. Whip it to stiff peaks, place it in a piping bag or airtight container, and keep it in the refrigerator. If it looks a little deflated when you take it out, give it a quick whisk with a hand mixer for a few seconds to fluff it back up. This is a great time-saving strategy for busy holidays.
How to Store Chocolate Whipped Cream: Best Practices
Proper storage is key to maintaining the quality and safety of your chocolate whipped cream. Because it is a dairy product, it is perishable and needs to be handled correctly to prevent it from spoiling or separating.
Refrigeration
For short-term storage, keep the cream in an airtight container in the refrigerator. It will stay fresh for 2 to 3 days. If you have piped it onto a cake or dessert, you can store the dessert in the fridge, but be aware that over time, the cream may start to “weep” or release liquid. Placing a piece of plastic wrap gently over the surface can help prevent a skin from forming.
Freezing
Yes, you can freeze whipped cream, but the texture will change slightly upon thawing. The best method is to spoon dollops of the cream onto a baking sheet lined with parchment paper and freeze them until solid. Then, transfer the frozen dollops into a freezer bag. They will keep for up to 1 month. To use, simply thaw a few dollops in the fridge overnight and place them on top of hot cocoa or desserts.
Meal Prep Considerations
If you are batch cooking for a party, it is better to whip the cream fresh on the day of the event for the best texture. However, you can measure and mix your dry ingredients (sugar, cocoa, salt) in a small bag ahead of time. When you are ready to bake, just dump the premix into the cream and whip. This cuts down on prep time without sacrificing quality.

FAQs: Frequently Asked Questions About Chocolate Whipped Cream
How do I make chocolate whipped cream from scratch?
What ingredients are needed for homemade chocolate whipped cream?
How long does chocolate whipped cream last in the fridge?
Can I make chocolate whipped cream without heavy cream?
What are the best ways to use chocolate whipped cream?

Chocolate Whipped Cream
🍫 Luxuriously airy chocolate whipped cream that stabilizes perfectly for pies, cakes, or hot cocoa!
☁️ Foolproof 5-minute recipe with intense chocolate flavor – lighter alternative to frosting.
- Total Time: 5 minutes
- Yield: 2 cups
Ingredients
– 1 cup cold heavy whipping cream
– 3 tablespoons unsweetened cocoa powder
– 3-4 tablespoons powdered sugar
– ½ teaspoon vanilla extract
– Pinch of salt
Instructions
1-First Step: Preparation and Mise en Place Before you start mixing, you need to prepare your tools and ingredients. Place your metal mixing bowl and the whisk attachment or beaters from your hand mixer into the freezer for at least 15 to 20 minutes. This step is vital because a cold bowl helps the cream whip up faster and hold its shape better. While your tools are chilling, measure out all your ingredients so they are ready to go. Ensure your heavy whipping cream is straight from the refrigerator, not room temperature. If you are using vanilla extract, have it measured and waiting. Sifting your cocoa powder before you start is also a good idea to prevent lumps from forming in your finished chocolate whipped cream.
2-Second Step: Whipping the Cream Remove the chilled bowl and beaters from the freezer. Pour the cold heavy whipping cream into the bowl. Begin beating on medium speed. You want to incorporate air into the cream gradually. Starting on medium speed prevents splashing and helps build a stable structure. Watch the cream closely as it mixes. It will go from a liquid state to frothy, and then start to thicken. You are looking for the “soft peak” stage. This is when you lift the beaters out of the cream, and the peaks that form droop over slightly at the tips. This usually takes about 1 to 2 minutes. Do not rush this step, as the foundation you build now determines the final volume.
3-Third Step: Adding Flavor and Sweetness Once you have achieved soft peaks, it is time to add the flavor. Reduce the mixer speed to low to prevent a cloud of cocoa powder from puffing out of the bowl. Sprinkle in the unsweetened cocoa powder, the powdered sugar, the salt, and the vanilla extract. Once the ingredients are added, increase the speed back to medium-high. Continue to whip the mixture until all the dry ingredients are fully incorporated. Scrape down the sides of the bowl with a spatula to make sure no pockets of cocoa powder are hiding at the bottom. You want the color to be uniform and a rich, deep brown.
4-Fourth Step: Achieving Stiff Peaks Increase the mixer to high speed. Continue whipping until the cream reaches the “stiff peak” stage. This is the crucial moment for perfect chocolate whipped cream. When you lift the beaters, the peaks should stand up straight without drooping or folding over. The mixture should look thick and glossy. Be very careful not to overwhip at this stage. If you whip too long, the cream will start to turn grainy and eventually separate into butter and buttermilk. If you notice the mixture looking slightly yellow or curdled, you have gone too far. Stop the mixer as soon as you see stiff peaks form.
5-Final Step: Serving and Storage Your homemade chocolate whipped cream is now ready to use. You can transfer it to a piping bag fitted with a decorative tip to frost cakes or top cupcakes. Alternatively, simply spoon it over your favorite desserts like brownies, pies, or fresh berries. For a richer flavor, you can gently fold in 2 tablespoons of melted dark chocolate at the very end using a spatula. This adds a luxurious texture and depth. Serve immediately for the fluffiest texture, or store it in the refrigerator if you are prepping ahead. This recipe yields about 2 cups, which is enough to top 8 to 10 servings.
Last Step:
Please leave a rating and comment letting us know how you liked this recipe! This helps our business to thrive and continue providing free, high-quality recipes for you.Notes
❄️ Chill bowl, beaters, and cream for maximum volume and stability.
🍫 Sift cocoa powder to prevent bitter lumps in the cream.
⏱️ Stop at stiff peaks – overwhipping turns it into butter!
- Prep Time: 5 minutes
- Category: Dessert
- Method: No-Bake
- Cuisine: American
- Diet: Vegetarian
Nutrition
- Serving Size: 2 tablespoons
- Calories: 100 calories
- Sugar: 6g
- Sodium: 20mg
- Fat: 10g
- Saturated Fat: 6g
- Unsaturated Fat: 3g
- Trans Fat: 0g
- Carbohydrates: 6g
- Fiber: 1g
- Protein: 1g
- Cholesterol: 35mg


