
Why You’ll Love This Edible Sugar Cookie Dough
If you’re looking for a sweet treat that satisfies your cookie cravings without turning on the oven, this edible sugar cookie dough recipe is exactly what you need. Here’s why this recipe stands out among other dessert options: * Ease of preparation: This recipe comes together in just 20 minutes of active time with simple pantry staples. You don’t need any special equipment or baking skills to create this delicious treat. Just mix, chill briefly, and enjoy! * Health benefits: Unlike traditional cookie dough, this version eliminates raw eggs and uses heat-treated flour to remove harmful bacteria. This means you can enjoy the classic cookie dough experience without the risk of salmonella or E. coli, making it a safer option for everyone in the family. * Versatility: This dough is incredibly adaptable to different dietary preferences. You can easily customize it with vegan ingredients, gluten-free flour alternatives, or reduced-calorie substitutions without sacrificing taste or texture. It’s perfect for serving at gatherings where guests may have various dietary restrictions. * Distinctive flavor: The creamy texture and classic vanilla-forward taste deliver the authentic cookie dough experience we all crave. The sweetness balances perfectly with buttery notes, creating an indulgent treat that stands on its own as a dessert rather than just a baking component.Jump to:
- Why You’ll Love This Edible Sugar Cookie Dough
- Essential Ingredients for Edible Sugar Cookie Dough
- Main Ingredients
- Special Dietary Options
- How to Prepare the Perfect Edible Sugar Cookie Dough: Step-by-Step Guide
- Preparing Your Ingredients
- Mixing the Dough
- Adding Mix-ins and Finishing
- Dietary Substitutions to Customize Your Edible Sugar Cookie Dough
- Protein and Main Component Alternatives
- Vegetable, Sauce, and Seasoning Modifications
- Mastering Edible Sugar Cookie Dough: Advanced Tips and Variations
- Pro Cooking Techniques
- Flavor Variations
- Presentation Tips
- Make-ahead Options
- How to Store Edible Sugar Cookie Dough: Best Practices
- Refrigeration
- Freezing
- Reheating
- Meal Prep Considerations
- FAQs: Frequently Asked Questions About Edible Sugar Cookie Dough
- Can you eat sugar cookie dough raw safely?
- How do you make edible sugar cookie dough at home?
- What’s the difference between edible cookie dough and regular dough?
- How long does edible sugar cookie dough last in the fridge?
- Is edible sugar cookie dough safe for kids and pregnant women?
- Edible Sugar Cookie Dough
- Ingredients
- Instructions
- Last Step:
- Notes
- Nutrition
- Did you make this recipe?
Essential Ingredients for Edible Sugar Cookie Dough
Before we start mixing up this delicious treat, let’s gather everything you’ll need. Each ingredient serves a specific purpose in creating the perfect texture and flavor:Main Ingredients
1 cup heat-treated all-purpose flour – This provides the structure for your dough while being safe for raw consumption after heat treatment ½ cup softened unsalted butter – Creates the rich, creamy texture and adds essential fat for that classic cookie dough mouthfeel ½ cup granulated sugar – Provides sweetness and helps create the right consistency in the dough 2 tbsp milk – Adds moisture and helps bind the ingredients together (use pasteurized for optimal safety) 1 tsp vanilla extract – Infuses the dough with that signature cookie flavor we all love Optional mix-ins (chocolate chips, sprinkles, nuts) – Customize your dough with your favorite additions for extra texture and flavorSpecial Dietary Options
Vegan: Substitute plant-based butter for regular butter and use oat milk, almond milk, or soy milk instead of dairy milk. Both alternatives work beautifully in this recipe without compromising texture. Gluten-free: Replace regular all-purpose flour with a high-quality gluten-free 1-to-1 baking flour. Make sure to heat-treat it the same way as regular flour for safety. Low-calorie: Try using a reduced-calorie butter alternative and natural sweeteners like monk fruit or stevia blends designed for baking. These substitutions can significantly reduce the calorie count while maintaining good flavor.How to Prepare the Perfect Edible Sugar Cookie Dough: Step-by-Step Guide
Creating your own edible sugar cookie dough is a simple process that yields delicious results. Follow these detailed steps for cookie dough perfection every time.Preparing Your Ingredients
First Step: Start by heat-treating your flour to eliminate any bacteria that could cause foodborne illness. Spread your flour on a baking sheet and bake at 350°F (175°C) for 5-10 minutes, stirring halfway through. Use a food thermometer to ensure the flour reaches 160°F internally. Let it cool completely before using. This crucial safety step takes about 15-20 minutes total including cooling time. Second Step: While your flour cools, prepare your butter. It should be softened to room temperature for proper creaming but not melted. Cut it into small cubes to help it incorporate evenly. Measure out your sugar, milk, vanilla extract, and any mix-ins you plan to use. Having everything measured and ready (mise en place) makes the process smoother and ensures accurate results.Mixing the Dough
Third Step: In a medium bowl, use a hand mixer or stand mixer to cream the softened butter and granulated sugar together. Beat on medium speed for 2-3 minutes until the mixture is light and fluffy. This process incorporates air into the dough and creates that desirable creamy texture. Scrape down the sides of the bowl as needed to ensure even mixing. Fourth Step: Add the vanilla extract and milk to the creamed butter and sugar mixture. Mix on low speed just until combined. Don’t overmix at this stage. The liquids help bring the dough together and create the perfect consistency for scooping. If you prefer a softer dough, you can add an additional teaspoon of milk. Fifth Step: With the mixer on low speed, gradually add the cooled, heat-treated flour to the wet mixture. Mix just until the flour disappears into the dough. It’s important not to overmix at this stage, as it can make the dough tough. The dough will become thick and should hold together when pinched. If it’s too crumbly, add milk one teaspoon at a time until it reaches the desired consistency.Adding Mix-ins and Finishing
Sixth Step: Gently fold in your chosen mix-ins using a spatula or wooden spoon. Chocolate chips are the classic choice, but sprinkles add festive color, and chopped nuts provide a satisfying crunch. Be careful not to overmix, which can break down your add-ins. For best distribution, use a folding motion rather than stirring vigorously. Final Step: Cover the bowl and refrigerate the dough for at least 30 minutes. This chilling period helps the flavors meld and firms up the dough for better scooping and eating. The dough can be stored in the refrigerator for up to a week in an airtight container. When ready to serve, scoop into small bowls or roll into balls for easy portioning. For an extra special presentation, top with additional sprinkles or a drizzle of melted chocolate.
Dietary Substitutions to Customize Your Edible Sugar Cookie Dough
Protein and Main Component Alternatives
For those looking to adjust the protein content or find alternatives to main ingredients, several options work well in this recipe. If you’re looking to boost the protein, try adding a scoop of vanilla protein powder or Greek yogurt in place of some of the butter. These additions not only increase the nutritional value but also create a creamier texture. For nut-free alternatives to mix-ins, consider using seeds like sunflower or pumpkin seeds instead of nuts. They provide similar crunch without the allergens. If you’re avoiding dairy altogether, coconut cream works beautifully as a substitute for butter, though it will impart a subtle coconut flavor to the finished dough.Vegetable, Sauce, and Seasoning Modifications
While this recipe doesn’t typically include vegetables, creative variations can incorporate unexpected ingredients for unique flavor profiles. For example, pureed white beans can replace some of the butter for added fiber and nutrients without noticeably changing the taste. Seasoning variations allow for endless creativity. Try adding cinnamon, nutmeg, or cardamom for a spiced version that evokes holiday flavors. For a mocha twist, dissolve instant espresso powder in the milk before mixing. Citrus zest from lemon, orange, or lime adds brightness that complements the sweetness beautifully.Mastering Edible Sugar Cookie Dough: Advanced Tips and Variations
Pro Cooking Techniques
For the smoothest texture, try using room temperature ingredients and creaming your butter and sugar longer than the recipe suggests. This creates tiny air pockets that make the dough exceptionally light. When folding in mix-ins, toss them in a tablespoon of flour first to prevent them from sinking to the bottom of your storage container.Flavor Variations
Transform this basic dough into different flavor profiles by swapping extracts or adding spices. Almond, coconut, or maple extract can completely change the character of your dough. For a chocolate version, replace 2 tablespoons of the flour with cocoa powder. A pinch of sea salt on top enhances the sweetness and creates a sophisticated flavor profile.Presentation Tips
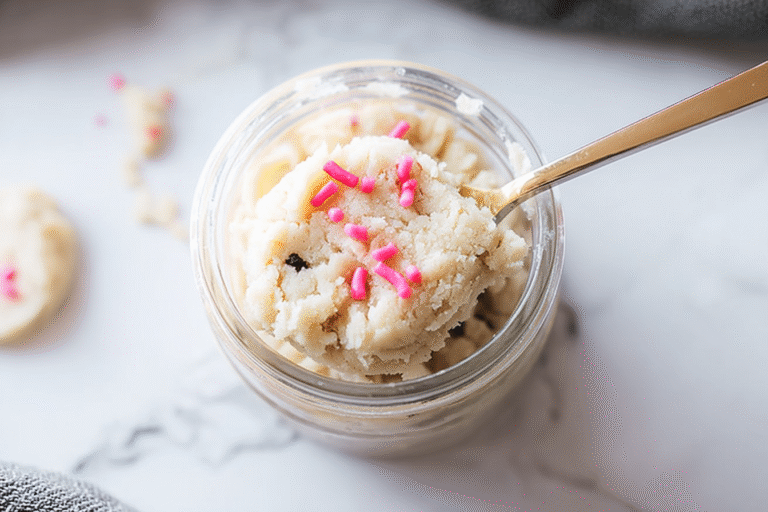
Serve your dough in small mason jars with colorful spoons for individual portions. Roll the dough into balls and coat them in sprinkles, nuts, or powdered sugar for an impressive presentation. You can also press the dough into a shallow pan, top with melted chocolate and sprinkles, then cut into bars for easy serving.Make-ahead Options
This dough freezes beautifully for up to 3 months. Portion it into logs or balls before freezing for easy thawing. You can also create a dough bar station by prepping various mix-ins in small bowls and letting guests customize their own creations. This makes it perfect for parties and family gatherings.How to Store Edible Sugar Cookie Dough: Best Practices
Proper storage ensures your edible cookie dough stays fresh and safe to eat. Follow these guidelines for the best results:Refrigeration
Store your homemade edible sugar cookie dough in an airtight container in the refrigerator for 5-7 days. The lack of eggs actually extends the shelf life compared to regular cookie dough. Keep the container away from strong-smelling foods, as the butter can absorb odors. For optimal freshness, place a piece of parchment paper directly on the surface of the dough to prevent it from drying out.Freezing
For longer storage, freeze portions in freezer bags for up to 2-3 months. Consider portioning into small logs or balls before freezing for easy thawing and serving. Press the dough flat in the bag to speed up freezing and thawing times. Label with the date so you can keep track of freshness.Reheating
When ready to enjoy frozen dough, transfer it to the refrigerator overnight to thaw. For a special treat, you can briefly microwave frozen dough balls (10-15 seconds) to create a warm, freshly-baked texture without actually baking. This creates a delightful contrast between the slightly warm exterior and cool center.Meal Prep Considerations
This dough is perfect for batch cooking and meal prep. Make a large batch on Sunday, portion into individual servings, and store in the refrigerator for convenient snacks throughout the week. Consider adding a variety of mix-ins to different portions for variety. Always use clean utensils when serving to prevent contamination.
FAQs: Frequently Asked Questions About Edible Sugar Cookie Dough
Can you eat sugar cookie dough raw safely?
How do you make edible sugar cookie dough at home?
What’s the difference between edible cookie dough and regular dough?
How long does edible sugar cookie dough last in the fridge?
Is edible sugar cookie dough safe for kids and pregnant women?
Edible Sugar Cookie Dough
🍪😋 Guilt-free raw sugar cookie dough indulgence – creamy, sweet, addictive snack straight from the bowl!
✨ Fully safe with heat-treated flour, no eggs; customizable flavors for instant dessert delight.
- Total Time: 20 minutes
- Yield: 2 cups
Ingredients
– 1 cup heat-treated all-purpose flour for structure and safe raw consumption
– ½ cup softened unsalted butter for rich creamy texture and mouthfeel
– ½ cup granulated sugar for sweetness and consistency
– 2 tbsp milk for moisture and binding (pasteurized)
– 1 tsp vanilla extract for signature cookie flavor
– chocolate chips, sprinkles, nuts (optional mix-ins) for extra texture and flavor
Instructions
1-First Step: Start by heat-treating your flour to eliminate any bacteria that could cause foodborne illness. Spread your flour on a baking sheet and bake at 350°F (175°C) for 5-10 minutes, stirring halfway through. Use a food thermometer to ensure the flour reaches 160°F internally. Let it cool completely before using. This crucial safety step takes about 15-20 minutes total including cooling time.
2-Second Step: While your flour cools, prepare your butter. It should be softened to room temperature for proper creaming but not melted. Cut it into small cubes to help it incorporate evenly. Measure out your sugar, milk, vanilla extract, and any mix-ins you plan to use. Having everything measured and ready (mise en place) makes the process smoother and ensures accurate results.
3-Third Step: In a medium bowl, use a hand mixer or stand mixer to cream the softened butter and granulated sugar together. Beat on medium speed for 2-3 minutes until the mixture is light and fluffy. This process incorporates air into the dough and creates that desirable creamy texture. Scrape down the sides of the bowl as needed to ensure even mixing.
4-Fourth Step: Add the vanilla extract and milk to the creamed butter and sugar mixture. Mix on low speed just until combined. Don’t overmix at this stage. The liquids help bring the dough together and create the perfect consistency for scooping. If you prefer a softer dough, you can add an additional teaspoon of milk.
5-Fifth Step: With the mixer on low speed, gradually add the cooled, heat-treated flour to the wet mixture. Mix just until the flour disappears into the dough. It’s important not to overmix at this stage, as it can make the dough tough. The dough will become thick and should hold together when pinched. If it’s too crumbly, add milk one teaspoon at a time until it reaches the desired consistency.
6-Sixth Step: Gently fold in your chosen mix-ins using a spatula or wooden spoon. Chocolate chips are the classic choice, but sprinkles add festive color, and chopped nuts provide a satisfying crunch. Be careful not to overmix, which can break down your add-ins. For best distribution, use a folding motion rather than stirring vigorously.
7-Final Step: Cover the bowl and refrigerate the dough for at least 30 minutes. This chilling period helps the flavors meld and firms up the dough for better scooping and eating. The dough can be stored in the refrigerator for up to a week in an airtight container. When ready to serve, scoop into small bowls or roll into balls for easy portioning. For an extra special presentation, top with additional sprinkles or a drizzle of melted chocolate.
Last Step:
Please leave a rating and comment letting us know how you liked this recipe! This helps our business to thrive and continue providing free, high-quality recipes for you.Notes
🔥 Verify flour reaches 160°F internally for complete safety – use thermometer.
❄️ Dough freezes beautifully in portions; thaw in fridge for fresh treats anytime.
🍬 Taste and adjust sugar before adding chips for perfect sweetness balance.
- Prep Time: 10 minutes
- Flour Treatment: 10 minutes
- Category: Dessert
- Method: No-Bake
- Cuisine: American
- Diet: Vegetarian
Nutrition
- Serving Size: 1/4 cup
- Calories: 220 calories
- Sugar: 18g
- Sodium: 110mg
- Fat: 11g
- Saturated Fat: 7g
- Unsaturated Fat: 3g
- Trans Fat: 0g
- Carbohydrates: 29g
- Fiber: 1g
- Protein: 2g
- Cholesterol: 25mg


