Why You’ll Love These Mexican Popsicles
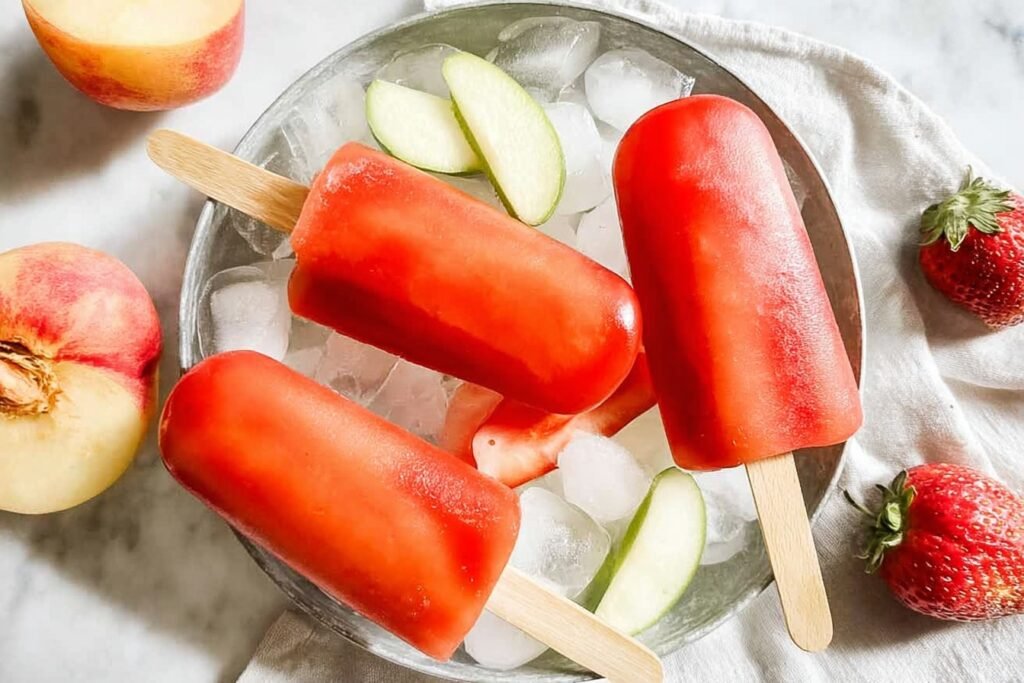
Mexican Popsicles are a fun, colorful way to bring a cool treat to your table. They are inspired by traditional Mexican paletas, and they come in bright flavors like strawberry cream, pecan cream, lime fruit, and mango and cream. If you love frozen snacks that taste fresh and feel special, these are a total win.
- Easy to make: Homemade Mexican Popsicles only need a quick blend, a pour into molds, and a freeze time of 4 to 6 hours. The prep time is just 10 to 15 minutes, so busy parents, students, and working professionals can fit them into almost any day.
- Real ingredients: These frozen treats use real fruit, real cream, real cane sugar, and premium natural components. That means real plump strawberries, smooth cream, freshly squeezed lime juice, real fruit chunks, ripe mango, and even real pecan pieces in some flavors.
- Great for many diets: Most Mexican Popsicles are naturally gluten-free. Fruit paletas are dairy-free and vegan, while cream paletas give you that rich, satisfying taste with real dairy. Some options are also made for different dietary needs, so label reading matters.
- Big flavor and fun texture: The fruit chunks add a fresh crunch, the cream versions feel smooth and rich, and the cane sugar keeps everything tasting clean and bright. Every bite feels refreshing and lively.
These Mexican Popsicles taste like summer in every bite, with fresh fruit flavor and creamy goodness that keeps you reaching for another one!
For readers who enjoy easy sweet treats at home, you may also love these chocolate muffins for a simple dessert idea or this cozy monkey bread for a crowd-pleasing bake.
Jump to:
- Why You’ll Love These Mexican Popsicles
- Essential Ingredients for Mexican Popsicles
- Special Dietary Options
- Popular Mexican Popsicle Flavors
- How to Prepare the Perfect Mexican Popsicles: Step-by-Step Guide
- Make the fruit base
- Blend the mixture
- Fill the molds
- Freeze until solid
- Unmold and serve
- Dietary Substitutions to Customize Your Mexican Popsicles
- Protein and Main Component Alternatives
- Vegetable, Sauce, and Seasoning Modifications
- Mastering Mexican Popsicles: Advanced Tips and Variations
- Pro cooking techniques
- Flavor variations
- Presentation tips
- Make-ahead options
- How to Store Mexican Popsicles: Best Practices
- FAQs: Frequently Asked Questions About Mexican Popsicles
- What is a Mexican paleta?
- What’s the difference between fruit and cream paletas?
- Are Mexican paletas made with real fruit?
- Where can I buy Helados Mexico paletas?
- Are Helados Mexico paletas gluten-free or dairy-free?
- Mexican Popsicles
- Ingredients
- Instructions
- Last Step:
- Notes
- Nutrition
- Did you make this recipe?
Essential Ingredients for Mexican Popsicles
Here is a clear ingredient list for homemade Mexican Popsicles. This version focuses on fruit and cream paletas, which are the most popular styles inspired by traditional Mexican frozen treats.
- 2 cups real plump strawberries, sliced
- 1 cup smooth cream
- 1 cup ripe mango, diced
- 1 cup smooth cream for mango and cream paletas
- 1 cup freshly squeezed lime juice
- 1 cup real fruit chunks for lime fruit paletas
- 1 cup creamy ice cream
- 1/2 cup real pecan pieces
- 1/2 cup cane sugar, or to taste
- 1/4 teaspoon fine salt, optional to brighten flavor
- 6 to 8 popsicle molds
- 6 to 8 popsicle sticks
Special Dietary Options
- Vegan: Use coconut cream, oat cream, or another plant-based cream instead of dairy cream. Fruit paletas made with fruit, juice, and cane sugar are naturally vegan.
- Gluten-free: Most fruit paletas and many cream versions are naturally gluten-free. Always check flavored add-ins and packaged mix-ins carefully.
- Low-calorie: Use more fruit and less sugar, or skip the cane sugar if your fruit is very ripe. Fruit paletas are usually the lightest choice.
Tip: Real fruit gives the best taste and texture, and fruit chunks make every bite more fun.
Popular Mexican Popsicle Flavors
| Flavor | Main Ingredients | Texture | Diet Notes |
|---|---|---|---|
| Strawberry cream | Real plump strawberries, smooth cream, cane sugar | Sweet, creamy, fruity | Not dairy-free |
| Pecan cream | Creamy ice cream, real pecan pieces, cane sugar | Rich, nutty, smooth | Contains dairy, may contain nuts |
| Lime fruit | Freshly squeezed lime juice, real fruit chunks, cane sugar | Bright, icy, tangy | Usually dairy-free and vegan |
| Mango and cream | Ripe mango, smooth cream, cane sugar | Fruity, silky, refreshing | Contains dairy |
How to Prepare the Perfect Mexican Popsicles: Step-by-Step Guide
Make the fruit base
First, wash and prep your fruit. Slice the strawberries, dice the mango, and gather the lime juice and fruit chunks. If you are making a cream flavor, set out the smooth cream or creamy ice cream so it is easy to pour and mix. Fresh fruit gives the best flavor, and it helps your Mexican Popsicles taste bright and natural.
Blend the mixture
Second, blend the fruit with the cream or juice, depending on the flavor you want. For strawberry cream, blend the strawberries with smooth cream and a little cane sugar until the mixture looks thick but pourable. For mango and cream, blend the ripe mango with cream until smooth. For lime fruit, mix freshly squeezed lime juice with fruit chunks and a little cane sugar, but leave some chunks whole for crunch.
If you want a quick homemade version, this step is very easy and works well for busy schedules. You do not need fancy tools. A blender and a spoon are enough for most batches. If you want a stronger fruit taste, add more fruit and less sugar. If you want a richer dessert, add a little more cream.
Fill the molds
Third, pour the mixture into popsicle molds. Tap the molds gently on the counter to remove air bubbles. If you want that classic paleta feel, make sure each mold gets some fruit pieces. Those little chunks create the fun texture that makes Mexican Popsicles so satisfying.
Leave a little space at the top because the mixture will expand slightly as it freezes. Insert the sticks carefully. If you are using a multi-pack style setup for different flavors, label each mold so no one mixes up strawberry cream with lime fruit or pecan cream.
Freeze until solid
Fourth, place the molds in the freezer. Let them freeze for 4 to 6 hours, or until completely solid. For best results, keep the freezer cold and avoid moving the molds around too much while they set. If your freezer is very full, give the pops a bit more time.
Fruit paletas freeze beautifully because they use simple ingredients. Cream paletas may need a little longer if the mixture is thicker. If you are making bolis, minis, or ice cream sandwiches, follow the same idea, but use the proper molds or wrappers for each treat.
Unmold and serve
Final step, remove the Mexican Popsicles from the freezer and let them sit for 1 to 2 minutes so they soften slightly. This makes them easier to release from the mold. Run the mold under cool water for a few seconds if needed, then gently pull the popsicle free.
Serve right away for the best texture. Fruit paletas are especially good when the fruit chunks are still a little icy. Cream paletas taste rich and smooth, and lime fruit paletas bring a bright, zippy finish. If you like a bigger spread for family nights, offer a few flavors at once in a variety pack style tray.
Best texture tip: let frozen paletas soften just a bit before eating so the fruit flavor comes through fully.
For more simple homemade breakfast and snack ideas, you can also check out this hash brown crusted quiche or make a sweet start to the day with these Moroccan pancakes.

Dietary Substitutions to Customize Your Mexican Popsicles
Protein and Main Component Alternatives
If you want to adjust your Mexican Popsicles for different needs, the main swap is the creamy base. Use coconut cream, oat cream, or cashew cream for a dairy-free version. For a lighter option, use more fruit juice and less cream. If you want a richer treat, use full-fat cream or creamy ice cream.
You can also change the fruit based on what is in season. Strawberry, mango, peach, pineapple, and lime all work well. If you are making pecan cream, you can swap pecans for another nut if needed, but only if allergies are not a concern. Always check labels if you are using packaged ingredients or store-bought add-ins.
Vegetable, Sauce, and Seasoning Modifications
Mexican Popsicles do not need vegetables, but you can still play with flavor. Add a splash of vanilla to cream versions, a little cinnamon for warmth, or a pinch of salt to make fruit taste brighter. For lime fruit pops, a little extra lime juice gives a more tangy bite. For mango and cream, a touch of vanilla makes the flavor feel even smoother.
If you want a softer sweetness, use less cane sugar and more ripe fruit. If you want a stronger tropical note, mix mango with pineapple or add a few coconut flakes. These changes let you match the treats to the season, your mood, or your dietary goals.
Mastering Mexican Popsicles: Advanced Tips and Variations
Pro cooking techniques
To make your Mexican Popsicles taste like the best shop-bought paletas, start with very ripe fruit. Ripe fruit gives more natural sweetness and better color. Blend only until combined if you want little fruit bits in the mix, or blend longer for a smoother result. A mix of smooth cream and fruit chunks gives the best of both worlds.
For extra neat layers, freeze one layer for 20 to 30 minutes before adding the next. This is great for strawberry cream with a fruit center or lime fruit with a creamy top. If you are making multi packs, prep several flavors at once so everyone gets a favorite.
Flavor variations
Try strawberry cream, pecan cream, lime fruit, or mango and cream first. After that, mix in coconut, pineapple, watermelon, or peach. You can also make bolis by pouring the mixture into freezer bags or tubes. Minis are perfect for kids or anyone who wants a small treat. Ice cream sandwiches are a fun option when you want a handheld dessert with a little more bite.
Presentation tips
Serve Mexican Popsicles on a chilled plate or in a tall glass with fruit slices around them. Add a sprinkle of chopped nuts on cream flavors or a few lime zest curls on fruit flavors. Colorful molds make them look extra festive. If you are serving guests, set out a variety pack so they can pick and choose.
Make-ahead options
These are great for meal prep and party planning. Blend the mixtures the night before, store them in the fridge for a short time, then pour and freeze the next morning. You can also make several batches and keep them ready in the freezer for quick snacks after school, after work, or after a warm day outside.
Real fruit, simple ingredients, and a cold freezer are all you need for a treat that feels special every time.
How to Store Mexican Popsicles: Best Practices
Mexican Popsicles store very well, which makes them great for meal prep and family snacks. Keep them in the freezer until you are ready to eat. If you are storing homemade paletas, wrap each one or keep them in a sealed freezer-safe container so they do not pick up freezer odors.
For short-term holding, refrigeration is not the best choice because these are frozen treats. If they soften too much, the texture changes fast. For long-term storage, keep them at 0°F or below in the freezer. Homemade fruit paletas are best within a few weeks, while store-bought options can last longer if unopened and kept frozen.
You do not need to reheat Mexican Popsicles. Instead, let them sit at room temperature for 1 to 3 minutes before eating so they soften slightly. This helps the fruit chunks and creamy layers taste better. For batch cooking, label each flavor and date so you know which pops to eat first.

FAQs: Frequently Asked Questions About Mexican Popsicles
What is a Mexican paleta?
What’s the difference between fruit and cream paletas?
Are Mexican paletas made with real fruit?
Where can I buy Helados Mexico paletas?
Are Helados Mexico paletas gluten-free or dairy-free?

Mexican Popsicles
🍦🧊 Authentic Mexican paletas burst with real fruit and cream flavors – refreshing frozen treats cooler than ice cream for hot days!
🍓🌴 Homemade strawberry cream, lime, or mango bolis in multi-packs – easy, customizable, naturally gluten-free summer indulgence!
- Total Time: 4 hours 15 minutes
- Yield: 8 paletas/bolis
Ingredients
– 2 cups real plump strawberries, sliced
– 1 cup smooth cream
– 1 cup ripe mango, diced
– 1 cup smooth cream for mango and cream paletas
– 1 cup freshly squeezed lime juice
– 1 cup real fruit chunks for lime fruit paletas
– 1 cup creamy ice cream
– 1/2 cup real pecan pieces
– 1/2 cup cane sugar, or to taste
– 1/4 teaspoon fine salt, optional to brighten flavor
Instructions
1-Make the fruit base: First, wash and prep your fruit. Slice the strawberries, dice the mango, and gather the lime juice and fruit chunks. If you are making a cream flavor, set out the smooth cream or creamy ice cream so it is easy to pour and mix. Fresh fruit gives the best flavor, and it helps your Mexican Popsicles taste bright and natural.
2-Blend the mixture: Second, blend the fruit with the cream or juice, depending on the flavor you want. For strawberry cream, blend the strawberries with smooth cream and a little cane sugar until the mixture looks thick but pourable. For mango and cream, blend the ripe mango with cream until smooth. For lime fruit, mix freshly squeezed lime juice with fruit chunks and a little cane sugar, but leave some chunks whole for crunch. If you want a quick homemade version, this step is very easy and works well for busy schedules. You do not need fancy tools. A blender and a spoon are enough for most batches. If you want a stronger fruit taste, add more fruit and less sugar. If you want a richer dessert, add a little more cream.
3-Fill the molds: Third, pour the mixture into popsicle molds. Tap the molds gently on the counter to remove air bubbles. If you want that classic paleta feel, make sure each mold gets some fruit pieces. Those little chunks create the fun texture that makes Mexican Popsicles so satisfying. Leave a little space at the top because the mixture will expand slightly as it freezes. Insert the sticks carefully. If you are using a multi-pack style setup for different flavors, label each mold so no one mixes up strawberry cream with lime fruit or pecan cream.
4-Freeze until solid: Fourth, place the molds in the freezer. Let them freeze for 4 to 6 hours, or until completely solid. For best results, keep the freezer cold and avoid moving the molds around too much while they set. If your freezer is very full, give the pops a bit more time. Fruit paletas freeze beautifully because they use simple ingredients. Cream paletas may need a little longer if the mixture is thicker. If you are making bolis, minis, or ice cream sandwiches, follow the same idea, but use the proper molds or wrappers for each treat.
5-Unmold and serve: Final step, remove the Mexican Popsicles from the freezer and let them sit for 1 to 2 minutes so they soften slightly. This makes them easier to release from the mold. Run the mold under cool water for a few seconds if needed, then gently pull the popsicle free. Serve right away for the best texture. Fruit paletas are especially good when the fruit chunks are still a little icy. Cream paletas taste rich and smooth, and lime fruit paletas bring a bright, zippy finish. If you like a bigger spread for family nights, offer a few flavors at once in a variety pack style tray.
Last Step:
Please leave a rating and comment letting us know how you liked this recipe! This helps our business to thrive and continue providing free, high-quality recipes for you.Notes
🍓 Use ripe real fruit for best natural flavor and texture.
🧊 Store in freezer up to 3 months; enjoy straight from cold.
🎨 Mix flavors for multi-packs: strawberry cream, pecan, lime fruit.
- Prep Time: 15 minutes
- Freeze: 4-6 hours
- Cook Time: N/A
- Category: Dessert
- Method: Freezing
- Cuisine: Mexican
- Diet: Gluten Free, Vegetarian (Vegan option)
Nutrition
- Serving Size: 1 paleta/boli
- Calories: 120 calories
- Sugar: 10g
- Sodium: 20mg
- Fat: 8g
- Saturated Fat: 5g
- Unsaturated Fat: 3g
- Trans Fat: 0g
- Carbohydrates: 12g
- Fiber: 1g
- Protein: 1g
- Cholesterol: 30mg


