Why You’ll Love This Lemon Lush Dessert
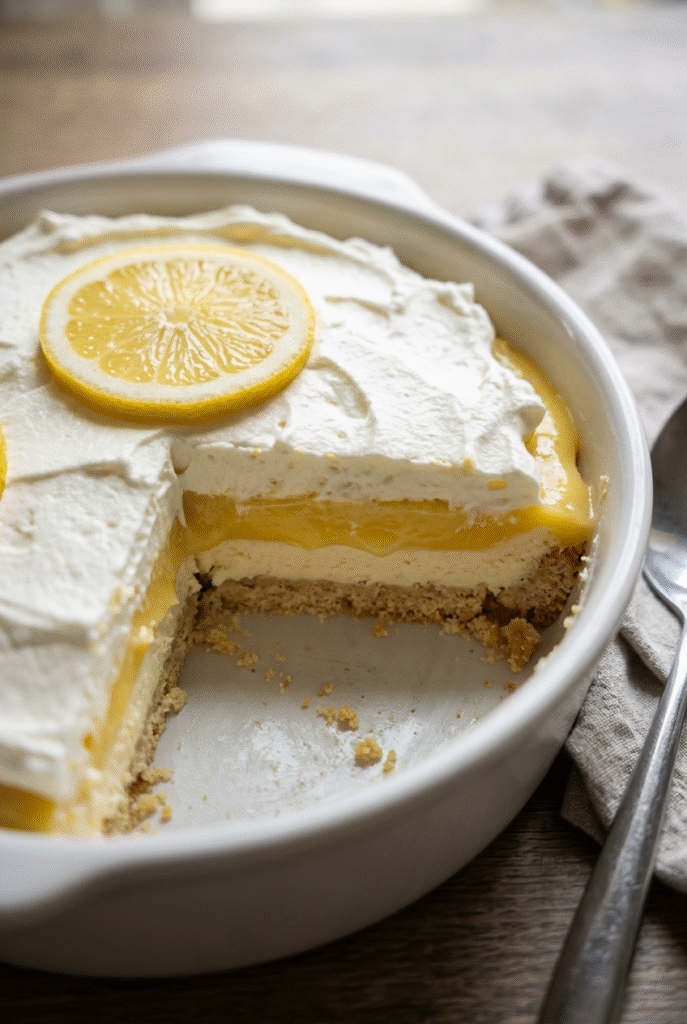
Lemon Lush Dessert is one of those sweet treats that feels right at home at family dinners, potlucks, and sunny weekend get-togethers. It has a buttery crust, a smooth cream cheese layer, bright lemon pudding, and a fluffy topping that makes every bite taste light and creamy. If you have ever wanted a dessert that looks special but comes together with simple steps, this one is a keeper.
- Easy to make: This dessert uses everyday ingredients and a simple layering method. The crust bakes quickly at 350°F, and the rest is mostly mixing, spreading, and chilling.
- Great for busy schedules: Since it needs cooling and chilling time, you can make it ahead and let the fridge do the work. That makes it handy for parents, students, and working professionals.
- Bright and refreshing: The lemon pudding gives it a fresh citrus taste that feels light after a big meal. If you enjoy lemon desserts, you may also like reading about the bright flavor notes in the health benefits of lemons.
- Perfect for sharing: A 9×13-inch pan feeds a crowd, which makes it a nice choice for gatherings, church suppers, and holiday tables.
This is the kind of dessert that disappears fast, because one square is never quite enough.
It also fits many different occasions. Serve it after a weeknight meal, bring it to a potluck, or make it for a weekend baking project with the kids. The mix of creamy layers and crunchy crust gives it that old-fashioned charm that many home cooks love.
| Recipe Snapshot | Details |
|---|---|
| Prep Time | 30 minutes |
| Cook Time | 15 minutes |
| Cooling Time | 45 minutes |
| Total Time | 1 hour 30 minutes |
| Servings | 12 to 16 |
Jump to:
- Why You’ll Love This Lemon Lush Dessert
- Essential Ingredients for Lemon Lush Dessert
- Main Ingredients
- Special Dietary Options
- How to Prepare the Perfect Lemon Lush Dessert: Step-by-Step Guide
- First Step: Prepare the crust
- Second Step: Make the cream cheese layer
- Third Step: Mix the lemon pudding
- Fourth Step: Chill until set
- Final Step: Slice and serve
- Dietary Substitutions to Customize Your Lemon Lush Dessert
- Protein and Main Component Alternatives
- Vegetable, Sauce, and Seasoning Modifications
- Mastering Lemon Lush Dessert: Advanced Tips and Variations
- Pro cooking techniques
- Flavor variations
- Presentation tips
- Make-ahead options
- How to Store Lemon Lush Dessert: Best Practices
- Refrigeration
- Freezing
- Reheating
- Meal prep considerations
- Nutrition Information for Lemon Lush Dessert
- FAQs: Frequently Asked Questions About Lemon Lush Dessert
- What is lemon lush dessert?
- What ingredients do I need for lemon lush dessert?
- How do you make lemon lush dessert step by step?
- How long does lemon lush dessert last in the fridge?
- Can you freeze lemon lush dessert or make it ahead?
- Lemon Lush Dessert
- Ingredients
- Instructions
- Last Step:
- Notes
- Nutrition
- Did you make this recipe?
Essential Ingredients for Lemon Lush Dessert
Every layer matters in Lemon Lush Dessert, and each ingredient has a job to do. The crust gives you a firm base, the cream cheese layer adds richness, and the lemon pudding brings that fresh citrus taste everyone expects. Keep your ingredients measured before you start so the layering process feels smooth and calm.
Main Ingredients
- 1 cup all-purpose flour – Forms the base of the crust and gives it structure.
- 1/2 cup unsalted butter, melted – Binds the crust together and adds rich flavor.
- 1/2 cup chopped pecans – Adds crunch and a nutty taste to the crust.
- 8 ounces cream cheese, room temperature – Creates the creamy middle layer.
- 1 cup confectioner’s sugar – Sweetens the cream cheese mixture and helps it stay smooth.
- 1 container whipped topping, divided – Lightens the cream cheese layer and finishes the top.
- 2 small packages lemon instant pudding mix (3.4 oz each) – Gives the dessert its lemon flavor and soft pudding layer.
- 3 cups milk – Helps the pudding set to the right texture.
Special Dietary Options
- Vegan: Use vegan butter, dairy-free cream cheese, plant-based whipped topping, and a dairy-free instant pudding mix if available. Swap the milk with unsweetened almond or oat milk, but check whether your pudding mix will set properly.
- Gluten-free: Replace the all-purpose flour with a trusted gluten-free baking blend. Check that the pudding mix and whipped topping are certified gluten-free.
- Low-calorie: Use light cream cheese, sugar-free pudding, and a reduced-fat whipped topping. You can also slightly reduce the pecans if you want a lighter crust.
If you enjoy simple layered sweets, you may also want to try the cozy flavors in our chocolate muffins recipe for another easy treat idea.
How to Prepare the Perfect Lemon Lush Dessert: Step-by-Step Guide
This dessert is easy, but a little care at each stage makes a big difference. The crust needs to be baked until lightly golden, then cooled all the way. After that, the cream cheese layer and pudding layers should go on gently so the dessert stays neat and creamy.
First Step: Prepare the crust
Start by heating your oven to 350°F. In a bowl, mix 1 cup all-purpose flour, 1/2 cup melted unsalted butter, and 1/2 cup chopped pecans until the mixture looks crumbly and evenly combined. The texture should feel damp enough to hold together when pressed.
Next, spread the mixture into a 9×13-inch baking dish. Press it down firmly and evenly with your fingers or the back of a measuring cup. A tight crust helps the layers sit better later and gives each square a neat shape when sliced.
Bake the crust for 15 to 20 minutes, or until it turns lightly golden brown around the edges. Keep an eye on it near the end so it does not overbake. Once it is done, place the pan on a cooling rack and let the crust cool completely before adding anything else.
Second Step: Make the cream cheese layer
While the crust cools, beat 8 ounces of room temperature cream cheese with 1 cup confectioner’s sugar until smooth and creamy. A hand mixer works well here, and it helps remove any lumps. The filling should look soft and silky before you move on.
Fold in half of the whipped topping gently. This helps lighten the mixture and gives it a fluffy texture. Try not to beat it too hard once the whipped topping goes in, or it may lose some of its airy feel.
When the crust is fully cool, spread the cream cheese mixture over the top. Use a spatula and move slowly from the center outward. Be gentle so the crust does not tear or lift from the pan. Then chill the dessert for 15 minutes so this layer can firm up a little.
A cool crust is one of the biggest secrets to a neat Lemon Lush Dessert. If the crust is warm, the cream layer can soften and slide.
Third Step: Mix the lemon pudding
In a separate bowl, whisk together the 2 small packages of lemon instant pudding mix and 3 cups milk. Stir until the mixture starts to thicken and looks smooth. This usually takes just a few minutes, but let it stand briefly if the pudding needs a little more body.
If you prefer a firmer pudding layer, you can use slightly less milk than the package directions call for. That small change helps the dessert slice better after chilling. This is one of the best tips for a picture-perfect pan.
Spread the pudding carefully over the cream cheese layer. Try to cover the whole surface without pressing down too hard. A light hand helps keep the layers separate and makes the finished dessert look pretty when sliced.
Fourth Step: Chill until set
Once the pudding layer is in place, put the pan back in the refrigerator. Chill it until the pudding is set and the layers feel firm, which gives the dessert its classic texture. This step matters because rushed chilling can make the layers blend together too much.
After the pudding has set, spread the remaining whipped topping over the top. You can make the surface smooth or add soft swirls with the back of a spoon. Either way, the top should look light and fluffy.
Return the dessert to the refrigerator and chill it until fully set. This usually takes at least several hours, and it tastes best when it has had time to rest long enough for the layers to settle together. If you are planning ahead for guests, making it the day before works beautifully.
Final Step: Slice and serve
Before serving, you can garnish the top with a little extra personality. Crust crumbs, lemon zest, or a sprinkle of chopped nuts all work well. They add texture and make the dessert look finished and inviting.
For clean slices, place the dessert in the freezer for a short time before cutting. Just a brief chill helps the layers firm up so each square comes out neater. Use a sharp knife and wipe it between cuts if you want tidy edges.
This recipe makes a lovely dessert for parties, but it is just as nice for a quiet family night. The creamy layers, lemon flavor, and buttery crust bring that nostalgic homemade feel many of us remember from childhood tables.

Dietary Substitutions to Customize Your Lemon Lush Dessert
Protein and Main Component Alternatives
If you need to change the main ingredients, there are a few easy swaps that still keep the dessert tasty. For the crust, you can replace the all-purpose flour with a gluten-free blend if someone at the table avoids wheat. For the cream cheese layer, dairy-free cream cheese can work well, though the texture may be a little softer.
Whipped topping also has plant-based versions now, which makes it easier to serve this dessert to guests with dairy concerns. For the pudding, check the label before buying, since some instant mixes contain milk ingredients or other additives. If you use sugar-free pudding, the dessert will be a little lighter and less sweet.
Vegetable, Sauce, and Seasoning Modifications
Even though this is a dessert, you can still adjust the flavor in small ways. Add lemon zest to the pudding layer if you want a stronger citrus taste. A few chopped nuts on top can add crunch and help balance the soft layers.
If you want a richer flavor, try mixing a tiny bit of vanilla into the cream cheese layer. For a brighter finish, top the dessert with fresh berries just before serving. Small changes like these let you keep the same classic style while matching the season or your guests’ tastes.
Mastering Lemon Lush Dessert: Advanced Tips and Variations
Once you have made Lemon Lush Dessert once or twice, the small details become second nature. That is when you can start shaping the recipe to fit your own kitchen style. A few simple tricks can make the dessert even smoother, neater, and more crowd pleasing.
Pro cooking techniques
Let the crust cool all the way before adding the cream cheese layer. This is one of the most important steps because warm crust can melt the filling. Also, spread the cream cheese mixture gently so you do not tear the base.
For the pudding, whisk until smooth and thickened, but do not let it sit too long before layering. If it firms up too much in the bowl, it can become harder to spread. Chilling between layers also helps the dessert stay distinct and pretty.
Flavor variations
If you want a little twist, add lemon zest to the top for more sparkle. You can also swap the pecans for walnuts if that is what you have on hand. Some cooks like to sprinkle crushed vanilla cookies on top for extra sweetness and crunch.
Another fun idea is to use a different instant pudding flavor for part of the dessert. Lemon stays classic, but a soft pistachio or coconut note can give it a playful change for special occasions. If you enjoy lemon desserts with a bakery feel, you may also like these lemon square ideas.
Presentation tips
Serve the dessert in neat squares on a chilled platter. A light garnish of lemon zest, chopped pecans, or extra crust crumbs makes each piece look special. You can even pipe small swirls of whipped topping on top if you want a more dressed-up look.
Make-ahead options
This recipe is a great make-ahead dessert. You can prepare it a day or two in advance and keep it covered in the refrigerator. In fact, the flavor often improves after it sits, because the layers settle together and become extra creamy.
How to Store Lemon Lush Dessert: Best Practices
Good storage keeps Lemon Lush Dessert tasting fresh and creamy. Since it has dairy layers, refrigeration is the safest and best choice. If you are planning for leftovers or prepping for a party, a few simple storage steps will help.
Refrigeration
Store leftover dessert in an airtight container or cover the pan tightly with plastic wrap. It keeps well in the refrigerator for 2 to 3 days, and many people find it tastes best within the first 48 hours. The crust stays firmer and the whipped topping looks freshest during that time.
Freezing
This dessert is not ideal for long freezing because the pudding and whipped topping can change texture after thawing. If needed, you can freeze it briefly before slicing to make clean cuts. That short chill is helpful, but long freezer storage may lead to a softer or separated texture later.
Reheating
No reheating is needed for this recipe. Serve it cold straight from the fridge for the best taste and texture. If it has been in the freezer for a few minutes before slicing, let it sit briefly before serving so it cuts smoothly.
Meal prep considerations
If you are making it for an event, prepare it the day before and keep it chilled until serving time. That gives the layers time to firm up and makes the dessert easier to slice. It is a smart choice for holidays, school events, and busy weeks when you want dessert ready ahead of time.
Nutrition Information for Lemon Lush Dessert
Here is the nutrition breakdown per serving based on the recipe provided. Values may vary a little depending on the exact brands you use.
| Nutrient | Amount |
|---|---|
| Calories | 329 kcal |
| Carbohydrates | 42 g |
| Protein | 6 g |
| Fat | 21 g |
| Saturated Fat | 11 g |
| Polyunsaturated Fat | 3 g |
| Monounsaturated Fat | 5 g |
| Trans Fat | 0.3 g |
| Cholesterol | 50 mg |
| Sodium | 386 mg |
| Potassium | 209 mg |
| Fiber | 1 g |
| Sugar | 18 g |
| Vitamin A | 623 IU |
| Vitamin C | 0.1 mg |
| Calcium | 124 mg |
| Iron | 1 mg |

FAQs: Frequently Asked Questions About Lemon Lush Dessert
What is lemon lush dessert?
What ingredients do I need for lemon lush dessert?
How do you make lemon lush dessert step by step?
How long does lemon lush dessert last in the fridge?
Can you freeze lemon lush dessert or make it ahead?

Lemon Lush Dessert
🍋 Dive into layers of zesty lemon pudding, creamy cheesecake, and nutty pecan crust for a refreshing, crowd-pleasing dessert that’s light yet indulgent!
🍰 This easy-to-make Lemon Lush is perfect for summer gatherings, potlucks, or anytime you crave a cool, no-fuss treat with bright citrus flavor.
- Total Time: 1 hour 30 minutes
- Yield: 12 servings
Ingredients
– 1 cup all-purpose flour
– 1/2 cup unsalted butter, melted
– 1/2 cup chopped pecans
– 8 ounces cream cheese, room temperature
– 1 cup confectioner’s sugar
– 1 container whipped topping, divided
– 2 small packages lemon instant pudding mix (3.4 oz each)
– 3 cups milk
Instructions
1-First Step: Prepare the crust Start by heating your oven to 350°F. In a bowl, mix 1 cup all-purpose flour, 1/2 cup melted unsalted butter, and 1/2 cup chopped pecans until the mixture looks crumbly and evenly combined. The texture should feel damp enough to hold together when pressed. Next, spread the mixture into a 9×13-inch baking dish. Press it down firmly and evenly with your fingers or the back of a measuring cup. A tight crust helps the layers sit better later and gives each square a neat shape when sliced. Bake the crust for 15 to 20 minutes, or until it turns lightly golden brown around the edges. Keep an eye on it near the end so it does not overbake. Once it is done, place the pan on a cooling rack and let the crust cool completely before adding anything else.
2-Second Step: Make the cream cheese layer While the crust cools, beat 8 ounces of room temperature cream cheese with 1 cup confectioner’s sugar until smooth and creamy. A hand mixer works well here, and it helps remove any lumps. The filling should look soft and silky before you move on. Fold in half of the whipped topping gently. This helps lighten the mixture and gives it a fluffy texture. Try not to beat it too hard once the whipped topping goes in, or it may lose some of its airy feel. When the crust is fully cool, spread the cream cheese mixture over the top. Use a spatula and move slowly from the center outward. Be gentle so the crust does not tear or lift from the pan. Then chill the dessert for 15 minutes so this layer can firm up a little.
3-Third Step: Mix the lemon pudding In a separate bowl, whisk together the 2 small packages of lemon instant pudding mix and 3 cups milk. Stir until the mixture starts to thicken and looks smooth. This usually takes just a few minutes, but let it stand briefly if the pudding needs a little more body. If you prefer a firmer pudding layer, you can use slightly less milk than the package directions call for. That small change helps the dessert slice better after chilling. This is one of the best tips for a picture-perfect pan. Spread the pudding carefully over the cream cheese layer. Try to cover the whole surface without pressing down too hard. A light hand helps keep the layers separate and makes the finished dessert look pretty when sliced.
4-Fourth Step: Chill until set Once the pudding layer is in place, put the pan back in the refrigerator. Chill it until the pudding is set and the layers feel firm, which gives the dessert its classic texture. This step matters because rushed chilling can make the layers blend together too much. After the pudding has set, spread the remaining whipped topping over the top. You can make the surface smooth or add soft swirls with the back of a spoon. Either way, the top should look light and fluffy. Return the dessert to the refrigerator and chill it until fully set. This usually takes at least several hours, and it tastes best when it has had time to rest long enough for the layers to settle together. If you are planning ahead for guests, making it the day before works beautifully.
5-Final Step: Slice and serve Before serving, you can garnish the top with a little extra personality. Crust crumbs, lemon zest, or a sprinkle of chopped nuts all work well. They add texture and make the dessert look finished and inviting. For clean slices, place the dessert in the freezer for a short time before cutting. Just a brief chill helps the layers firm up so each square comes out neater. Use a sharp knife and wipe it between cuts if you want tidy edges. This recipe makes a lovely dessert for parties, but it is just as nice for a quiet family night. The creamy layers, lemon flavor, and buttery crust bring that nostalgic homemade feel many of us remember from childhood tables.
Last Step:
Please leave a rating and comment letting us know how you liked this recipe! This helps our business to thrive and continue providing free, high-quality recipes for you.Notes
🍬 Cool the crust completely before layering to prevent sogginess.
🥛 Use slightly less milk than called for on pudding package for a firmer texture.
✋ Spread each layer gently to avoid disturbing the crust below.
- Prep Time: 30 minutes
- Chill Time: 45 minutes
- Cook Time: 15 minutes
- Category: Desserts
- Method: Baking
- Cuisine: American
- Diet: Vegetarian
Nutrition
- Serving Size: 1/12 of dish
- Calories: 329 kcal
- Sugar: 18g
- Sodium: 386mg
- Fat: 21g
- Saturated Fat: 11g
- Unsaturated Fat: 8g
- Trans Fat: 0.3g
- Carbohydrates: 42g
- Fiber: 1g
- Protein: 6g
- Cholesterol: 50mg


