Why You’ll Love This Strawberry Lasagna
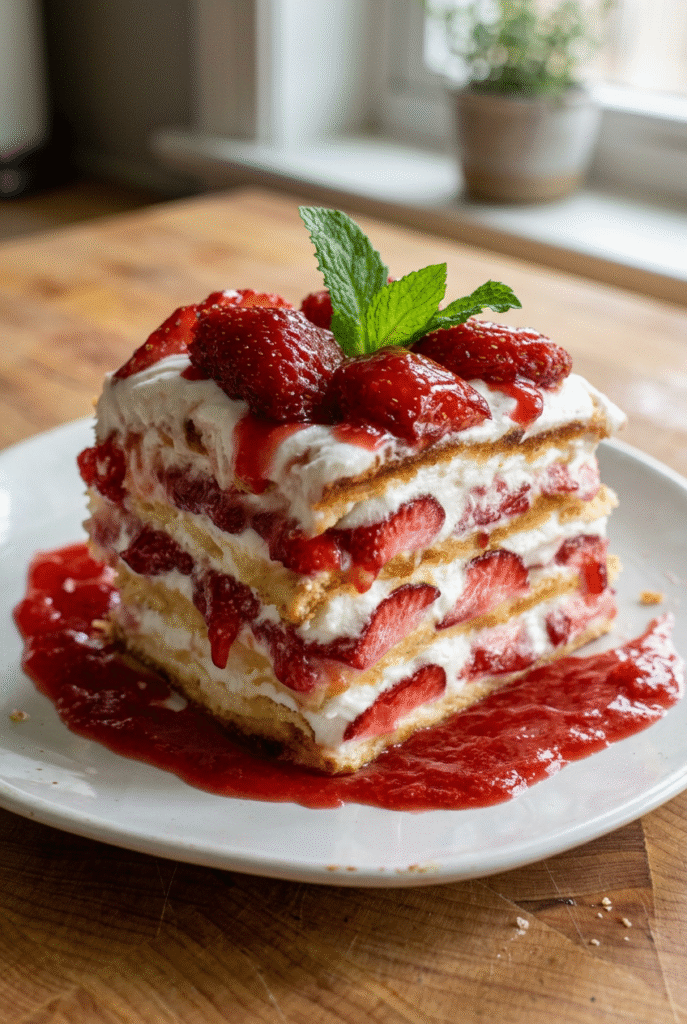
If you want a sweet treat that looks beautiful and slices cleanly, Strawberry Lasagna is a great choice. This no bake dessert brings together a buttery graham cracker crust, a creamy cheesecake style filling, and a fresh strawberry layer for a dessert that feels special without a lot of work.
For a home cook, busy parent, student, or working professional, that kind of recipe is a lifesaver. It is simple to put together, needs no oven time, and can be made ahead for parties, holidays, or weeknight cravings. It also fits nicely with the kind of comforting, practical recipes found on Recipes Valentina.
- Easy to make: No baking means less stress, less cleanup, and no need to watch the oven.
- Great for make-ahead plans: The layers chill in the fridge, so you can prep it earlier in the day or the night before.
- Fresh and creamy flavor: Sweet strawberries and smooth cream layers give every bite a cool, rich taste.
- Flexible for gatherings: It works for birthdays, potlucks, picnics, and family dinners because it serves well when chilled.
The best part of Strawberry Lasagna is how it looks like a bakery dessert but comes together with simple store-bought and fresh ingredients.
This dessert also has a nice balance of textures. The crust adds crunch, the cream layer is soft and smooth, and the strawberry filling gives it a bright fruity finish. If you like easy desserts that still feel homemade, this one is worth adding to your regular recipe list.
Jump to:
- Why You’ll Love This Strawberry Lasagna
- Essential Ingredients for Strawberry Lasagna
- Main Ingredients
- Special Dietary Options
- How to Prepare the Perfect Strawberry Lasagna: Step-by-Step Guide
- First Step: Make the crust
- Second Step: Whip the cream mixture
- Third Step: Spread the cream layer
- Fourth Step: Make the strawberry gelatin layer
- Fifth Step: Add the strawberry layer
- Sixth Step: Finish with the topping and garnish
- Protein and Main Component Alternatives
- Vegetable, Sauce, and Seasoning Modifications
- Fruit changes
- Topping and flavor changes
- Mastering Strawberry Lasagna: Advanced Tips and Variations
- Pro cooking techniques
- Flavor variations
- Presentation tips
- Make-ahead options
- How to Store Strawberry Lasagna: Best Practices
- Refrigeration
- Freezing
- Serving after storage
- FAQs: Frequently Asked Questions About Strawberry Lasagna
- How long does strawberry lasagna need to chill?
- Can I make strawberry lasagna the day before?
- Why is my strawberry lasagna runny and how do I fix it?
- How do I keep the crust from getting soggy in strawberry lasagna?
- Can I freeze strawberry lasagna?
- Strawberry Lasagna
- Ingredients
- Instructions
- Last Step:
- Notes
- Nutrition
- Did you make this recipe?
Essential Ingredients for Strawberry Lasagna
Before you start, gather every ingredient and measure it out. This helps the layers set properly and keeps the dessert neat when you slice it.
Main Ingredients
- 2 1/2 cups graham cracker crumbs – Forms the base and gives the dessert a sweet, crunchy crust.
- 10 tablespoons salted butter, melted – Helps bind the crust and adds rich flavor.
- 3 1/4 cups heavy cream, cold – Whips into a fluffy topping and helps create the creamy layers.
- 1 cup powdered sugar – Sweetens the cream filling and whipped layer.
- 8 ounces cream cheese, softened – Gives the dessert its smooth, tangy cheesecake style layer.
- 1/4 cup sour cream – Adds extra creaminess and a slight tang that balances the sweetness.
- 3 ounces strawberry gelatin – Helps the strawberry layer set and gives it strong berry flavor.
- 3/4 cup boiling water – Dissolves the gelatin fully so the layer sets evenly.
- 1/4 cup cold water – Cools the gelatin mixture and helps it thicken at the right pace.
- 1/4 cup heavy cream – Adds richness to the strawberry layer.
- 1 1/2 cups strawberries, sliced – Adds fresh fruit inside the dessert for color and flavor.
- 1/2 cup strawberries, chopped for garnish – Gives the finished dessert a fresh, pretty topping.
Special Dietary Options
- Vegan: Use dairy-free butter, vegan cream cheese, coconut cream, and a plant-based gelatin alternative.
- Gluten-free: Replace the graham crackers with gluten-free graham-style crumbs or gluten-free cookie crumbs.
- Low-calorie: Use light cream cheese, reduced sugar whipped topping, and a smaller amount of powdered sugar.
| Layer | Main Role | Why It Matters |
|---|---|---|
| Graham crust | Base | Keeps the dessert firm and adds a sweet crunch |
| Cream layer | Middle filling | Makes the dessert smooth, rich, and sliceable |
| Strawberry layer | Fruit filling | Brings fresh flavor and helps the dessert hold together |
| Whipped topping | Top layer | Creates a light finish and a pretty look |
How to Prepare the Perfect Strawberry Lasagna: Step-by-Step Guide
Take your time with the layers and chill each part long enough. That is the key to a dessert that slices neatly and holds its shape.
First Step: Make the crust
Start by combining the 2 1/2 cups graham cracker crumbs with the 10 tablespoons melted salted butter in a medium bowl. Stir until the crumbs look evenly coated and feel like damp sand. Press the mixture firmly into the bottom of a 9 by 13 inch dish. Use the bottom of a measuring cup or glass to pack it down well, because a tight crust helps every slice stay neat.
Once the crust is pressed in, place the dish in the refrigerator while you make the filling. This quick chill helps the butter firm up and keeps the base from crumbling later. If you want a firmer crust, you can chill it for 20 to 30 minutes before adding the cream layer.
Second Step: Whip the cream mixture
In a large mixing bowl, beat the 3 1/4 cups cold heavy cream with the 1 cup powdered sugar until soft peaks form. This usually takes a few minutes with a hand mixer or stand mixer. The cream should look fluffy, not grainy.
Set aside about one-third of this whipped cream if you want a little extra on top later. In another bowl, beat the 8 ounces softened cream cheese with the 1/4 cup sour cream until smooth. Add a spoonful of whipped cream to loosen the mixture, then fold in the rest gently. Use slow folding motions so the filling stays airy. This creates the creamy layer that makes Strawberry Lasagna so rich and sliceable.
Third Step: Spread the cream layer
Remove the crust from the fridge and spread the cream cheese mixture over it in an even layer. Use an offset spatula or the back of a spoon to get the surface smooth. Try to reach every corner so the dessert layers look clean when cut.
If the cream layer is too soft, chill the dish for 10 to 15 minutes before adding the next part. A slightly firmer cream layer helps the strawberry mixture sit on top instead of sinking into the crust. That small step makes a big difference in the final shape.
Fourth Step: Make the strawberry gelatin layer
In a heat-safe bowl, add the 3 ounces strawberry gelatin and pour in the 3/4 cup boiling water. Stir until the gelatin is fully dissolved. Then add the 1/4 cup cold water and the 1/4 cup heavy cream. Mix well. Let the mixture cool for a few minutes until it is still pourable but not hot.
Stir in the 1 1/2 cups sliced strawberries. If the fruit releases a lot of juice, pat it dry first. This helps keep the filling from getting watery. The gelatin mixture should be bright, fruity, and slightly thick before it goes on top of the cream layer.
Fifth Step: Add the strawberry layer
Carefully spoon the strawberry mixture over the cream layer. Spread it gently so it stays even across the dish. If you pour too fast, it may disturb the layer underneath. A slow, gentle spread works best.
At this stage, the dessert will look soft, but that is normal. The refrigerator will do the rest of the work. Cover the dish loosely with plastic wrap and chill it for at least 4 to 6 hours. Overnight chilling gives the best texture and the cleanest slices. For more make-ahead dessert ideas that are simple and family friendly, you may also like these chocolate muffins.
Sixth Step: Finish with the topping and garnish
Once the dessert has fully set, add the remaining whipped cream if you saved some. Smooth it over the top or pipe it in soft swirls for a prettier finish. Sprinkle or place the 1/2 cup chopped strawberries for garnish over the top.
For very clean slices, use a sharp knife dipped in warm water and wiped dry between cuts. This keeps the layers tidy and helps each piece hold its shape. Serve the dessert cold for the best texture.
If the dessert does not hold its shape, it usually means it needed more chill time. Patience is what makes Strawberry Lasagna slice perfectly.
Protein and Main Component Alternatives
This recipe is built as a dessert, so the main part people often want to change is the dairy filling. Here are a few practical swaps if you need to work around allergies, preferences, or what you already have on hand.
- Cream cheese swap: Use dairy-free cream cheese for a lactose-free version.
- Heavy cream swap: Use full-fat coconut cream for a dairy-free whipped filling.
- Sour cream swap: Use plain Greek yogurt for a lighter tangy layer, if dairy is fine.
- Gelatin swap: Use a plant-based berry setting mix if you want to avoid animal-based gelatin.
- Crust swap: Use gluten-free cookie crumbs if graham crackers are not an option.
If you enjoy easy breakfast or brunch ideas with simple swaps, you might also like this quinoa spinach egg bake.
Vegetable, Sauce, and Seasoning Modifications
Even though Strawberry Lasagna is a dessert, you can still adjust the fruit, topping, and flavor profile in smart ways. These changes help match the season or your personal taste.
Fruit changes
- Use raspberries or mixed berries instead of some of the strawberries for a more tart flavor.
- Add a few blueberry slices for color.
- Mix in diced peaches during summer for a sweeter fruit layer.
Topping and flavor changes
- Add a little vanilla extract to the cream layer for extra warmth.
- Use lemon zest for a brighter fruit taste.
- Top with crushed freeze-dried strawberries for a stronger berry flavor and a pretty finish.
- Drizzle with a light strawberry sauce right before serving if you want more fruit flavor.
Keep in mind that juicy fruit can soften the layers faster, so always pat fruit dry when possible. If you want a sweet weekend bake that pairs nicely with fruit desserts, try this monkey bread recipe too.
Mastering Strawberry Lasagna: Advanced Tips and Variations
Once you know the basics, a few small habits can make your Strawberry Lasagna look and taste even better. These tips are especially helpful when you are serving guests or making it for a holiday table.
Pro cooking techniques
Press the crust down firmly and evenly. This is one of the biggest secrets to clean slices. If one section is loose, it can crumble when you cut into it. Also, chill the dessert long enough before serving. A full overnight chill is best when you want perfect layers.
When folding the whipped cream into the cream cheese mixture, use a gentle hand. Stirring too hard can knock out the air and make the filling heavy. Soft, fluffy filling sets up better and tastes lighter.
Flavor variations
Add a thin layer of strawberry jam between the cream filling and fruit layer for a sweeter bite. You can also mix a little vanilla or almond extract into the cream filling for a bakery style flavor. If you like more tang, increase the sour cream just slightly.
Presentation tips
For a clean look, top each slice with a small strawberry piece and a tiny dollop of whipped cream. If you are serving for a party, cut the dessert with a warm knife and wipe the blade between slices. This keeps the layers sharp and neat.
Make-ahead options
Strawberry Lasagna is ideal for busy schedules. Make it the day before, cover it well, and let it rest in the fridge overnight. That extra time helps the gelatin layer set and gives you cleaner slices. For another simple treat that works well for planning ahead, take a look at this cinnamon bread recipe.
How to Store Strawberry Lasagna: Best Practices
Since this is a chilled dessert, storage matters. The good news is that it keeps well when handled the right way.
Refrigeration
Cover the dish tightly with plastic wrap or a fitted lid and keep it in the refrigerator. It stays best for 3 to 4 days. For the cleanest texture, serve within the first 24 hours, when the crust is still firm and the fruit looks fresh.
Freezing
You can freeze Strawberry Lasagna for up to 2 months. Wrap the whole dish tightly in plastic wrap, then foil. If freezing slices, place them on a tray first until firm, then move them to freezer-safe containers. Thaw them overnight in the fridge before serving.
Serving after storage
Do not leave the dessert out for long once it is chilled. After serving, return leftovers to the fridge as soon as possible. If the top looks a little soft after storage, add fresh chopped strawberries right before serving.
Cold storage is what keeps this dessert neat, creamy, and safe to serve.

FAQs: Frequently Asked Questions About Strawberry Lasagna
How long does strawberry lasagna need to chill?
Can I make strawberry lasagna the day before?
Why is my strawberry lasagna runny and how do I fix it?
How do I keep the crust from getting soggy in strawberry lasagna?
Can I freeze strawberry lasagna?

Strawberry Lasagna
🍓 Dive into creamy layers of cheesecake, fresh strawberries, and fluffy whipped cream in this effortless no-bake delight – perfect for beating the heat!
🍰 Thanks to the stabilizing strawberry gelatin, it slices cleanly and beautifully every single time, wowing your guests.
- Total Time: 4 hours 30 minutes
- Yield: 12 servings
Ingredients
– 2 1/2 cups graham cracker crumbs for the base
– 10 tablespoons salted butter, melted to bind the crust
– 3 1/4 cups heavy cream, cold for whipped layers
– 1 cup powdered sugar to sweeten
– 8 ounces cream cheese, softened for cheesecake layer
– 1/4 cup sour cream for creaminess
– 3 ounces strawberry gelatin for strawberry layer
– 3/4 cup boiling water to dissolve gelatin
– 1/4 cup cold water to cool gelatin
– 1/4 cup heavy cream for strawberry layer
– 1 1/2 cups strawberries, sliced for fresh fruit
– 1/2 cup strawberries, chopped for garnish
Instructions
1-First Step: Make the crust. Start by combining the 2 1/2 cups graham cracker crumbs with the 10 tablespoons melted salted butter in a medium bowl. Stir until the crumbs look evenly coated and feel like damp sand. Press the mixture firmly into the bottom of a 9 by 13 inch dish. Use the bottom of a measuring cup or glass to pack it down well, because a tight crust helps every slice stay neat. Once the crust is pressed in, place the dish in the refrigerator while you make the filling. This quick chill helps the butter firm up and keeps the base from crumbling later. If you want a firmer crust, you can chill it for 20 to 30 minutes before adding the cream layer.
2-Second Step: Whip the cream mixture. In a large mixing bowl, beat the 3 1/4 cups cold heavy cream with the 1 cup powdered sugar until soft peaks form. This usually takes a few minutes with a hand mixer or stand mixer. The cream should look fluffy, not grainy. Set aside about one-third of this whipped cream if you want a little extra on top later. In another bowl, beat the 8 ounces softened cream cheese with the 1/4 cup sour cream until smooth. Add a spoonful of whipped cream to loosen the mixture, then fold in the rest gently. Use slow folding motions so the filling stays airy. This creates the creamy layer that makes Strawberry Lasagna so rich and sliceable.
3-Third Step: Spread the cream layer. Remove the crust from the fridge and spread the cream cheese mixture over it in an even layer. Use an offset spatula or the back of a spoon to get the surface smooth. Try to reach every corner so the dessert layers look clean when cut. If the cream layer is too soft, chill the dish for 10 to 15 minutes before adding the next part. A slightly firmer cream layer helps the strawberry mixture sit on top instead of sinking into the crust. That small step makes a big difference in the final shape.
4-Fourth Step: Make the strawberry gelatin layer. In a heat-safe bowl, add the 3 ounces strawberry gelatin and pour in the 3/4 cup boiling water. Stir until the gelatin is fully dissolved. Then add the 1/4 cup cold water and the 1/4 cup heavy cream. Mix well. Let the mixture cool for a few minutes until it is still pourable but not hot. Stir in the 1 1/2 cups sliced strawberries. If the fruit releases a lot of juice, pat it dry first. This helps keep the filling from getting watery. The gelatin mixture should be bright, fruity, and slightly thick before it goes on top of the cream layer.
5-Fifth Step: Add the strawberry layer. Carefully spoon the strawberry mixture over the cream layer. Spread it gently so it stays even across the dish. If you pour too fast, it may disturb the layer underneath. A slow, gentle spread works best. At this stage, the dessert will look soft, but that is normal. The refrigerator will do the rest of the work. Cover the dish loosely with plastic wrap and chill it for at least 4 to 6 hours. Overnight chilling gives the best texture and the cleanest slices. For more make-ahead dessert ideas that are simple and family friendly, you may also like these chocolate muffins.
6-Sixth Step: Finish with the topping and garnish. Once the dessert has fully set, add the remaining whipped cream if you saved some. Smooth it over the top or pipe it in soft swirls for a prettier finish. Sprinkle or place the 1/2 cup chopped strawberries for garnish over the top. For very clean slices, use a sharp knife dipped in warm water and wiped dry between cuts. This keeps the layers tidy and helps each piece hold its shape. Serve the dessert cold for the best texture.
Last Step:
Please leave a rating and comment letting us know how you liked this recipe! This helps our business to thrive and continue providing free, high-quality recipes for you.Notes
💡 Chill each layer for at least 15 minutes before adding the next to keep them distinct and prevent bleeding.
🍓 Choose fresh, ripe strawberries for vibrant color and maximum flavor in every bite.
⏰ For the best texture and slices that hold their shape, let it chill overnight.
- Prep Time: 30 minutes
- Chill: 4 hours
- Cook Time: 0 minutes
- Category: Dessert
- Method: No Bake
- Cuisine: American
- Diet: Vegetarian
Nutrition
- Serving Size: 1/12 recipe
- Calories: 512 kcal
- Sugar: 35g
- Sodium: 289mg
- Fat: 40g
- Saturated Fat: 24g
- Unsaturated Fat: 12g
- Trans Fat: 1g
- Carbohydrates: 38g
- Fiber: 1g
- Protein: 5g
- Cholesterol: 120mg


