Why You’ll Love This Easy Guava Lava Cookies
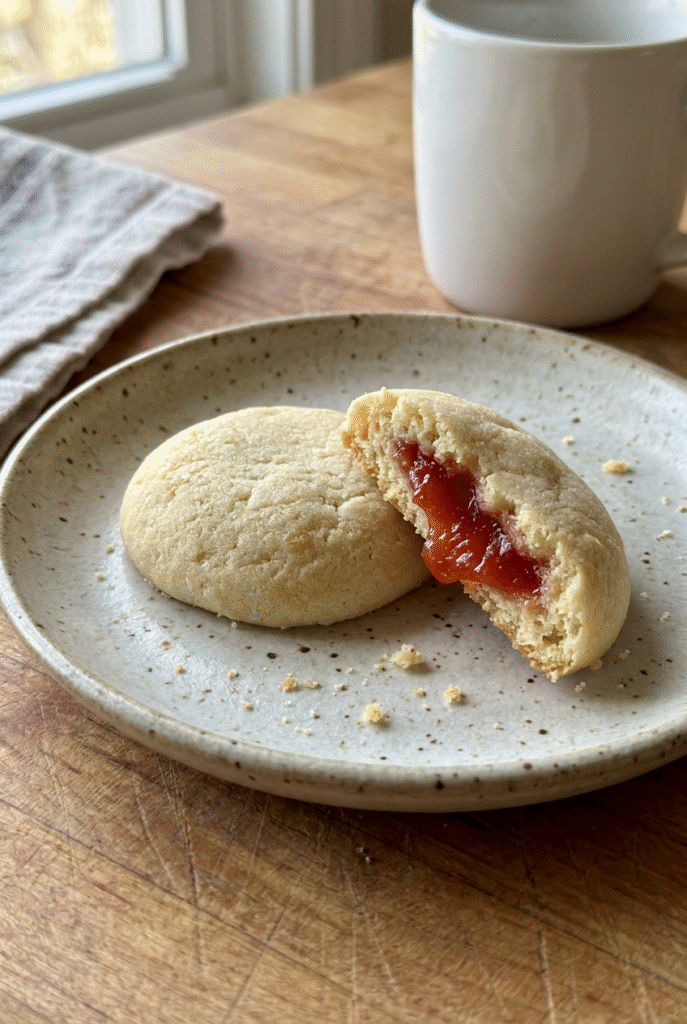
Easy Guava Lava Cookies bring together soft cookie dough and sweet guava paste in a way that feels special but still simple enough for home baking. If you want a fun treat that looks bakery-style without a lot of fuss, this recipe fits right in with busy weeknights, weekend baking, or holiday trays.
- Easy to make: This Easy Guava Lava Cookies recipe uses basic pantry ingredients and a simple mixing method. The dough comes together in one bowl for the dry ingredients and one bowl for the butter mixture, then it rests in the fridge for at least 1 hour, which helps busy bakers plan ahead.
- Soft cookie texture: The butter, sugar, egg, and vanilla create a tender cookie that bakes up lightly golden on the edges. The chilled dough also helps the cookies hold their shape, so you get a soft bite with a sweet center.
- Bright tropical flavor: Guava paste gives these cookies a fruity filling with a rich, jam-like taste. If you enjoy fruit desserts, guava offers a flavor that feels fresh and different from the usual chocolate or vanilla cookie.
- Good for sharing: These cookies work well for bake sales, lunchbox treats, after-dinner sweets, or coffee breaks. They are easy to dust with powdered sugar, which makes them look pretty with almost no extra effort.
For readers who like fruit-forward sweets, guava is a great choice. You can read more about the fruit at Cleveland Clinic’s guava benefits guide.
This recipe also fits well with many baking routines because it uses a short ingredient list and a quick bake time. With a total prep and chill time of about 1 hour 30 minutes, Easy Guava Lava Cookies are a smart pick when you want homemade cookies without spending the whole day in the kitchen.
Jump to:
- Why You’ll Love This Easy Guava Lava Cookies
- Essential Ingredients for Easy Guava Lava Cookies
- Main ingredients
- Ingredient notes and simple swaps
- Special dietary options
- How to Prepare the Perfect Easy Guava Lava Cookies: Step-by-Step Guide
- First step: mix the dry ingredients
- Second step: cream the butter and sugar
- Third step: add the egg and vanilla
- Fourth step: add the dry mixture
- Fifth step: chill the dough
- Sixth step: prepare the guava filling
- Seventh step: assemble the cookies
- Eighth step: bake until lightly golden
- Ninth step: cool and serve
- Dietary Substitutions to Customize Your Easy Guava Lava Cookies
- Protein and main component alternatives
- Vegetable, sauce, and seasoning modifications
- Mastering Easy Guava Lava Cookies: Advanced Tips and Variations
- Pro cooking techniques
- Flavor variations
- Presentation tips
- Make-ahead options
- How to Store Easy Guava Lava Cookies: Best Practices
- Refrigeration
- Freezing
- Reheating
- Meal prep considerations
- FAQs: Frequently Asked Questions About Easy Guava Lava Cookies
- Easy Guava Lava Cookies
- Ingredients
- Instructions
- Last Step:
- Notes
- Nutrition
- Did you make this recipe?
Essential Ingredients for Easy Guava Lava Cookies
Here is everything you need for Easy Guava Lava Cookies. Keep the measurements exact for the best texture and filling.
Main ingredients
- 2 1/2 cups all-purpose flour – Gives the cookies structure and helps the dough hold the guava center.
- 1/2 teaspoon baking powder – Adds a little lift so the cookies bake up soft instead of dense.
- 1/4 teaspoon salt – Balances the sweetness and brings out the flavor of the butter and guava.
- 1 cup unsalted butter, softened – Creates a rich, tender cookie base and helps the dough cream properly with sugar.
- 3/4 cup granulated sugar – Sweetens the dough and helps give the cookies light color and a slight crisp edge.
- 1 large egg – Binds the dough together and adds moisture.
- 1 teaspoon vanilla extract – Adds warm flavor that pairs well with the guava paste.
- 1 cup guava paste, cut into small cubes – This is the filling that gives Easy Guava Lava Cookies their sweet, fruity center.
Ingredient notes and simple swaps
| Ingredient | Why it matters | Possible swap |
|---|---|---|
| All-purpose flour | Builds the dough structure | Use a 1 to 1 gluten-free baking flour if needed |
| Unsalted butter | Adds flavor and softness | Use plant-based butter for a dairy-free version |
| Granulated sugar | Sweetens and helps with browning | Coconut sugar can work, but the texture will be a bit different |
| Guava paste | Creates the lava-style center | Try another firm fruit paste if guava is hard to find |
Special dietary options
- Vegan: Replace the butter with a vegan baking stick and use a plant-based egg replacement. The cookie texture may be slightly different, but the guava filling still works well.
- Gluten-free: Use a gluten-free all-purpose flour blend that includes xanthan gum if your mix does not already contain it.
- Low-calorie: You can reduce the sugar slightly, but keep in mind that the texture may change. Another option is to enjoy a smaller portion and dust lightly with powdered sugar instead of adding a heavy coating.
If you enjoy simple bakes like this one, you may also like these chocolate muffins for an easy homemade treat or this soft monkey bread for a sweet breakfast idea.
How to Prepare the Perfect Easy Guava Lava Cookies: Step-by-Step Guide
First step: mix the dry ingredients
Start by grabbing a medium bowl and whisking together the 2 1/2 cups all-purpose flour, 1/2 teaspoon baking powder, and 1/4 teaspoon salt. Mixing these first helps spread the baking powder and salt evenly through the flour. This step matters because even distribution gives you a better cookie texture from edge to center.
Use a whisk or fork to break up any clumps. If the flour is packed tightly in the cup, the dough can become dry and harder to shape. For best results, spoon the flour into the measuring cup and level it off.
Second step: cream the butter and sugar
In a separate large bowl, beat 1 cup softened unsalted butter with 3/4 cup granulated sugar until the mixture looks pale and fluffy. This usually takes a few minutes with a hand mixer or stand mixer. Creaming adds air to the dough, which helps create a softer cookie.
Make sure the butter is softened, not melted. Softened butter blends smoothly with the sugar, while melted butter can make the dough greasy and harder to chill. If you are baking in a warm kitchen, work quickly so the butter stays at the right texture.
Third step: add the egg and vanilla
Beat in 1 large egg and 1 teaspoon vanilla extract until combined. The egg helps bind the dough, and the vanilla adds a warm background flavor that balances the guava filling. Scrape down the sides of the bowl if needed so everything mixes evenly.
At this stage, the dough should still look creamy. If it starts to curdle a little, that is usually fine. Once the flour goes in, the texture will come together.
Fourth step: add the dry mixture
Slowly add the flour mixture to the butter mixture and mix just until combined. Stop as soon as the dough comes together. Overmixing can make the cookies tough, which is one of the most common mistakes in Easy Guava Lava Cookies.
If the dough feels a little sticky, that is normal. Do not add extra flour unless it is truly too soft to handle. The chilling step will help the dough firm up.
Fifth step: chill the dough
Cover the bowl and refrigerate the dough for at least 1 hour. This step is important because chilled dough is easier to shape and less likely to spread too much in the oven. It also helps the butter firm up, which supports that soft center and neat cookie shape.
Tip: If you are short on time, you may be tempted to skip the chill, but this recipe works best when the dough has enough time to rest in the fridge.
If you need a small-batch baking project while you wait, try reading through other easy brunch ideas like this hash brown crusted quiche for a savory meal option.
Sixth step: prepare the guava filling
While the dough chills, cut 1 cup guava paste into small cubes. The pieces should be small enough to fit inside the dough and seal easily. If the pieces are too big, the dough may split open during baking and the filling can leak out.
Work with a sharp knife and a cutting board. If the guava paste sticks to the knife, lightly oil the blade or use a little flour on the surface. Small, neat cubes make assembly much easier.
Seventh step: assemble the cookies
Preheat the oven to 350°F and line a baking sheet with parchment paper. Take the chilled dough out of the fridge and scoop or pinch off portions. Flatten each piece in your palm, place a cube or two of guava paste in the center, then wrap the dough around it and roll it into a ball.
Place the dough balls on the baking sheet, leaving about 2 inches between each one. That space helps the cookies bake evenly and gives them room to spread a little. If the cookies are packed too closely, they can bake into one another.
Eighth step: bake until lightly golden
Bake the cookies for 12 to 15 minutes, or until the edges are lightly golden. The centers may still look a little soft when you pull them out, and that is fine. They will continue to set as they cool on the baking sheet.
Try not to overbake. If they go too far, the cookies can lose their soft texture and the guava center may become too thick. Watch the last few minutes closely, since oven temperatures can vary.
Ninth step: cool and serve
Let the cookies cool on the baking sheet for a few minutes, then move them to a wire rack. This helps them finish setting without getting soggy on the bottom. Once cooled, serve them as they are or dust them with powdered sugar for a simple finish.
These cookies taste great with coffee, tea, or a cold glass of milk. They also make a nice dessert for parties because the guava center gives each bite a fun surprise.

Dietary Substitutions to Customize Your Easy Guava Lava Cookies
Protein and main component alternatives
Even though this recipe is based on butter and egg, there are a few ways to adjust it for different needs. If you want a dairy-free version, use a plant-based butter stick made for baking. For the egg, try a store-bought egg replacer or another trusted baking substitute.
If gluten is a concern, replace the all-purpose flour with a gluten-free 1 to 1 blend. Choose one that is made for cookies so the dough holds together well. Because gluten-free flours can behave differently, chilling the dough becomes even more important.
Vegetable, sauce, and seasoning modifications
This cookie recipe does not use vegetables or sauce, but you can still change the flavor in simple ways. Add a little citrus zest to the dough if you want a brighter taste, or swap vanilla for almond extract for a deeper flavor. If guava paste is not available, another firm fruit paste can work in the center, though the taste will change.
For a lighter treat, keep the powdered sugar garnish very small or skip it altogether. You can also make the cookies smaller so the portions are easier to manage. For more substitution ideas in baking, check out this guide to egg substitutes.
Mastering Easy Guava Lava Cookies: Advanced Tips and Variations
Pro cooking techniques
Do not overmix the dough once the flour goes in. Mix only until the ingredients are combined, then chill right away. This small habit helps keep the cookies tender. Another helpful move is to keep the guava cubes small and even so they seal cleanly inside the dough.
If your kitchen is warm, work with one tray of dough at a time while keeping the rest cold. This helps the cookies hold their shape. A parchment-lined baking sheet also makes cleanup easier and helps prevent sticking.
Flavor variations
You can keep the cookies classic or add a small twist. A little lemon or lime zest in the dough gives the sweet guava a brighter edge. If you like warm spices, a tiny pinch of cinnamon can add depth without taking over the flavor.
For a richer finish, dust the cooled cookies with powdered sugar right before serving. You can also serve them with fresh fruit on the side for a more colorful dessert plate.
Presentation tips
For a pretty look, place the cookies on a simple white plate and finish with a light sugar dusting. If you are serving them at a party, stack them in a small tower or arrange them in a circle around fresh fruit. The soft golden color and hidden guava center make them look special even without fancy decorations.
Make-ahead options
The dough can be chilled ahead of time, which makes this recipe useful for busy schedules. You can prepare the dough in the morning and bake later in the day, or chill it overnight if needed. This is helpful for working professionals, parents, and students who want homemade cookies without rushing.
How to Store Easy Guava Lava Cookies: Best Practices
Easy Guava Lava Cookies keep well when stored the right way. After they cool completely, place them in an airtight container. Add a piece of parchment between layers if you stack them so the cookies do not stick together.
Refrigeration
Store the cookies in the fridge for up to 5 days. This is a good option if your kitchen is warm or if you want them to last a little longer. Let them sit at room temperature before serving so the texture softens again.
Freezing
You can freeze baked cookies for longer storage. Place them in a freezer-safe container or bag with parchment between layers. For the best texture, thaw them in the fridge or at room temperature before eating.
Reheating
If you like them slightly warm, heat a cookie in the microwave for 8 to 10 seconds. Warm only a little so the guava center does not become too hot. You can also let them sit on the counter until they reach room temperature.
Meal prep considerations
The dough is a smart make-ahead option for batch baking. You can chill it, shape it, and bake when ready. That makes it easy to plan for school snacks, potlucks, or weekend dessert trays.

FAQs: Frequently Asked Questions About Easy Guava Lava Cookies
Print
Easy Guava Lava Cookies
🍪🌺 Oozing guava lava cookies burst tropical sweetness in soft buttery dough—exotic melt-in-mouth bliss.
🫐 1.5hr chill-bake treat: powdered sugar finish, shareable delight for tea or parties!
- Total Time: 1 hour 30 minutes
- Yield: 24 cookies
Ingredients
– 2 1/2 cups all-purpose flour for structure
– 1/2 teaspoon baking powder for lift
– 1/4 teaspoon salt for balancing sweetness
– 1 cup unsalted butter, softened for rich tender cookie base
– 3/4 cup granulated sugar for sweetening
– 1 large egg for binding and moisture
– 1 teaspoon vanilla extract for flavor
– 1 cup guava paste, cut into small cubes for filling
Instructions
1-First step: mix the dry ingredients Start by grabbing a medium bowl and whisking together the 2 1/2 cups all-purpose flour, 1/2 teaspoon baking powder, and 1/4 teaspoon salt. Mixing these first helps spread the baking powder and salt evenly through the flour. This step matters because even distribution gives you a better cookie texture from edge to center. Use a whisk or fork to break up any clumps. If the flour is packed tightly in the cup, the dough can become dry and harder to shape. For best results, spoon the flour into the measuring cup and level it off.
2-Second step: cream the butter and sugar In a separate large bowl, beat 1 cup softened unsalted butter with 3/4 cup granulated sugar until the mixture looks pale and fluffy. This usually takes a few minutes with a hand mixer or stand mixer. Creaming adds air to the dough, which helps create a softer cookie. Make sure the butter is softened, not melted. Softened butter blends smoothly with the sugar, while melted butter can make the dough greasy and harder to chill. If you are baking in a warm kitchen, work quickly so the butter stays at the right texture.
3-Third step: add the egg and vanilla Beat in 1 large egg and 1 teaspoon vanilla extract until combined. The egg helps bind the dough, and the vanilla adds a warm background flavor that balances the guava filling. Scrape down the sides of the bowl if needed so everything mixes evenly. At this stage, the dough should still look creamy. If it starts to curdle a little, that is usually fine. Once the flour goes in, the texture will come together.
4-Fourth step: add the dry mixture Slowly add the flour mixture to the butter mixture and mix just until combined. Stop as soon as the dough comes together. Overmixing can make the cookies tough, which is one of the most common mistakes in Easy Guava Lava Cookies. If the dough feels a little sticky, that is normal. Do not add extra flour unless it is truly too soft to handle. The chilling step will help the dough firm up.
5-Fifth step: chill the dough Cover the bowl and refrigerate the dough for at least 1 hour. This step is important because chilled dough is easier to shape and less likely to spread too much in the oven. It also helps the butter firm up, which supports that soft center and neat cookie shape.
6-Sixth step: prepare the guava filling While the dough chills, cut 1 cup guava paste into small cubes. The pieces should be small enough to fit inside the dough and seal easily. If the pieces are too big, the dough may split open during baking and the filling can leak out. Work with a sharp knife and a cutting board. If the guava paste sticks to the knife, lightly oil the blade or use a little flour on the surface. Small, neat cubes make assembly much easier.
7-Seventh step: assemble the cookies Preheat the oven to 350°F and line a baking sheet with parchment paper. Take the chilled dough out of the fridge and scoop or pinch off portions. Flatten each piece in your palm, place a cube or two of guava paste in the center, then wrap the dough around it and roll it into a ball. Place the dough balls on the baking sheet, leaving about 2 inches between each one. That space helps the cookies bake evenly and gives them room to spread a little. If the cookies are packed too closely, they can bake into one another.
8-Eighth step: bake until lightly golden Bake the cookies for 12 to 15 minutes, or until the edges are lightly golden. The centers may still look a little soft when you pull them out, and that is fine. They will continue to set as they cool on the baking sheet. Try not to overbake. If they go too far, the cookies can lose their soft texture and the guava center may become too thick. Watch the last few minutes closely, since oven temperatures can vary.
9-Ninth step: cool and serve Let the cookies cool on the baking sheet for a few minutes, then move them to a wire rack. This helps them finish setting without getting soggy on the bottom. Once cooled, serve them as they are or dust them with powdered sugar for a simple finish. These cookies taste great with coffee, tea, or a cold glass of milk. They also make a nice dessert for parties because the guava center gives each bite a fun surprise.
Last Step:
Please leave a rating and comment letting us know how you liked this recipe! This helps our business to thrive and continue providing free, high-quality recipes for you.Notes
❄️ Chill dough 1+ hour—prevents spreading, seals filling.
🫐 Small guava cubes melt evenly without bursting.
📏 Space 2 inches apart; bake small test batch first.
- Prep Time: 20 minutes
- Chilling Time: 1 hour
- Cook Time: 15 minutes
- Category: Desserts
- Method: Bake
- Cuisine: Fusion
- Diet: Vegetarian
Nutrition
- Serving Size: 1 cookie
- Calories: 180 kcal
- Sugar: 12g
- Sodium: 60mg
- Fat: 10g
- Saturated Fat: 6g
- Unsaturated Fat: 4g
- Trans Fat: 0g
- Carbohydrates: 22g
- Fiber: 1g
- Protein: 2g
- Cholesterol: 30mg


