Why You’ll Love This Homemade Dill Pickles Recipe
If you have fresh cucumbers on hand, this Homemade Dill Pickles Recipe is one of the easiest ways to turn them into a crunchy, tangy snack fast. It comes together with simple pantry ingredients, takes just minutes to prep, and waits for you in the fridge while the flavor builds. That means less work for you and more tasty pickles for lunch boxes, burgers, snack plates, and quick bites.
- Easy to make: This Homemade Dill Pickles Recipe uses a quick brine and simple slicing, so there is no canning setup needed. You only need about 10 minutes of prep and 1 minute of cook time before the fridge does the rest.
- Fresh and lighter: Homemade pickles let you control the salt and sugar, which is great for diet-conscious eaters and busy families who want a simple snack with better ingredient control.
- Works for many meals: These dill pickles fit right into sandwiches, salads, burger nights, picnic plates, and snack boards. They also pair well with hearty mains like slow cooker beef brisket or a cozy dinner such as au gratin potatoes.
- Big flavor, small effort: Garlic, dill, mustard seeds, and peppercorns create that classic dill pickle taste people love. The sugar does not make them sweet, it simply balances the vinegar so the brine tastes bright and crisp.
Quick refrigerator pickles are perfect when you want that crunchy dill pickle taste without waiting weeks for a canned batch.
These pickles are a smart choice for home cooks, students, newlyweds, and working professionals because they fit into real life. You can make them in the morning and enjoy them a couple of days later, or let them sit longer for even more flavor.
Jump to:
- Why You’ll Love This Homemade Dill Pickles Recipe
- Essential Ingredients for Homemade Dill Pickles Recipe
- Main Ingredients
- Special Dietary Options
- How to Prepare the Perfect Homemade Dill Pickles Recipe: Step-by-Step Guide
- First Step: Wash and slice the cucumbers
- Second Step: Pack the jars
- Third Step: Make the brine
- Fourth Step: Pour the brine over the cucumbers
- Fifth Step: Cool and refrigerate
- Sixth Step: Taste and serve
- Dietary Substitutions to Customize Your Homemade Dill Pickles Recipe
- Protein and Main Component Alternatives
- Vegetable, Sauce, and Seasoning Modifications
- Mastering Homemade Dill Pickles Recipe: Advanced Tips and Variations
- Pro cooking techniques
- Flavor variations
- Presentation tips
- Make-ahead options
- How to Store Homemade Dill Pickles Recipe: Best Practices
- Refrigeration
- Freezing
- Meal prep considerations
- FAQs: Frequently Asked Questions About Homemade Dill Pickles Recipe
- What are the best jars for making homemade dill pickles?
- How long do homemade dill pickles last in the fridge?
- Can I make homemade dill pickles without canning?
- What type of cucumbers are best for homemade dill pickles?
- How long should I wait to eat homemade dill pickles?
- Homemade Dill Pickles Recipe
- Ingredients
- Instructions
- Last Step:
- Notes
- Nutrition
- Did you make this recipe?
Essential Ingredients for Homemade Dill Pickles Recipe
Here is everything you need for this Homemade Dill Pickles Recipe. The ingredient list is simple, but each item plays an important role in getting that crisp, tangy, garlic-filled bite.
Main Ingredients
- 12 to 14 Persian cucumbers or 8 to 10 pickling cucumbers – These are the best cucumbers for crunch because they stay firm and hold their shape in the brine.
- 4 garlic cloves, halved – Garlic gives the pickles that bold, savory flavor that makes each bite so good.
- 2 teaspoons mustard seeds – These add a gentle sharpness and classic pickle flavor.
- 2 teaspoons peppercorns – Peppercorns bring a light, peppery bite to the brine.
- Fresh dill sprigs, a few per jar – Dill is the star herb in this Homemade Dill Pickles Recipe and gives the brine its signature fresh taste.
- 2 cups water – Water softens the vinegar so the brine is balanced and not too harsh.
- 2 cups white vinegar – White vinegar gives the pickles their bright, tangy finish and helps preserve them in the fridge.
- 1/4 cup sugar – Sugar balances the sharp vinegar flavor without making the pickles sweet.
- 2 tablespoons salt – Salt is needed for flavor and for building that classic pickle brine.
Special Dietary Options
- Vegan: This recipe is naturally vegan as written.
- Gluten-free: All ingredients are naturally gluten-free, so no swaps are needed.
- Low-calorie: For a lighter version, reduce the sugar a little and enjoy the cucumbers as a crisp, low-calorie snack.
| Ingredient | Why It Matters | Easy Swap or Note |
|---|---|---|
| Persian or pickling cucumbers | Gives the best crunch | Choose small, firm cucumbers |
| White vinegar | Creates the tangy pickle flavor | Keep it for the classic taste |
| Sugar | Balances the brine | Reduce slightly if you want less sweetness |
| Fresh dill | Adds the signature herb flavor | Use a few sprigs per jar |
How to Prepare the Perfect Homemade Dill Pickles Recipe: Step-by-Step Guide
This quick pickle method is easy, and once you make it one time, it feels almost effortless. The key is using fresh cucumbers, a hot brine, and clean jars with tight lids. Whether you like spears or chips, the process stays simple and the payoff is huge.
First Step: Wash and slice the cucumbers
Start by washing the cucumbers well under cool water. If you are making spears, slice each cucumber lengthwise into quarters. If you want chips, thinly slice the cucumbers horizontally. The shape you choose changes the timing a little, but both versions work well in this Homemade Dill Pickles Recipe.
For the best results, use Persian cucumbers or small pickling cucumbers. They are firmer, less watery, and much better for quick pickles. If your cucumbers are very large, the centers may get soft faster, so smaller ones are the better pick for crunch.
Second Step: Pack the jars
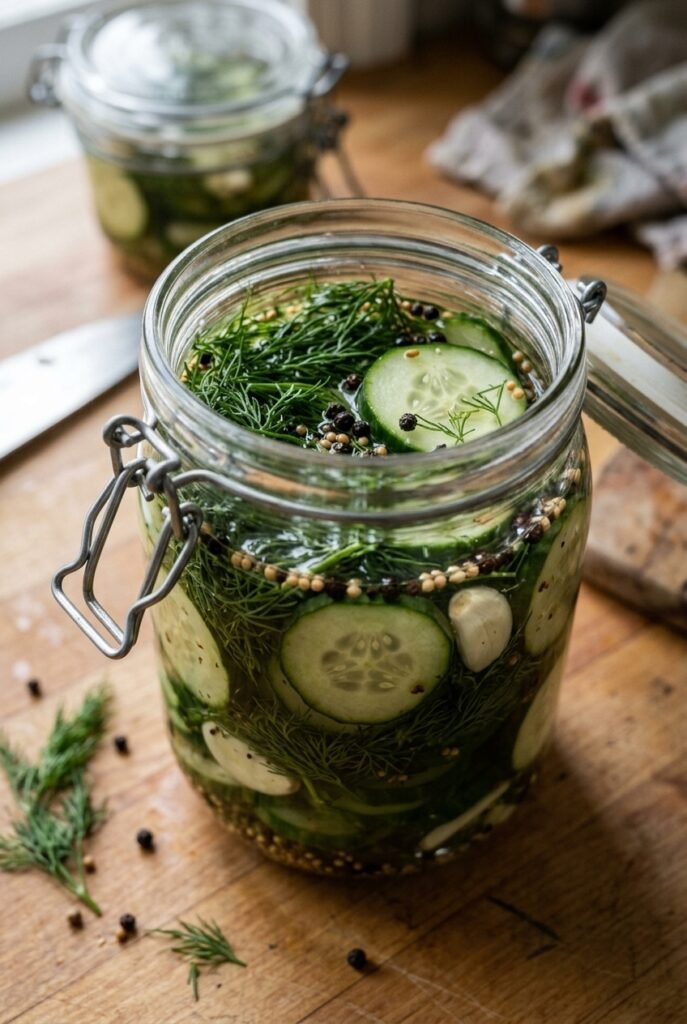
Divide the cucumbers among 4 clean 8-ounce jars or 2 clean 16-ounce jars. Pack them in snugly, but do not smash them down. Tuck a few dill sprigs into each jar, then add the halved garlic cloves, mustard seeds, and peppercorns. This step builds all the flavor right inside the jar, which is why refrigerator pickles taste so good even with such a short wait.
Use jars with airtight lids so your homemade dill pickles stay crisp and fresh in the fridge.
If you like to serve pickles with dinner recipes like slow cooker Italian lemon chicken or alongside a sandwich tray, smaller jars can be handy because they are easy to grab and store.
Third Step: Make the brine
Place the water, white vinegar, sugar, and salt in a medium saucepan. Heat over medium heat, stirring often, until the sugar and salt dissolve fully. You do not need to boil hard. You just want everything dissolved and mixed well. This usually takes about 1 minute of cook time, which is why this is such a fast pickle recipe.
The sugar may seem small, but it matters. It softens the vinegar bite so the pickles taste bright instead of harsh. If you want less sweetness, you can reduce the sugar a little, but do not skip it completely if you want a balanced brine.
Fourth Step: Pour the brine over the cucumbers
Let the brine cool slightly before pouring it over the cucumbers. This helps protect the herbs and garlic while still allowing the flavors to move into the cucumbers. Pour enough brine into each jar to cover the cucumbers fully. If needed, gently press the cucumbers down with a clean spoon so they stay under the liquid.
At this stage, the pickles already smell amazing. You will notice the dill, garlic, and vinegar working together right away. That is a good sign that your Homemade Dill Pickles Recipe is on track.
Fifth Step: Cool and refrigerate
Let the jars cool to room temperature before moving them to the fridge. Once chilled, the pickles need time to absorb all that flavor. Pickle chips will be lightly pickled in 1 day and taste even better over time. Pickle spears will be lightly pickled in 2 days and taste best after 5 or 6 days.
For the best texture, give chips at least 24 hours in the fridge and spears at least 48 hours. This resting time matters because the brine needs time to work its way into each cucumber slice.
Sixth Step: Taste and serve
After the waiting time, taste a pickle and decide if you want to keep chilling them longer. The flavor grows with time, so many people find the pickles taste even better after several days. Serve them with burgers, grilled chicken, sandwiches, or snack boards. They also make a great crunchy side for big comfort meals.
These homemade pickles are especially nice next to dishes like slow cooker honey lime chicken because the sharp pickle flavor cuts through richer foods so nicely.

Dietary Substitutions to Customize Your Homemade Dill Pickles Recipe
Protein and Main Component Alternatives
This recipe does not rely on meat or dairy, so it already fits many eating styles. Still, there are easy ways to adjust the main ingredient if you cannot find the exact cucumbers listed.
- Kirby cucumbers: A great swap if Persian cucumbers are not available. They are small, crisp, and ideal for quick dill pickles.
- Small garden cucumbers: Use only if they are firm and fresh. Remove any soft spots first.
- Thinly sliced radishes or carrots: If you want a mixed pickle jar, add a few slices for color and crunch. They brine well beside the cucumbers.
Vegetable, Sauce, and Seasoning Modifications
You can adjust the brine to match your taste. If you want a spicier jar, add crushed red pepper flakes. If you prefer a stronger dill flavor, use extra fresh dill sprigs. For a more savory brine, add a little extra peppercorn or a garlic clove.
- Less sugar: Reduce the sugar slightly for a sharper pickle flavor.
- More heat: Add crushed red pepper for a spicy kick.
- Extra herbs: Add a little fresh parsley or more dill if you like a greener flavor profile.
- Different vinegars: White vinegar gives the cleanest classic taste, but you can try other mild vinegars if you like a softer tang.
These small changes let you keep the same easy process while making the pickles fit your own taste. That is one reason this Homemade Dill Pickles Recipe works so well for busy home cooks.
Mastering Homemade Dill Pickles Recipe: Advanced Tips and Variations
Once you have made a batch or two, a few small tricks can help you get even better flavor and texture. The good news is that quick pickles are forgiving, so you do not need fancy tools or special skills.
Pro cooking techniques
Use very fresh cucumbers for the crispest result. If you have time, chill the cucumbers before slicing them so they stay firmer in the jar. Also, make sure the brine covers every piece of cucumber. If some slices sit above the liquid, they can soften or lose flavor more quickly.
For clean packing, use jars with tight seals and wash them well before filling. Ball Mason jars are a popular choice because they are reliable, easy to find, and great for fridge storage. Wide-mouth jars are especially handy when you are packing spears or fishing out chips later.
Flavor variations
You can keep the classic dill taste or play with the flavor a little. Add extra garlic for a stronger bite, use more peppercorns for a bolder finish, or toss in a pinch of red pepper flakes for heat. Some cooks like a brighter, more herb-forward jar, while others want a deeper garlic taste.
Presentation tips
Serve the pickles in a small bowl with the dill sprigs visible for a fresh, homemade look. They make a pretty side for burgers, sandwiches, picnic plates, and snack boards. If you are packing lunches, tuck a few chips into a small container for an easy crunchy side.
Make-ahead options
This recipe is made for planning ahead. You can prep the jars the night before and let them chill overnight, then check them the next day. Chips are ready sooner than spears, so they are perfect for a fast meal prep snack. If you are making a larger batch, just double the brine and use more jars.
The longer these pickles sit in the fridge, the more flavor they pick up, so patience really pays off.
How to Store Homemade Dill Pickles Recipe: Best Practices
These refrigerator pickles are easy to store and even easier to enjoy later. After the jars cool to room temperature, place them in the fridge right away. Keep the cucumbers submerged in brine and use airtight jars for the best texture and flavor.
Refrigeration
Homemade dill pickles usually last several weeks in the fridge, and many batches stay good for 1 to 2 months when stored properly. For the best crunch, eat them within 4 to 6 weeks. Always keep them cold, tightly sealed, and covered in brine.
Freezing
Freezing whole pickles is not a great idea because it softens the texture. If you want to save something for later, you can freeze extra brine for another batch, but the cucumbers themselves are best kept in the refrigerator.
Meal prep considerations
Label your jars with the date so you know when they were made. This is helpful for meal prep, snack planning, and batch cooking. If you are making several jars for the week, store them in the back of the fridge where the temperature is most steady.
| Storage Method | Best Practice | Time Frame |
|---|---|---|
| Fridge | Keep in airtight jars and fully covered in brine | 1 to 2 months |
| Best eating window | Enjoy when texture is crispest and flavor is balanced | 4 to 6 weeks |
| Freezer | Not recommended for whole pickles | Can soften texture |

FAQs: Frequently Asked Questions About Homemade Dill Pickles Recipe
What are the best jars for making homemade dill pickles?
How long do homemade dill pickles last in the fridge?
Can I make homemade dill pickles without canning?
What type of cucumbers are best for homemade dill pickles?
How long should I wait to eat homemade dill pickles?

Homemade Dill Pickles Recipe
🥒 Crunchy homemade dill pickles deliver garlicky, vinegary tang—probiotic-free snack boosts meals effortlessly.
🌿 Fridge-ready in 2 days: customizable, no-canning simple method for endless burgers, sandwiches!
- Total Time: 10 minutes + 2-5 days
- Yield: 4 pint jars
Ingredients
– 12 to 14 Persian cucumbers or 8 to 10 pickling cucumbers
– 4 garlic cloves, halved
– 2 teaspoons mustard seeds
– 2 teaspoons peppercorns
– Fresh dill sprigs, a few per jar
– 2 cups water
– 2 cups white vinegar
– 1/4 cup sugar
– 2 tablespoons salt
Instructions
1-First Step: Wash and slice the cucumbers: Start by washing the cucumbers well under cool water. If you are making spears, slice each cucumber lengthwise into quarters. If you want chips, thinly slice the cucumbers horizontally. The shape you choose changes the timing a little, but both versions work well in this Homemade Dill Pickles Recipe. For the best results, use Persian cucumbers or small pickling cucumbers. They are firmer, less watery, and much better for quick pickles. If your cucumbers are very large, the centers may get soft faster, so smaller ones are the better pick for crunch.
2-Second Step: Pack the jars: Divide the cucumbers among 4 clean 8-ounce jars or 2 clean 16-ounce jars. Pack them in snugly, but do not smash them down. Tuck a few dill sprigs into each jar, then add the halved garlic cloves, mustard seeds, and peppercorns. This step builds all the flavor right inside the jar, which is why refrigerator pickles taste so good even with such a short wait. Use jars with airtight lids so your homemade dill pickles stay crisp and fresh in the fridge. If you like to serve pickles with dinner recipes like slow cooker Italian lemon chicken or alongside a sandwich tray, smaller jars can be handy because they are easy to grab and store.
3-Third Step: Make the brine: Place the water, white vinegar, sugar, and salt in a medium saucepan. Heat over medium heat, stirring often, until the sugar and salt dissolve fully. You do not need to boil hard. You just want everything dissolved and mixed well. This usually takes about 1 minute of cook time, which is why this is such a fast pickle recipe. The sugar may seem small, but it matters. It softens the vinegar bite so the pickles taste bright instead of harsh. If you want less sweetness, you can reduce the sugar a little, but do not skip it completely if you want a balanced brine.
4-Fourth Step: Pour the brine over the cucumbers: Let the brine cool slightly before pouring it over the cucumbers. This helps protect the herbs and garlic while still allowing the flavors to move into the cucumbers. Pour enough brine into each jar to cover the cucumbers fully. If needed, gently press the cucumbers down with a clean spoon so they stay under the liquid. At this stage, the pickles already smell amazing. You will notice the dill, garlic, and vinegar working together right away. That is a good sign that your Homemade Dill Pickles Recipe is on track.
5-Fifth Step: Cool and refrigerate: Let the jars cool to room temperature before moving them to the fridge. Once chilled, the pickles need time to absorb all that flavor. Pickle chips will be lightly pickled in 1 day and taste even better over time. Pickle spears will be lightly pickled in 2 days and taste best after 5 or 6 days. For the best texture, give chips at least 24 hours in the fridge and spears at least 48 hours. This resting time matters because the brine needs time to work its way into each cucumber slice.
6-Sixth Step: Taste and serve: After the waiting time, taste a pickle and decide if you want to keep chilling them longer. The flavor grows with time, so many people find the pickles taste even better after several days. Serve them with burgers, grilled chicken, sandwiches, or snack boards. They also make a great crunchy side for big comfort meals. These homemade pickles are especially nice next to dishes like slow cooker honey lime chicken because the sharp pickle flavor cuts through richer foods so nicely.
Last Step:
Please leave a rating and comment letting us know how you liked this recipe! This helps our business to thrive and continue providing free, high-quality recipes for you.Notes
🥒 Choose firm Persian or pickling cucumbers—avoid large ones for best crunch.
⏳ Patience key: flavors peak after 48+ hours; they improve weekly.
🔥 Add red pepper flakes or chili for spicy version.
- Prep Time: 10 minutes
- Pickling Time: 2-5 days
- Cook Time: 2 minutes
- Category: Snacks
- Method: Quick Pickle
- Cuisine: American
- Diet: Vegan, Gluten-Free, Low-Calorie
Nutrition
- Serving Size: 4 spears (½ cup)
- Calories: 25 kcal
- Sugar: 3g
- Sodium: 450mg
- Fat: 0g
- Saturated Fat: 0g
- Unsaturated Fat: 0g
- Trans Fat: 0g
- Carbohydrates: 5g
- Fiber: 1g
- Protein: 0g
- Cholesterol: 0mg


