Why You’ll Love These No-Bake Strawberry Cheesecake Cups
No-Bake Strawberry Cheesecake Cups are the kind of dessert that feels special, but takes very little effort. They are creamy, fruity, and layered with a buttery cookie crumb base, so every spoonful tastes like a little treat.
- Easy to make: This recipe comes together in about 25 minutes of prep time, and there is no oven needed. That makes these No-Bake Strawberry Cheesecake Cups a great choice for busy weeknights, school events, or last-minute guests.
- Comforting and satisfying: You get rich cream cheese filling, fluffy whipped cream, sweet strawberry jam, and a crumbly base in one cup. For readers who enjoy fruit-based sweets, this style is also a nice way to enjoy strawberries, which are naturally packed with vitamin C and other helpful nutrients. If you want a quick read on strawberry benefits, this guide to the health benefits of strawberries is a useful place to start.
- Flexible for different needs: You can swap graham cracker crumbs for vanilla wafers or shortbread cookies, and you can use store-bought whipped topping if you do not want to whip cream by hand. That makes these no-bake dessert cups friendly for home cooks with different pantry items on hand.
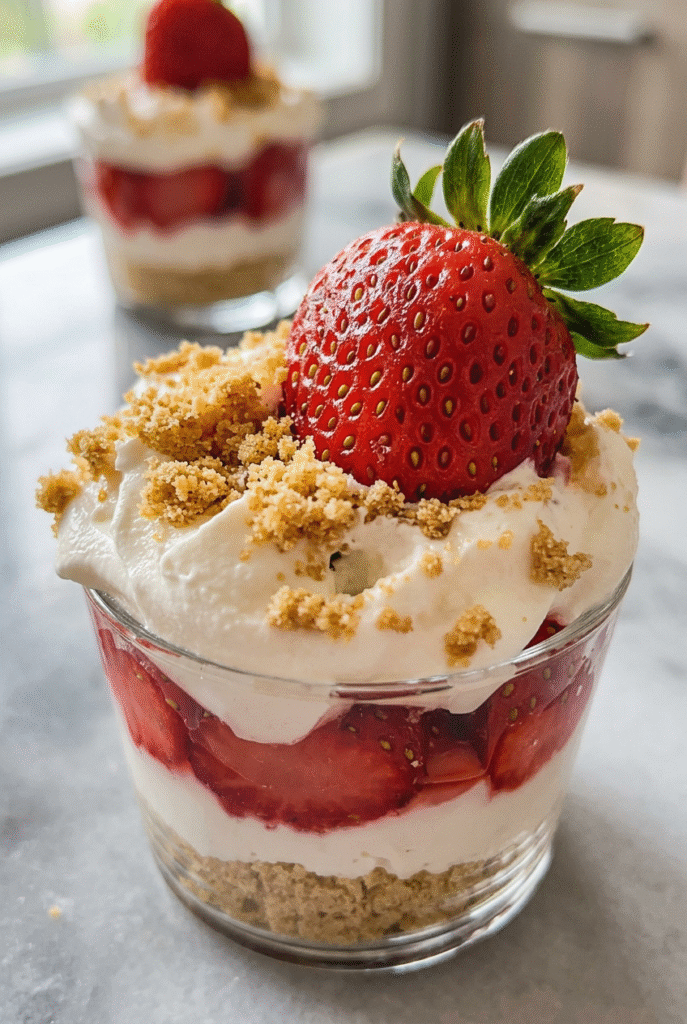
- Bright flavor and pretty layers: The sweet strawberry jam, smooth cheesecake filling, and fresh strawberry garnish make each cup look beautiful in clear dessert cups. The layers also make them ideal for parties, potlucks, and family dinners.
This is the kind of dessert that looks fancy in a cup, but feels easy enough for any home cook to make on a regular day.
If you enjoy simple make-ahead sweets, you may also like browsing easy dessert ideas from Recipes Valentina for more family-friendly treats.
Jump to:
- Why You’ll Love These No-Bake Strawberry Cheesecake Cups
- Essential Ingredients for No-Bake Strawberry Cheesecake Cups
- Main Ingredients
- Special Dietary Options
- How to Prepare the Perfect No-Bake Strawberry Cheesecake Cups: Step-by-Step Guide
- First Step: Gather and chill your tools
- Second Step: Make the whipped cream
- Third Step: Prepare the cheesecake filling
- Fourth Step: Mix the crust
- Fifth Step: Warm the jam if needed
- Sixth Step: Build the dessert cups
- Final Step: Chill and garnish
- Dietary Substitutions to Customize Your No-Bake Strawberry Cheesecake Cups
- Protein and Main Component Alternatives
- Vegetable, Sauce, and Seasoning Modifications
- Mastering No-Bake Strawberry Cheesecake Cups: Advanced Tips and Variations
- Flavor variations
- Presentation tips
- Make-ahead options
- How to Store No-Bake Strawberry Cheesecake Cups: Best Practices
- FAQs: Frequently Asked Questions About No-Bake Strawberry Cheesecake Cups
- What size cups should I use for no-bake strawberry cheesecake cups?
- Can I use homemade strawberry sauce instead of jam in no-bake cheesecake cups?
- Can I use low-fat cream cheese in no-bake strawberry cheesecake cups?
- How long do no-bake strawberry cheesecake cups last in the fridge?
- Can I make no-bake strawberry cheesecake cups ahead of time?
- No-Bake Strawberry Cheesecake Cups
- Ingredients
- Instructions
- Last Step:
- Notes
- Nutrition
- Did you make this recipe?
Essential Ingredients for No-Bake Strawberry Cheesecake Cups
Below is the full ingredient list for these strawberry cheesecake parfaits. Each item plays an important part in the texture, flavor, and structure of the dessert cups.
Main Ingredients
- 1-1/2 cups heavy whipping cream – Whips into soft, airy volume that makes the filling light and smooth.
- 1/2 cup powdered sugar, divided – Sweetens both the whipped cream and the cream cheese mixture.
- 1 teaspoon pure vanilla extract – Adds warm flavor and helps the cheesecake taste more balanced.
- 8 ounces cream cheese, softened to room temperature – Creates the rich, creamy cheesecake base.
- 1 cup graham cracker crumbs – Forms the buttery crust layer at the bottom of each cup.
- 1/4 cup butter, melted – Binds the crumbs together and gives the crust a rich flavor.
- 3/4 cup seedless strawberry jam – Adds a sweet fruit layer without extra prep work.
- Sliced fresh strawberries, optional for garnish – Brings freshness, color, and a pretty finish right before serving.
Special Dietary Options
- Vegan: Use plant-based cream cheese, coconut whipped topping, vegan butter, and a fruit spread made without gelatin.
- Gluten-free: Use gluten-free graham-style crumbs, gluten-free vanilla cookies, or shortbread-style gluten-free crumbs.
- Low-calorie: Use light cream cheese, reduced-sugar jam, and a lighter whipped topping to lower the richness.
If you want to learn more about cream cheese and how it fits into everyday eating, this cream cheese nutrition guide offers a helpful breakdown.
| Ingredient | Purpose in the Recipe | Easy Swap |
|---|---|---|
| Heavy whipping cream | Creates fluffy volume | Store-bought whipped topping |
| Cream cheese | Builds the cheesecake layer | Light cream cheese or Neufchâtel |
| Graham cracker crumbs | Makes the crust | Vanilla wafers or shortbread cookies |
| Strawberry jam | Adds sweet berry flavor | Homemade strawberry sauce |
How to Prepare the Perfect No-Bake Strawberry Cheesecake Cups: Step-by-Step Guide
These No-Bake Strawberry Cheesecake Cups are simple to assemble, and the layers come together in a clean, easy order. Using clear dessert cups helps you see the layers, which makes the final dessert look extra nice with very little effort.
First Step: Gather and chill your tools
Start by gathering all ingredients and equipment. You will need an electric mixer, a chilled bowl for the whipped cream, a second mixing bowl, a small bowl for the crust, and six 9-ounce dessert cups. If you want the whipped cream to form quickly, place the bowl and mixer beaters in the fridge or freezer for a short time before starting.
Room temperature cream cheese is important here because it blends smoothly. If it is too cold, the filling may turn lumpy. Let it sit out for about 30 to 45 minutes before mixing if needed.
Second Step: Make the whipped cream
Add the 1-1/2 cups heavy whipping cream, 1/4 cup powdered sugar, and 1 teaspoon pure vanilla extract to the chilled bowl. Beat with an electric mixer on medium-high speed until stiff peaks form. The cream should hold its shape when you lift the beaters.
Do not rush this step. If you stop too early, the filling may be too soft. If you go too far, the cream can turn grainy, so watch it closely. A cold bowl and cold beaters help the cream thicken faster and give a better texture.
Third Step: Prepare the cheesecake filling
In another bowl, beat the 8 ounces softened cream cheese with the remaining 1/4 cup powdered sugar until smooth and creamy. This should take about 1 to 2 minutes with an electric mixer. Scrape down the sides of the bowl if needed so everything blends evenly.
Next, reserve one rounded cup of whipped cream. This portion will go on top of the dessert cups later. Fold the rest of the whipped cream into the cream cheese mixture gently. Use a spatula and stir just until combined so the filling stays light and airy.
Fourth Step: Mix the crust
In a small bowl, mix 1 cup graham cracker crumbs with 1/4 cup melted butter. Stir until all the crumbs are evenly coated. The mixture should look like damp sand and hold together when pressed lightly.
Do not pack the crust too firmly. A light press is enough, and it makes the finished cups easier to scoop after chilling. This small detail helps the dessert keep a nice spoonable texture.
Fifth Step: Warm the jam if needed
If your 3/4 cup seedless strawberry jam feels thick, warm it in the microwave for 20 to 30 seconds. This makes it easier to spoon into the cups and helps the layers spread more smoothly. Stir the jam after warming so the texture is even.
You can also use homemade strawberry sauce if you want a fresher taste. Just cool it completely before layering so it does not melt the filling.
Sixth Step: Build the dessert cups
Evenly divide the crust mixture among six 9-ounce dessert cups. Press it down lightly with the back of a spoon. Then divide the cheesecake filling among the cups, spooning it over the crust layer.
After that, add a layer of strawberry jam to each cup. Try to spread it close to the edges so the red layer shows through the sides of the clear cups. Finish with the reserved whipped cream on top.
Final Step: Chill and garnish
Place the cups in the refrigerator for 20 minutes. This short chill helps the layers firm up and makes the dessert taste even better. Right before serving, top each cup with sliced fresh strawberries if you want a pretty garnish.
Add the strawberries at the last minute so they do not release juice and make the top watery. Serve the dessert cups cold, straight from the fridge, for the best texture.
For the cleanest layers, spoon each component gently into the cups instead of pressing or smearing it down.

Dietary Substitutions to Customize Your No-Bake Strawberry Cheesecake Cups
Protein and Main Component Alternatives
There is no protein-heavy ingredient in the traditional sense here, but the main dairy components can still be adjusted to fit different needs. If you want a lighter version of these No-Bake Strawberry Cheesecake Cups, use low-fat cream cheese or Neufchâtel cream cheese. The result will still be creamy, though slightly less rich.
You can also swap the whipped cream with store-bought whipped topping. This is a good option for busy parents, students, or anyone who wants to save time. For an even lighter texture, some cooks like using Greek yogurt in part of the filling, though the taste will be tangier and the set a little softer.
Vegetable, Sauce, and Seasoning Modifications
Since this recipe is a dessert, vegetable swaps do not really apply, but the strawberry layer can be changed to fit seasonal fruit or pantry items. Try raspberry jam, blueberry preserves, or cherry topping if strawberries are not available. You can also add a little lemon zest to the filling for a brighter flavor.
For the crust, crushed vanilla wafers or shortbread cookies work well if you do not have graham crackers. If you need a gluten-free version, use certified gluten-free cookies. For a lower sugar option, choose reduced-sugar jam and lightly sweetened whipped topping. These changes keep the dessert easy while giving you room to adjust flavor and texture.
Mastering No-Bake Strawberry Cheesecake Cups: Advanced Tips and Variations
Once you make these a time or two, small changes can help you get even better results. The biggest trick is to keep your ingredients cold, especially the whipping cream and mixing bowl. Cold tools help the cream whip faster, which saves time and gives a more stable topping.
Another helpful tip is to layer with a light hand. If you press the crust too hard, it becomes dense. If you fold the whipped cream too aggressively, the filling can lose its fluffy texture. Gentle mixing gives you the best final result.
Flavor variations
- Use raspberry jam for a tart berry twist.
- Add lemon zest to the cream cheese filling for a brighter flavor.
- Swap in crushed vanilla wafers for a sweeter crust.
- Top with mixed berries for a party-ready look.
Presentation tips
Clear dessert cups make the layers visible and pretty. For a polished look, wipe the inside edges of the cups with a clean paper towel before chilling. Add the fresh strawberries right before serving so they stay bright and juicy.
Make-ahead options
These dessert cups are a smart make-ahead choice for parties, school events, and holiday meals. You can assemble them a few hours ahead, or even the day before if you wait to add the fresh strawberry garnish. That makes them a good fit for anyone with a busy schedule who still wants a homemade dessert.
If you enjoy make-ahead comfort food, you may also like other simple recipes from Recipes Valentina that work well for family meals and gatherings.
How to Store No-Bake Strawberry Cheesecake Cups: Best Practices
These No-Bake Strawberry Cheesecake Cups keep well when stored the right way. For short-term storage, cover each cup with plastic wrap or place them in an airtight container and refrigerate for 3 to 5 days. The crust will soften a little over time, but the flavor stays delicious.
Keep them chilled at 35 to 40 degrees Fahrenheit. Avoid leaving them out at room temperature for more than 2 hours. If you are making them for later in the day, store them without the fresh strawberry garnish until just before serving.
Freezing is possible, but the texture may change a bit because cream-based desserts can separate slightly after thawing. If you still want to freeze them, wrap each cup well and freeze for up to 1 month. Thaw overnight in the refrigerator.
For meal prep, it is smart to assemble the crust and filling ahead, then add the jam and garnish later. That keeps the dessert fresh and helps the berry layer stay bright.

FAQs: Frequently Asked Questions About No-Bake Strawberry Cheesecake Cups
What size cups should I use for no-bake strawberry cheesecake cups?
Can I use homemade strawberry sauce instead of jam in no-bake cheesecake cups?
Can I use low-fat cream cheese in no-bake strawberry cheesecake cups?
How long do no-bake strawberry cheesecake cups last in the fridge?
Can I make no-bake strawberry cheesecake cups ahead of time?

No-Bake Strawberry Cheesecake Cups
🍓 Indulgent no-bake layers of creamy cheesecake, crumbly crust, and vibrant strawberry jam deliver dreamy dessert satisfaction.
🥄 Portable parfait cups ready in under an hour—perfect for parties, make-ahead treats, or guilt-free indulgence!
- Total Time: 45 minutes
- Yield: 6 servings
Ingredients
– 1-1/2 cups heavy whipping cream for soft, airy volume
– 1/2 cup powdered sugar, divided for sweetening
– 1 teaspoon pure vanilla extract for flavor
– 8 ounces cream cheese, softened to room temperature for cheesecake base
– 1 cup graham cracker crumbs for crust layer
– 1/4 cup butter, melted for binding crumbs
– 3/4 cup seedless strawberry jam for sweet fruit layer
– Sliced fresh strawberries for garnish
Instructions
1-First Step: Gather and chill your tools Start by gathering all ingredients and equipment. You will need an electric mixer, a chilled bowl for the whipped cream, a second mixing bowl, a small bowl for the crust, and six 9-ounce dessert cups. If you want the whipped cream to form quickly, place the bowl and mixer beaters in the fridge or freezer for a short time before starting. Room temperature cream cheese is important here because it blends smoothly. If it is too cold, the filling may turn lumpy. Let it sit out for about 30 to 45 minutes before mixing if needed.
2-Second Step: Make the whipped cream Add the 1-1/2 cups heavy whipping cream, 1/4 cup powdered sugar, and 1 teaspoon pure vanilla extract to the chilled bowl. Beat with an electric mixer on medium-high speed until stiff peaks form. The cream should hold its shape when you lift the beaters. Do not rush this step. If you stop too early, the filling may be too soft. If you go too far, the cream can turn grainy, so watch it closely. A cold bowl and cold beaters help the cream thicken faster and give a better texture.
3-Third Step: Prepare the cheesecake filling In another bowl, beat the 8 ounces softened cream cheese with the remaining 1/4 cup powdered sugar until smooth and creamy. This should take about 1 to 2 minutes with an electric mixer. Scrape down the sides of the bowl if needed so everything blends evenly. Next, reserve one rounded cup of whipped cream. This portion will go on top of the dessert cups later. Fold the rest of the whipped cream into the cream cheese mixture gently. Use a spatula and stir just until combined so the filling stays light and airy.
4-Fourth Step: Mix the crust In a small bowl, mix 1 cup graham cracker crumbs with 1/4 cup melted butter. Stir until all the crumbs are evenly coated. The mixture should look like damp sand and hold together when pressed lightly. Do not pack the crust too firmly. A light press is enough, and it makes the finished cups easier to scoop after chilling. This small detail helps the dessert keep a nice spoonable texture.
5-Fifth Step: Warm the jam if needed If your 3/4 cup seedless strawberry jam feels thick, warm it in the microwave for 20 to 30 seconds. This makes it easier to spoon into the cups and helps the layers spread more smoothly. Stir the jam after warming so the texture is even. You can also use homemade strawberry sauce if you want a fresher taste. Just cool it completely before layering so it does not melt the filling.
6-Sixth Step: Build the dessert cups Evenly divide the crust mixture among six 9-ounce dessert cups. Press it down lightly with the back of a spoon. Then divide the cheesecake filling among the cups, spooning it over the crust layer. After that, add a layer of strawberry jam to each cup. Try to spread it close to the edges so the red layer shows through the sides of the clear cups. Finish with the reserved whipped cream on top.
7-Final Step: Chill and garnish Place the cups in the refrigerator for 20 minutes. This short chill helps the layers firm up and makes the dessert taste even better. Right before serving, top each cup with sliced fresh strawberries if you want a pretty garnish. Add the strawberries at the last minute so they do not release juice and make the top watery. Serve the dessert cups cold, straight from the fridge, for the best texture.
Last Step:
Please leave a rating and comment letting us know how you liked this recipe! This helps our business to thrive and continue providing free, high-quality recipes for you.Notes
❄️ Chill bowl and beaters for whipped cream to achieve stiff peaks faster.
🍓 Warm jam briefly if thick for smooth layering; add fresh berries right before serving.
🥄 Don’t pack crust too firmly for easier scooping after chilling.
- Prep Time: 25 minutes
- Chill Time: 20 minutes
- Category: Desserts
- Method: No Bake
- Cuisine: American
- Diet: Vegetarian
Nutrition
- Serving Size: 1 dessert cup
- Calories: 621 kcal
- Sugar: 37g
- Sodium: 302mg
- Fat: 44g
- Saturated Fat: 26g
- Unsaturated Fat: 13g
- Trans Fat: 0.3g
- Carbohydrates: 54g
- Fiber: 1g
- Protein: 5g
- Cholesterol: 126mg


