Why You’ll Love These Zesty Lemon Bliss Balls
If you want a snack that is bright, fresh, and easy to make, these Zesty Lemon Bliss Balls are a great fit. They come together fast in a food processor, need no baking, and taste like a sunny little treat you can grab any day of the week. This recipe is perfect for busy mornings, after-school snacking, work breaks, or a quick sweet bite after dinner.
- Easy to make: You only need a handful of simple ingredients and about 15 minutes of active prep time. No oven, no fuss, and no long cleanup.
- Good for many lifestyles: These bliss balls are naturally vegan, gluten-free, and refined sugar-free, which makes them a smart choice for many home cooks and diet-conscious eaters.
- Fresh citrus flavor: The lemon zest and lemon juice give each bite a lively, tangy taste that stands out from typical energy bites.
- Great for busy days: They store well in the fridge, so you can make a batch ahead and have snacks ready when life gets hectic.
For readers who enjoy simple, feel-good recipes, this is the kind of snack that checks a lot of boxes. If you like quick make-ahead bites, you may also enjoy the snack-friendly ideas in our easy chocolate muffins recipe or these helpful egg substitutes for home baking.
These lemon bliss balls are one of those small recipes that can make a busy day feel a little easier and a lot brighter.
For extra background on citrus, you can also read this helpful guide from Cleveland Clinic on lemon benefits.
Jump to:
- Why You’ll Love These Zesty Lemon Bliss Balls
- Essential Ingredients for Zesty Lemon Bliss Balls
- What each ingredient does
- Special dietary options
- How to Prepare the Perfect Zesty Lemon Bliss Balls: Step-by-Step Guide
- First Step: Get your ingredients ready
- Second Step: Break down the cashews and coconut
- Third Step: Add the dates and lemon
- Fourth Step: Check the texture
- Fifth Step: Roll into balls
- Final Step: Chill and serve
- Protein and Main Component Alternatives
- Nut swaps
- Date alternatives
- Texture boosters
- Protein-friendly additions
- Vegetable, Sauce, and Seasoning Modifications
- Citrus and flavor changes
- Spice ideas
- Coating and topping ideas
- Seasonal serving ideas
- Mastering Zesty Lemon Bliss Balls: Advanced Tips and Variations
- Pro cooking techniques
- Flavor variations
- Presentation tips
- Make-ahead options
- How to Store Zesty Lemon Bliss Balls: Best Practices
- Refrigeration
- Freezing
- Reheating
- Meal prep considerations
- FAQs: Frequently Asked Questions About Zesty Lemon Bliss Balls
- What are zesty lemon bliss balls?
- How do you make zesty lemon bliss balls at home?
- What ingredients are in zesty lemon bliss balls?
- Are zesty lemon bliss balls healthy?
- How do you store zesty lemon bliss balls?
- Zesty Lemon Bliss Balls
- Ingredients
- Instructions
- Last Step:
- Notes
- Nutrition
- Did you make this recipe?
Essential Ingredients for Zesty Lemon Bliss Balls
These ingredients are simple, wholesome, and easy to find. The measurements below are the exact ones you need for the base recipe.
- 1 cup raw cashews
- 1/2 cup unsweetened shredded coconut, plus more for rolling
- 1 cup packed dates, pitted if needed
- 1 tablespoon lemon zest from approximately 1 large lemon
- 2 tablespoons lemon juice
- 2 to 4 tablespoons water, as needed for blending
What each ingredient does
Raw cashews create a soft, creamy base with a mild flavor that lets the lemon shine. Unsweetened shredded coconut adds texture and helps the balls hold together. Dates bring natural sweetness and stickiness, so the mixture binds without added sugar. Lemon zest gives the recipe its bold citrus aroma, while lemon juice adds the fresh tang that makes these bites taste so lively. A little water helps the mixture blend into a smooth dough.
| Ingredient | Role in the recipe | Helpful note |
|---|---|---|
| Raw cashews | Base and creamy texture | Use unsalted, raw nuts for the best flavor |
| Shredded coconut | Texture and coating | Keep extra coconut nearby for rolling |
| Dates | Natural sweetness and binding | Fresh dates blend more easily |
| Lemon zest | Strong lemon flavor | Zest only the yellow skin, not the white pith |
| Lemon juice | Bright citrus taste | Fresh juice tastes best here |
| Water | Helps mixture come together | Add slowly so the dough stays firm |
Special dietary options
- Vegan: This recipe is already vegan as written.
- Gluten-free: The ingredients listed are naturally gluten-free. Just check labels if you buy packaged coconut or dates.
- Low-calorie: Roll smaller balls to keep portions light, and use just enough water to blend. You can also reduce the coconut coating if you want a slightly lighter snack.
How to Prepare the Perfect Zesty Lemon Bliss Balls: Step-by-Step Guide
Making these Zesty Lemon Bliss Balls is easy, even if you do not bake often. A food processor does most of the work, and the dough comes together fast once the dates soften and the nuts break down.
First Step: Get your ingredients ready
Start by measuring everything before you turn on the food processor. If your dates feel dry or firm, soak them in warm water for 5 to 10 minutes, then drain them well. This small step can make a big difference because soft dates blend into a smoother dough. Also, zest the lemon before you juice it so the fruit is easier to handle.
Second Step: Break down the cashews and coconut
Add the 1 cup raw cashews and 1/2 cup unsweetened shredded coconut to the food processor. Pulse several times until the mixture looks like coarse crumbs. You do not want a powder here. A little texture helps the bliss balls feel pleasant and not too dense.
At this stage, scrape the sides if needed. If you are making a double batch, pause once or twice so the machine does not get overloaded. A steady pulse is better than running it nonstop.
Third Step: Add the dates and lemon
Add the 1 cup packed dates, 1 tablespoon lemon zest, and 2 tablespoons lemon juice to the processor. Pulse again until the mixture begins to clump together. The dates should break down and distribute through the nut mixture, while the lemon zest gives off that fresh, bright aroma right away.
If the mixture still looks dry, add 1 tablespoon of water at a time. You may need 2 to 4 tablespoons total, depending on how soft the dates are. The finished dough should stick together when pressed between your fingers.
Fourth Step: Check the texture
Before rolling, pinch a small amount of dough and press it into a ball. If it holds its shape, you are ready to go. If it crumbles, add a tiny splash more water and pulse again. If it feels too wet, add a spoonful more coconut and pulse just once or twice. The goal is a soft, moldable mixture that rolls easily but does not feel sticky.
If the dough is too dry, add water slowly. If it is too wet, add a little coconut. Small adjustments are better than big ones.
Fifth Step: Roll into balls
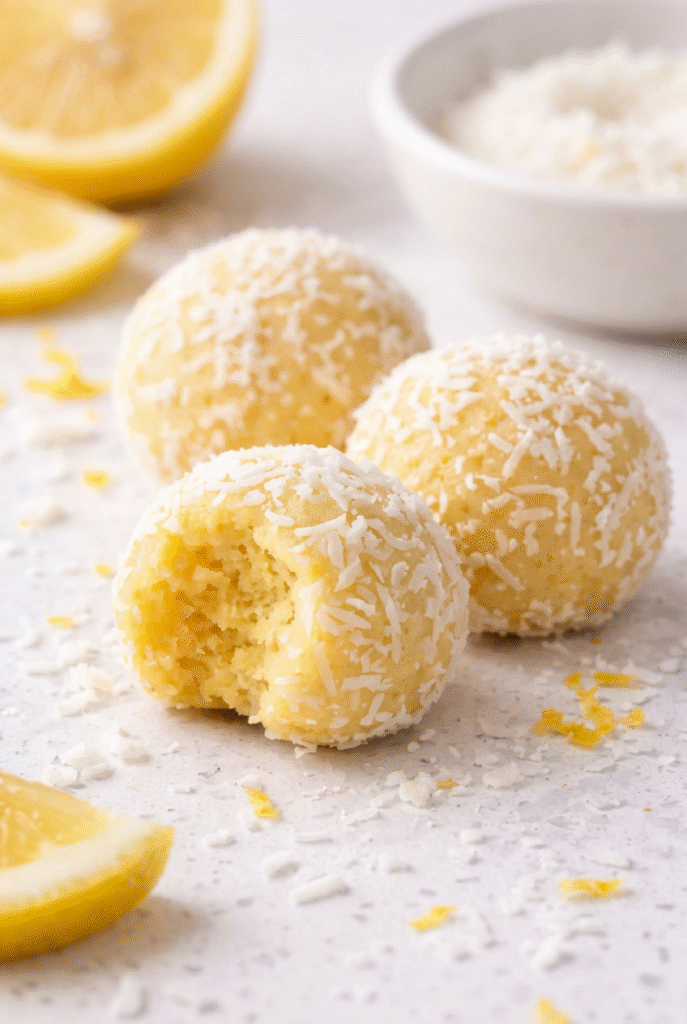
Use a small spoon or cookie scoop to portion the dough into even pieces. Roll each portion between your palms until smooth. For a neat finish, place extra unsweetened shredded coconut in a shallow bowl and roll each ball in the coconut coating. This gives the bites a pretty look and a little extra texture.
For a standard snack size, aim for 1-inch balls. If you want smaller bites for kids, lunchboxes, or party trays, you can make them a bit smaller. Just remember that smaller balls may set more quickly in the fridge.
Final Step: Chill and serve
Place the rolled bliss balls on a lined tray or plate and chill them for about 20 to 30 minutes. This helps them firm up and makes the texture more pleasant. Once chilled, move them to an airtight container and keep them cold until ready to eat.
These are lovely straight from the fridge, especially on warm days. They also pair well with tea, coffee, or a simple fruit snack. If you like easy breakfast ideas and snacky recipes, you may also enjoy our quinoa spinach egg bake for another simple make-ahead option.
Protein and Main Component Alternatives
Even though this version uses cashews as the main nut base, there are plenty of ways to tweak the recipe depending on what you have at home or what your body prefers. The trick is to keep the texture close enough that the mixture still rolls well.
Nut swaps
If you do not have cashews, try raw almonds, walnuts, or sunflower seeds. Almonds give a slightly firmer bite, while walnuts bring a deeper flavor. Sunflower seeds work well for a nut-free option, though the taste is a little more earthy. If you use a drier nut, you may need a touch more water.
Date alternatives
Dates are the main sweetener and binder, so they are hard to replace without changing the recipe. If you must swap them, soft dried figs can work in a pinch, but the flavor will be different. Raisins are not the best choice here because they can make the mixture less smooth and sweeter in a heavier way. For the closest result, stick with dates.
Texture boosters
Some cooks like to add a spoonful of rolled oats or chia seeds for a little more body. Oats make the bites a bit more filling, while chia seeds add a gentle crunch and extra fiber. If you try either one, start with 1 to 2 tablespoons so the mixture does not dry out too much.
Protein-friendly additions
If you want more protein, add a small scoop of plain or vanilla plant-based protein powder. You can also pair the bliss balls with Greek yogurt if dairy works for you, though that changes the snack into a mixed serving rather than a fully vegan one. Another easy option is to serve them with a handful of nuts on the side for a more satisfying snack plate.
Vegetable, Sauce, and Seasoning Modifications
Since this is a sweet no-bake snack, the usual vegetable and sauce swaps do not really apply in the same way they would for a dinner recipe. Still, there are lots of fun flavor changes you can make with seasonings, citrus, and finishing touches.
Citrus and flavor changes
If you love a sharper lemon taste, add a little more zest before adding more juice. Zest gives strong flavor without making the mixture too wet. You can also mix in a bit of orange zest for a softer citrus note. Lime zest works too if you want a brighter, tangier twist.
Spice ideas
A tiny pinch of sea salt can make the lemon flavor pop. Vanilla is another nice addition if you want the bites to taste more dessert-like. For a cozy twist, add a little cardamom or ginger. These spices should stay light so they do not overpower the lemon.
Coating and topping ideas
Besides rolling the balls in coconut, you can finish them with:
- Finely chopped pistachios
- A light dusting of lemon zest
- Crushed freeze-dried berries
- A drizzle of melted white chocolate for special occasions
If you like sweet snack recipes with a homemade feel, you may also enjoy our easy monkey bread recipe for a fun weekend baking project.
Seasonal serving ideas
In spring and summer, serve these chilled with fresh berries. In cooler months, pair them with tea or a warm drink for a cozy snack. They work well on dessert trays, lunchbox snack boxes, and holiday cookie platters, too.
Mastering Zesty Lemon Bliss Balls: Advanced Tips and Variations
Once you have made this recipe once or twice, it becomes easy to adjust by feel. A few small habits can help you get a better texture, stronger flavor, and a nicer finish every time.
Pro cooking techniques
First, do not overprocess the mixture too long. You want it to come together, not turn into a greasy paste. Pulse in short bursts and check the texture often. Second, use fresh lemon zest. It has a much stronger aroma than bottled flavoring and makes the whole recipe taste brighter.
If your dates are dry, warm soaking water is your friend. Just drain them well before blending so extra moisture does not make the dough too soft. Also, chill your hands for a minute under cold water before rolling if the mixture gets sticky. That little trick helps a lot.
Flavor variations
Try adding a pinch of vanilla, a little cardamom, or a spoonful of shredded coconut inside the mixture for extra texture. You can also make a more dessert-like version with a few white chocolate chips mixed in after pulsing. For a stronger citrus bite, add a touch more zest and roll the finished balls in lemony coconut.
Presentation tips
For serving, arrange the balls on a small platter and finish with a light sprinkle of coconut. A few lemon slices or mint leaves make the plate look fresh and inviting. If you are packing them for guests, place each ball in a mini paper cup for a tidy look. This is especially nice for parties, brunches, or gift boxes.
Make-ahead options
These are perfect for batch prep. Make a full batch on Sunday, chill them, and portion them into snack containers for the week. They also work well in lunchboxes and travel bags because they hold their shape once cold. If you want to prep even further ahead, freeze half the batch and thaw them as needed. That way, you always have a bright, homemade snack ready to go.
Small tweaks, like fresh zest or a pinch of salt, can make a big difference in a simple no-bake recipe.
For more nut-based inspiration, take a look at this helpful guide from the California Walnut Commission’s cashew facts page.
How to Store Zesty Lemon Bliss Balls: Best Practices
Good storage keeps these bites tasting fresh and helps the texture stay just right. Since they are made with nuts, dates, coconut, and lemon, they do best when kept cold.
Refrigeration
Store the bliss balls in an airtight container in the refrigerator for up to 2 weeks. Place parchment paper between layers if you stack them so they do not stick together. The cold helps them stay firm and makes the lemon flavor feel extra refreshing.
Freezing
If you want to keep them longer, freeze them in a single layer on a tray first. Once solid, move them into a freezer-safe bag or container. They can stay frozen for up to 3 months. Let them sit at room temperature for about 10 minutes before eating so they soften slightly.
Reheating
These do not need reheating. In fact, warming them too much can make the oils soften and the texture less pleasant. If they get too firm from the fridge, let them sit out briefly before serving.
Meal prep considerations
For meal prep, make a double batch and portion them into small containers. They travel well in lunch bags and work nicely as a grab-and-go snack. Just keep them cool during transport if you can. If the surface dries out a little after a few days, a very light roll in fresh coconut can bring them back to life.

FAQs: Frequently Asked Questions About Zesty Lemon Bliss Balls
What are zesty lemon bliss balls?
How do you make zesty lemon bliss balls at home?
What ingredients are in zesty lemon bliss balls?
Are zesty lemon bliss balls healthy?
How do you store zesty lemon bliss balls?

Zesty Lemon Bliss Balls
🍋 Bursting with zesty lemon flavor and natural sweetness from dates, these no-bake bliss balls deliver a refreshing energy boost.
🥥 Quick to make with wholesome cashews and coconut, perfect healthy snack for on-the-go or post-workout refreshment!
- Total Time: 40 minutes
- Yield: 12-16 balls
Ingredients
– 1 cup raw cashews
– 1/2 cup unsweetened shredded coconut, plus more for rolling
– 1 cup packed dates, pitted if needed
– 1 tablespoon lemon zest from approximately 1 large lemon
– 2 tablespoons lemon juice
– 2 to 4 tablespoons water, as needed for blending
Instructions
1-First Step: Get your ingredients ready Start by measuring everything before you turn on the food processor. If your dates feel dry or firm, soak them in warm water for 5 to 10 minutes, then drain them well. This small step can make a big difference because soft dates blend into a smoother dough. Also, zest the lemon before you juice it so the fruit is easier to handle.
2-Second Step: Break down the cashews and coconut Add the 1 cup raw cashews and 1/2 cup unsweetened shredded coconut to the food processor. Pulse several times until the mixture looks like coarse crumbs. You do not want a powder here. A little texture helps the bliss balls feel pleasant and not too dense. At this stage, scrape the sides if needed. If you are making a double batch, pause once or twice so the machine does not get overloaded. A steady pulse is better than running it nonstop.
3-Third Step: Add the dates and lemon Add the 1 cup packed dates, 1 tablespoon lemon zest, and 2 tablespoons lemon juice to the processor. Pulse again until the mixture begins to clump together. The dates should break down and distribute through the nut mixture, while the lemon zest gives off that fresh, bright aroma right away. If the mixture still looks dry, add 1 tablespoon of water at a time. You may need 2 to 4 tablespoons total, depending on how soft the dates are. The finished dough should stick together when pressed between your fingers.
4-Fourth Step: Check the texture Before rolling, pinch a small amount of dough and press it into a ball. If it holds its shape, you are ready to go. If it crumbles, add a tiny splash more water and pulse again. If it feels too wet, add a spoonful more coconut and pulse just once or twice. The goal is a soft, moldable mixture that rolls easily but does not feel sticky. If the dough is too dry, add water slowly. If it is too wet, add a little coconut. Small adjustments are better than big ones.
5-Fifth Step: Roll into balls Use a small spoon or cookie scoop to portion the dough into even pieces. Roll each portion between your palms until smooth. For a neat finish, place extra unsweetened shredded coconut in a shallow bowl and roll each ball in the coconut coating. This gives the bites a pretty look and a little extra texture. For a standard snack size, aim for 1-inch balls. If you want smaller bites for kids, lunchboxes, or party trays, you can make them a bit smaller. Just remember that smaller balls may set more quickly in the fridge.
6-Final Step: Chill and serve Place the rolled bliss balls on a lined tray or plate and chill them for about 20 to 30 minutes. This helps them firm up and makes the texture more pleasant. Once chilled, move them to an airtight container and keep them cold until ready to eat. These are lovely straight from the fridge, especially on warm days. They also pair well with tea, coffee, or a simple fruit snack. If you like easy breakfast ideas and snacky recipes, you may also enjoy our quinoa spinach egg bake for another simple make-ahead option.
Last Step:
Please leave a rating and comment letting us know how you liked this recipe! This helps our business to thrive and continue providing free, high-quality recipes for you.Notes
🍋 Use fresh lemons for the brightest, most vibrant citrus flavor.
💧 Add water gradually to achieve the perfect sticky dough consistency without making it too wet.
❄️ Chill the balls before serving for the best texture and to help them hold their shape.
- Prep Time: 10 minutes
- Chilling Time: 30 minutes
- Category: Snacks
- Method: No Bake
- Cuisine: Healthy
- Diet: Vegan, Gluten-Free, Raw
Nutrition
- Serving Size: 1 ball
- Calories: 120 kcal
- Sugar: 10g
- Sodium: 5mg
- Fat: 8g
- Saturated Fat: 3g
- Unsaturated Fat: 5g
- Trans Fat: 0g
- Carbohydrates: 12g
- Fiber: 2g
- Protein: 2g
- Cholesterol: 0mg


