Why You’ll Love This Lava Cake
Lava cake is more than just a dessert. It is an experience that brings joy to any table. This chocolate lava cake recipe combines simplicity with extraordinary results, making it perfect for both beginners and experienced bakers alike.
Ease of preparation: Despite its impressive appearance, this molten chocolate cake is surprisingly simple to make. With just 15 minutes of prep time and 12 minutes in the oven, you can create a restaurant-quality dessert at home. The straightforward method requires no special equipment beyond basic kitchen tools, and the recipe comes together in less than 30 minutes from start to finish.
Health benefits: While dessert should always be enjoyed in moderation, this lava cake recipe uses high-quality dark chocolate which contains antioxidants and minerals like iron, magnesium, and copper. Dark chocolate with 70% cocoa content has less sugar than milk chocolate and offers potential heart health benefits when consumed in reasonable amounts. The recipe creates portion-controlled servings, making it easier to enjoy a treat without overindulging.
Versatility: This molten lava cake adapts beautifully to various dietary needs and preferences. Whether you need vegan, gluten-free, or low-sugar options, the base recipe is easily modified without compromising the delicious result. You can customize the flavor profile with different extracts, add-ins, or serving suggestions to suit any occasion or preference.
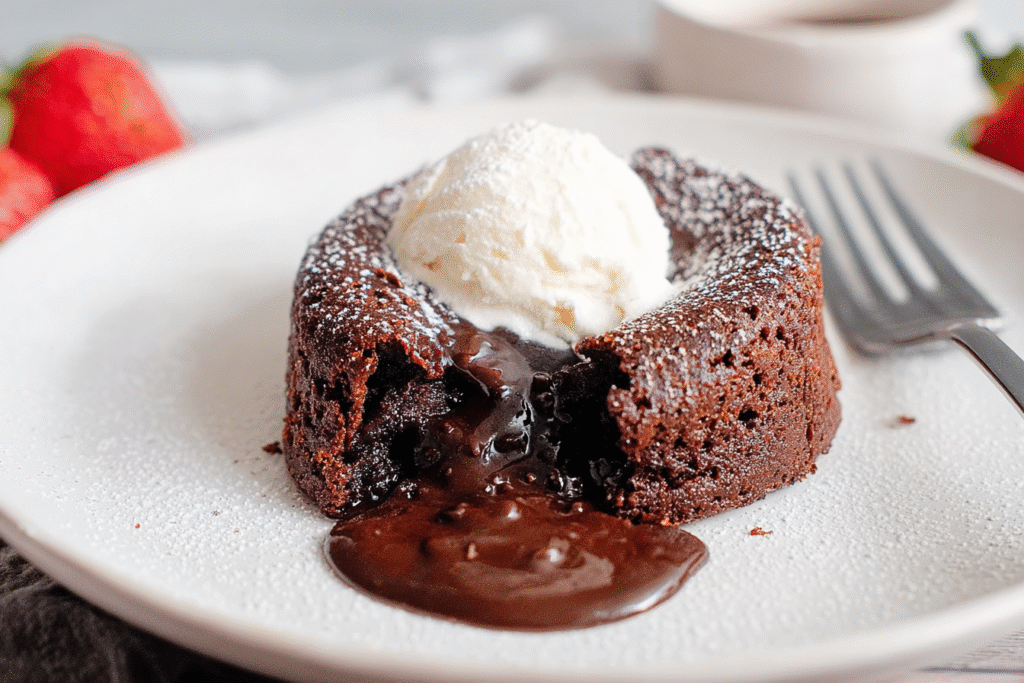
Distinctive flavor: The magic of lava cake lies in its contrast between the slightly firm exterior and the gooey, molten center. This dual-texture experience creates a sensational dessert that feels luxurious and special. The intense chocolate flavor, balanced by just the right amount of sweetness, makes this a memorable treat that will impress family and friends alike.
Jump to:
- Why You’ll Love This Lava Cake
- Essential Ingredients for Lava Cake
- Main Ingredients
- Special Dietary Options
- How to Prepare the Perfect Lava Cake: Step-by-Step Guide
- Preparation and Mise en Place
- Mixing the Batter
- Folding and Filling
- Baking to Perfection
- Dietary Substitutions to Customize Your Lava Cake
- Protein and Main Component Alternatives
- Vegetable, Sauce, and Seasoning Modifications
- Mastering Lava Cake: Advanced Tips and Variations
- Pro Cooking Techniques
- Flavor Variations
- Presentation Tips
- Make-Ahead Options
- How to Store Lava Cake: Best Practices
- Refrigeration
- Freezing
- Reheating
- Meal Prep Considerations
- FAQs: Frequently Asked Questions About Lava Cake
- What is a chocolate lava cake?
- How do you make lava cake at home?
- Why doesn’t my lava cake have a molten center?
- Can you make lava cake in the microwave?
- How do you store and reheat chocolate lava cake?
- Lava Cake
- Ingredients
- Instructions
- Last Step:
- Notes
- Nutrition
- Did you make this recipe?
Essential Ingredients for Lava Cake
The success of your chocolate lava cake starts with quality ingredients. Each component plays a specific role in creating the perfect texture and flavor profile.
Main Ingredients
- 4 oz dark chocolate (70% cocoa) – Provides the rich chocolate flavor and creates the molten center
- 1/2 cup butter – Adds richness and helps create the gooey texture
- 1/2 cup sugar – Sweetens the cake and creates structure
- 2 eggs – Provides structure and helps the cake rise
- 2 egg yolks – Adds richness and ensures the center remains molten
- 1/4 cup flour – Just enough to provide structure without making the cake too dense
- Cocoa powder for dusting – Prevents sticking and adds visual appeal
- 1/2 tsp vanilla – Enhances the chocolate flavor without overpowering it
Special Dietary Options
Vegan: Replace eggs with flax eggs (1 tbsp ground flaxseed + 3 tbsp water per egg), use coconut oil or vegan butter instead of dairy butter, and choose vegan dark chocolate.
Gluten-free: Substitute all-purpose flour with a 1:1 gluten-free flour blend or almond flour for a slightly nuttier flavor.
Low-calorie: Use a sugar substitute like stevia or erythritol, reduce the butter slightly, and incorporate some Greek yogurt for moisture with fewer calories.
How to Prepare the Perfect Lava Cake: Step-by-Step Guide
Creating the perfect lava cake requires attention to detail, but this step-by-step guide will make the process foolproof. Follow these instructions carefully for consistent, impressive results every time.
Preparation and Mise en Place
First Step: Begin by preheating your oven to 425°F (220°C). This high temperature is crucial for creating the characteristic molten center. While the oven heats, generously grease four 6-ounce ramekins with butter, making sure to coat every inch. Dust the buttered ramekins with cocoa powder, tapping out any excess. This step ensures the cakes will release easily after baking while adding a subtle chocolate coating.
Second Step: Prepare your ingredients for smooth assembly. Break the dark chocolate into small pieces for even melting. Cut the butter into cubes as well. Measure out all remaining ingredients before starting. Having everything ready beforehand prevents scrambling once the cooking process begins. Room temperature eggs incorporate better into the batter, so remove them from the refrigerator about 20 minutes before starting.
Mixing the Batter
Third Step: Create a double boiler by setting a heatproof bowl over a pot of simmering water (making sure the bottom of the bowl doesn’t touch the water). Add the chocolate and butter to the bowl, stirring occasionally until completely melted and smooth. Alternatively, you can melt them together in the microwave in 30-second bursts, stirring between each interval. Be careful not to overheat the chocolate, which can cause it to seize.
Fourth Step: Remove the chocolate mixture from heat and whisk in the sugar until smooth and slightly thickened. The mixture should be glossy and warm but not hot. Add the eggs and egg yolks one at a time, whisking well after each addition. This gradual incorporation prevents the eggs from cooking when they hit the warm chocolate mixture. Continue whisking until the batter becomes thick and pale, about 2-3 minutes.
Folding and Filling
Fifth Step: Gently fold in the flour using a rubber spatula, being careful not to overmix which can develop gluten and make the cake tough. Sprinkle the flour over the batter and fold it in just until no streaks remain. Add the vanilla extract and give one final gentle fold. The batter should be smooth and thick, with a glossy appearance.
Sixth Step: Divide the batter evenly among the prepared ramekins, filling each about 3/4 full. This ensures the cakes have room to rise without overflowing. Tap each ramekin gently on the counter to release any air bubbles. If you have time, refrigerate the filled ramekins for 15-30 minutes. This helps the cakes bake more evenly and makes the molten center more pronounced.
Baking to Perfection
Seventh Step: Place the ramekins on a baking sheet (to catch any potential spills) and transfer to the preheated oven. Bake for exactly 10-12 minutes. The tops should look set and slightly domed, with a soft jiggle in the center when gently shaken. The edges will start to pull away from the sides slightly. Do not overbake, or the molten center will disappear.
Final Step: Remove the cakes from the oven and let them rest for exactly 1 minute. This brief cooling period allows them to set slightly while still maintaining the molten center. Run a thin knife around the edge of each cake to loosen it from the ramekin. Place a serving plate upside down over each ramekin and quickly invert. Lift the ramekin away carefully to reveal the cake. Dust with powdered sugar, add a scoop of vanilla ice cream or fresh berries, and serve immediately while still warm for the full lava cake experience.

Dietary Substitutions to Customize Your Lava Cake
Creating a dessert that accommodates different dietary needs doesn’t mean sacrificing flavor or texture. These substitutions allow everyone to enjoy the indulgence of a warm, gooey chocolate lava cake regardless of restrictions.
Protein and Main Component Alternatives
The eggs in traditional lava cake provide structure and richness, but several alternatives work well. For a vegan version, commercial egg replacers, flax eggs, or chia eggs (1 tbsp ground seeds + 3 tbsp water per egg) can bind the ingredients together effectively. Silken tofu blended until smooth can also replace eggs, though it may create a slightly denser texture.
For those avoiding dairy, coconut oil makes an excellent butter substitute, offering a subtle sweetness that complements chocolate. Vegan butter sticks work equally well and behave similarly to regular butter in baking. When choosing chocolate, look for brands that specifically state they are dairy-free, as many dark chocolates still contain milk fat or traces of dairy.
Vegetable, Sauce, and Seasoning Modifications
While traditional lava cake focuses purely on chocolate, there are creative ways to add nutrition and variety. Pureed avocado or mashed sweet potato can replace some of the butter for added nutrients while maintaining moisture. These additions work best when combined with the chocolate mixture to mask their flavor completely.
For flavor variations, consider adding spices like cinnamon, chili powder, or espresso powder to enhance the chocolate notes. Fruit purees such as raspberry or orange can create interesting flavor profiles, though they may require slight adjustments to the flour amount to maintain proper structure.
Serving options can also accommodate dietary needs. Coconut whipped cream makes a delightful dairy-free topping, while naturally sweet fruits like strawberries, raspberries, or bananas provide sweetness without added sugar. A drizzle of pure maple syrup can replace traditional chocolate sauce for a natural sweetener option.
Mastering Lava Cake: Advanced Tips and Variations
Once you have mastered the basic lava cake technique, these expert tips will help you create customized versions that showcase your personal style and creativity. Check out our chocolate dessert collection for more inspiration.
Pro Cooking Techniques
The key to a consistently successful lava cake is precise timing and temperature control. Use an oven thermometer to verify your oven temperature accuracy, as even a 10-degree difference can affect the outcome. When testing for doneness, remember that the toothpick method isn’t reliable for lava cakes. Instead, look for visual cues: the edges should be set while the center remains soft and jiggles slightly when shaken.
Temperature shock helps create a defined molten center. After filling your ramekins, refrigerate them for at least 30 minutes before baking. This cold exterior allows the edges to set quickly in the hot oven while the center remains liquid. For even better results, freeze the filled ramekins for 15 minutes before baking directly from the freezer.
Flavor Variations
Transform your basic lava cake into something special with these creative flavor combinations. You can find more easy dessert recipes on our site.
| Flavor Variation | Key Ingredients | Best For |
|---|---|---|
| Peppermint Mocha | 1/2 tsp peppermint extract, extra cocoa powder | Holiday gatherings |
| Peanut Butter Cup | Peanut butter center in each ramekin | Peanut butter lovers |
| Raspberry Truffle | Raspberry liqueur, fresh raspberries | Summer entertaining |
| Espresso Chocolate | 1 tbsp instant espresso dissolved in water | Coffee enthusiasts |
| Orange Chocolate | 1 tbsp orange zest, 1 tsp orange extract | Chocolate orange fans |
Presentation Tips
Beautiful presentation makes your lava cake even more impressive. Dust the cakes generously with powdered sugar using a fine-mesh sieve for a professional look. Create a stencil using a doily or paper cutout before dusting to add decorative patterns on top.
For an elegant restaurant-style presentation, use a chef’s torch to lightly caramelize the edges after dusting with sugar. Serve on dessert plates that have been lightly warmed in the oven for a few minutes to keep the cake at the perfect temperature longer.
Pro tip: Place a fresh mint leaf or edible flower next to each lava cake for an instant restaurant-quality presentation that takes just seconds.
Make-Ahead Options
Lava cakes are excellent for entertaining because they can be prepared in advance. Prepare the batter and fill the ramekins up to 24 hours before baking. Cover tightly with plastic wrap and refrigerate until ready to bake. Add 1-2 minutes to the baking time for refrigerated batter.
For even greater convenience, freeze completely filled ramekins for up to 1 month. Thaw overnight in the refrigerator before baking. Alternatively, you can bake the cakes slightly less than the recipe calls for, freeze them, and reheat briefly in the oven just before serving.
How to Store Lava Cake: Best Practices
Proper storage ensures your lava cakes maintain their quality and flavor. Follow these guidelines for keeping your desserts fresh and delicious. For more additional molten cake recipes, check out this helpful resource.
Refrigeration
Freshly baked lava cakes can be stored in an airtight container in the refrigerator for up to 2 days. The molten center will firm during refrigeration but will return to a gooey state when reheated. Allow the cakes to cool completely before refrigerating to prevent condensation that could make them soggy. Place parchment paper between layers if stacking to prevent sticking.
Freezing
For longer storage, freezing is an excellent option. Wrap each cooled lava cake individually in plastic wrap, then place in a freezer-safe container or bag. Label with the date and store for up to 1 month. Alternatively, freeze unbaked ramekins wrapped in plastic and foil for 1 month. Thaw overnight in the refrigerator before baking as usual, adding a minute or two to the baking time if needed.
Reheating
Reheating properly restores the lava cake to its original glory. For refrigerated cakes, microwave on medium power for 15-20 seconds until warm and gooey again. Alternatively, reheat in a 350°F oven for 5-7 minutes until heated through. For frozen baked cakes, thaw in the refrigerator overnight before reheating using the same method. Avoid overheating, which can cause the center to completely cook through. View nutritional information for more details.
Meal Prep Considerations
Lava cakes work well for meal prep when preparing for special occasions or dinner parties. Prepare the batter and fill ramekins up to 24 hours in advance, storing covered in the refrigerator. This approach allows you to have fresh, warm lava cakes with minimal preparation time when guests arrive. Consider doubling or tripling the recipe and freezing extra portions for future occasions.

FAQs: Frequently Asked Questions About Lava Cake
What is a chocolate lava cake?
How do you make lava cake at home?
Why doesn’t my lava cake have a molten center?
Can you make lava cake in the microwave?
How do you store and reheat chocolate lava cake?

Lava Cake
🍫🌋 Indulgent chocolate lava cakes with dramatic gooey molten centers – restaurant-quality dessert at home!
✨ Quick 30-minute bake impresses guests; pair with ice cream for ultimate warm-cool contrast.
- Total Time: 27 minutes
- Yield: 4 cakes
Ingredients
– 4 oz dark chocolate (70% cocoa) for rich chocolate flavor and molten center
– 1/2 cup butter for richness and gooey texture
– 1/2 cup sugar for sweetening and structure
– 2 eggs for structure and rising
– 2 egg yolks for richness and molten center
– 1/4 cup flour for structure
– Cocoa powder for dusting
– 1/2 tsp vanilla for enhancing chocolate flavor
Instructions
1-First Step: Begin by preheating your oven to 425°F (220°C). This high temperature is crucial for creating the characteristic molten center. While the oven heats, generously grease four 6-ounce ramekins with butter, making sure to coat every inch. Dust the buttered ramekins with cocoa powder, tapping out any excess. This step ensures the cakes will release easily after baking while adding a subtle chocolate coating.
2-Second Step: Prepare your ingredients for smooth assembly. Break the dark chocolate into small pieces for even melting. Cut the butter into cubes as well. Measure out all remaining ingredients before starting. Having everything ready beforehand prevents scrambling once the cooking process begins. Room temperature eggs incorporate better into the batter, so remove them from the refrigerator about 20 minutes before starting.
3-Third Step: Create a double boiler by setting a heatproof bowl over a pot of simmering water (making sure the bottom of the bowl doesn’t touch the water). Add the chocolate and butter to the bowl, stirring occasionally until completely melted and smooth. Alternatively, you can melt them together in the microwave in 30-second bursts, stirring between each interval. Be careful not to overheat the chocolate, which can cause it to seize.
4-Fourth Step: Remove the chocolate mixture from heat and whisk in the sugar until smooth and slightly thickened. The mixture should be glossy and warm but not hot. Add the eggs and egg yolks one at a time, whisking well after each addition. This gradual incorporation prevents the eggs from cooking when they hit the warm chocolate mixture. Continue whisking until the batter becomes thick and pale, about 2-3 minutes.
5-Fifth Step: Gently fold in the flour using a rubber spatula, being careful not to overmix which can develop gluten and make the cake tough. Sprinkle the flour over the batter and fold it in just until no streaks remain. Add the vanilla extract and give one final gentle fold. The batter should be smooth and thick, with a glossy appearance.
6-Sixth Step: Divide the batter evenly among the prepared ramekins, filling each about 3/4 full. This ensures the cakes have room to rise without overflowing. Tap each ramekin gently on the counter to release any air bubbles. If you have time, refrigerate the filled ramekins for 15-30 minutes. This helps the cakes bake more evenly and makes the molten center more pronounced.
7-Seventh Step: Place the ramekins on a baking sheet (to catch any potential spills) and transfer to the preheated oven. Bake for exactly 10-12 minutes. The tops should look set and slightly domed, with a soft jiggle in the center when gently shaken. The edges will start to pull away from the sides slightly. Do not overbake, or the molten center will disappear.
8-Final Step: Remove the cakes from the oven and let them rest for exactly 1 minute. This brief cooling period allows them to set slightly while still maintaining the molten center. Run a thin knife around the edge of each cake to loosen it from the ramekin. Place a serving plate upside down over each ramekin and quickly invert. Lift the ramekin away carefully to reveal the cake. Dust with powdered sugar, add a scoop of vanilla ice cream or fresh berries, and serve immediately while still warm for the full lava cake experience.
Last Step:
Please leave a rating and comment letting us know how you liked this recipe! This helps our business to thrive and continue providing free, high-quality recipes for you.Notes
⏱️ Underbake slightly for perfect molten flow – test one first.
🍫 Use high-quality chocolate for richest flavor and smoothest melt.
❄️ Prep ramekins well to ensure easy release without sticking.
- Prep Time: 15 minutes
- Cook Time: 12 minutes
- Category: Dessert
- Method: Baking
- Cuisine: French
- Diet: Vegetarian
Nutrition
- Serving Size: 1 cake
- Calories: 450 calories
- Sugar: 30g
- Sodium: 90mg
- Fat: 30g
- Saturated Fat: 18g
- Unsaturated Fat: 10g
- Trans Fat: 0g
- Carbohydrates: 42g
- Fiber: 2g
- Protein: 7g
- Cholesterol: 220mg


